This entire setup process will work for many 3D printers however I am writing this in the context of an Anycubic Kobra Neo (First Gen). The main thing you need to know is that the printer setup, including print area dimensions, may differ for your printer. Additionally, your printer might have a different USB connection or capabilities. The raspberry pi and OctoPi installation will be the same for any printer
Why You Want This
Printing via the Anycubic Neo is a little bit of a pain. Sure, you can connect a USB cable to a nearby PC and use Cura, but this means you need to have your printer near your computer and it makes it quite a bit more difficult to monitor or send jobs remotely.
OctoPi solves these problems by having a service that can run on a USB-powered Raspberry Pi device (the size of a deck of cards) that you can install right with the printer and now manage the printer remotely with a suite of plugins that don’t just make management easier but can actually improve the quality of your prints.
How Hard is This?
This is probably 3/10 on the difficulty scale. All you need is the hardware (described below), a computer (to configure the pi and run your slicer - Cura in this document), and about an hour of time.
What You Need to Buy (if you don't have it)
There are a lot of options but if you want a specific recomendations, this is what I am using:
- Raspberry Pi 4 Model B (2GB)
- USB-c Power Supply (5v) (you cannot power the pi off the Neo’s USB port as that is needed for the data connection)
- USB Type A to Type C cable. This cable must support data transfer and not just charging as this will connect the pi to the printer.
- 32GB microSDHC Card (DOS format)
- MicroSD Reader - USB-A adaptor, USB-C adaptor. The Neo came with one so you might not need this.
- (Optional) USB-A Web Camera. If you have a spare USB web cam, there is a good chance it will already work with Raspberry PI. I’m using a Logi 925e Business Webcam.
- (Optional) Micro-HDMI to HDMI cable. Not needed for setup, but a nice-to-have if you ever need to connect a monitor.
Installing OctoPi
The steps to install OctoPi are:
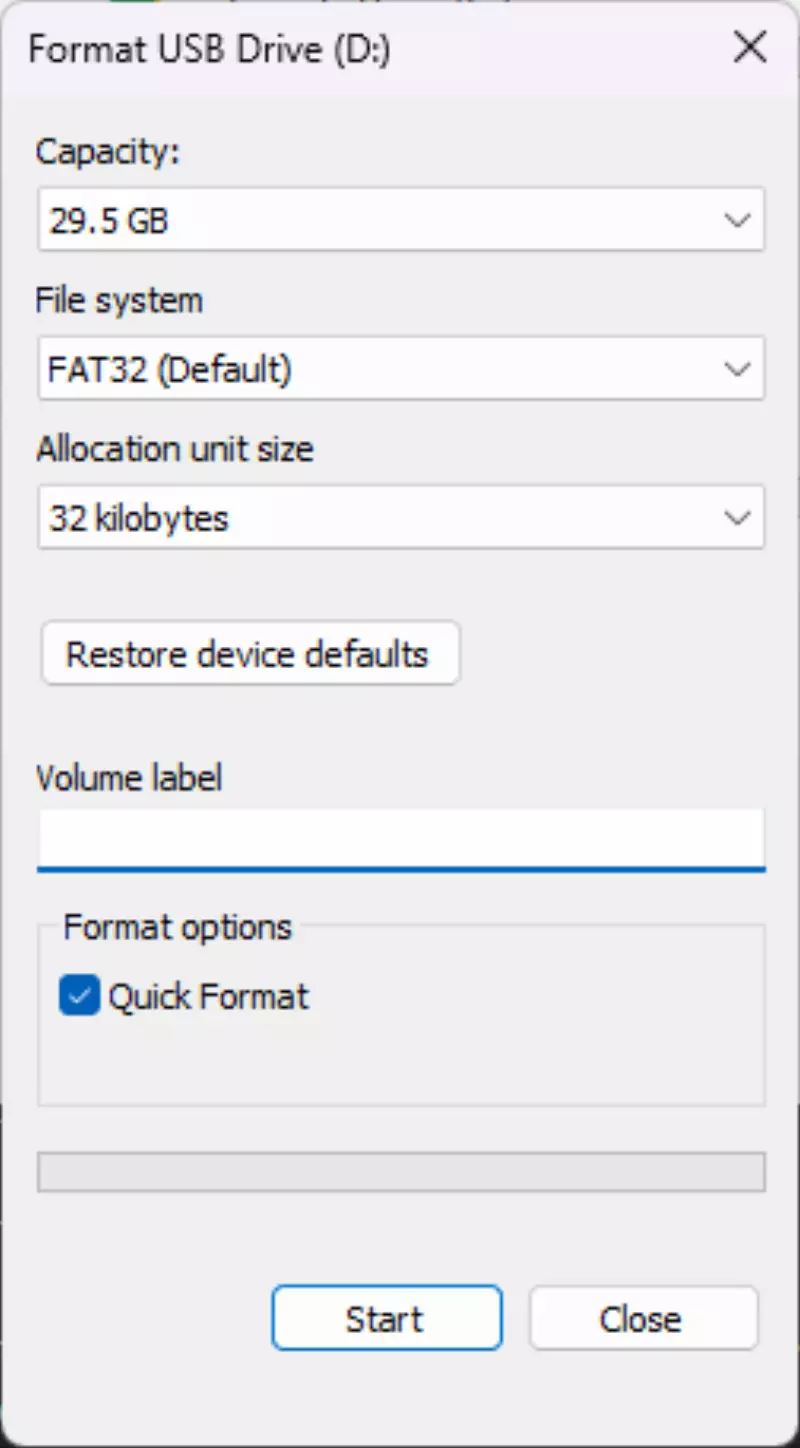
- Insert the microSD card into the adpator and plug into your computer.
- If the card is not already FAT32 formatted, use the Windows drive format tool to format as FAT32.
- Download the Raspberry Pi Imager for your platform (I’m on Windows).
- Install the imager application.
- Run the imager application
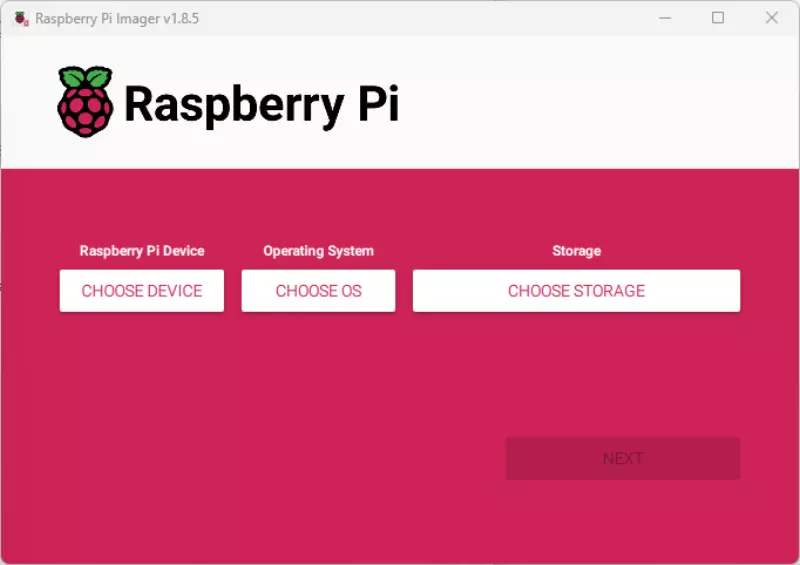
- Click “CHOOSE OS”
- Scroll down to “other specific-purpose OS”
- Choose “3D printing”
- Choose “OctoPi”
- Choose “OptoPi (stable)” (this should bring you back to the main screen)
- Click “CHOOSE STORAGE”
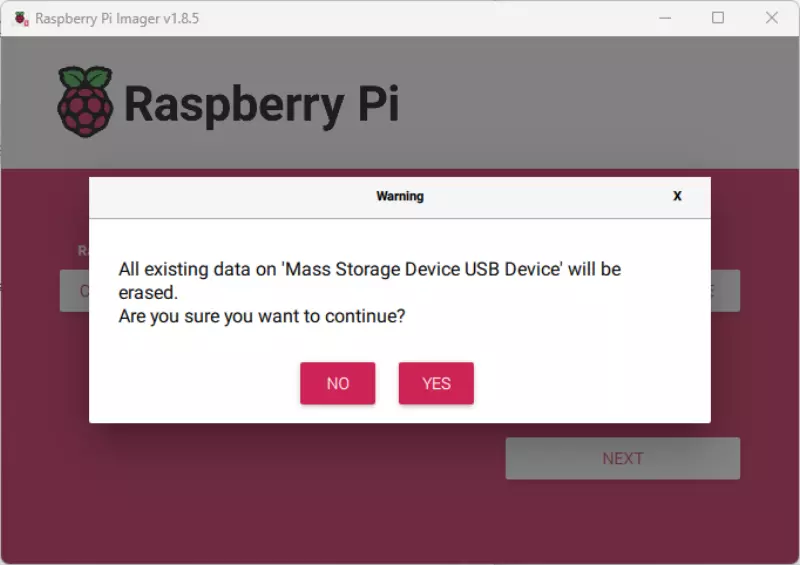
- Choose your USB device that has the micro SD card (make sure you get the right device - this WILL overwrite your drive)
- Click “NEXT”
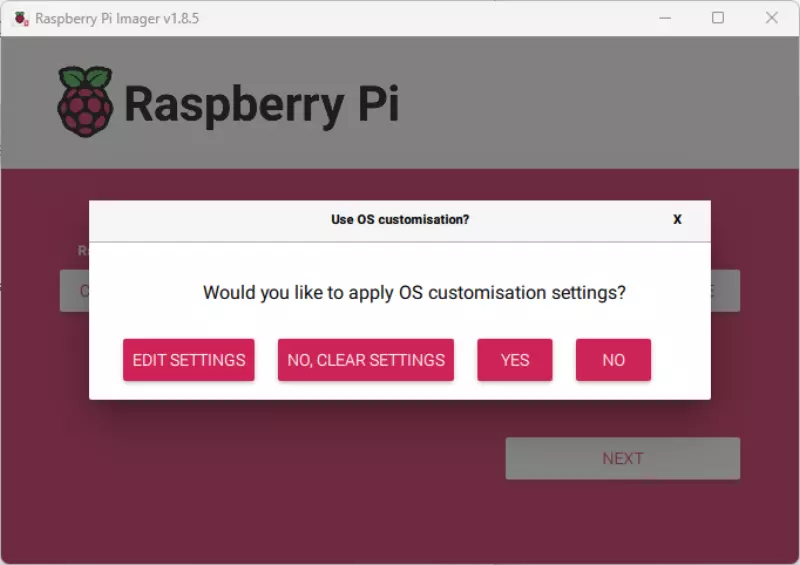
- On the “Use OS customization” window, click “EDIT SETTINGS”
- Set the hostname (this will be the name of the raspberry pi on your network) - you need to remember this!
- Set the username to “pi” and set a password
- Configure the wireless LAN with your wifi details
- Optionally, set the locale settings
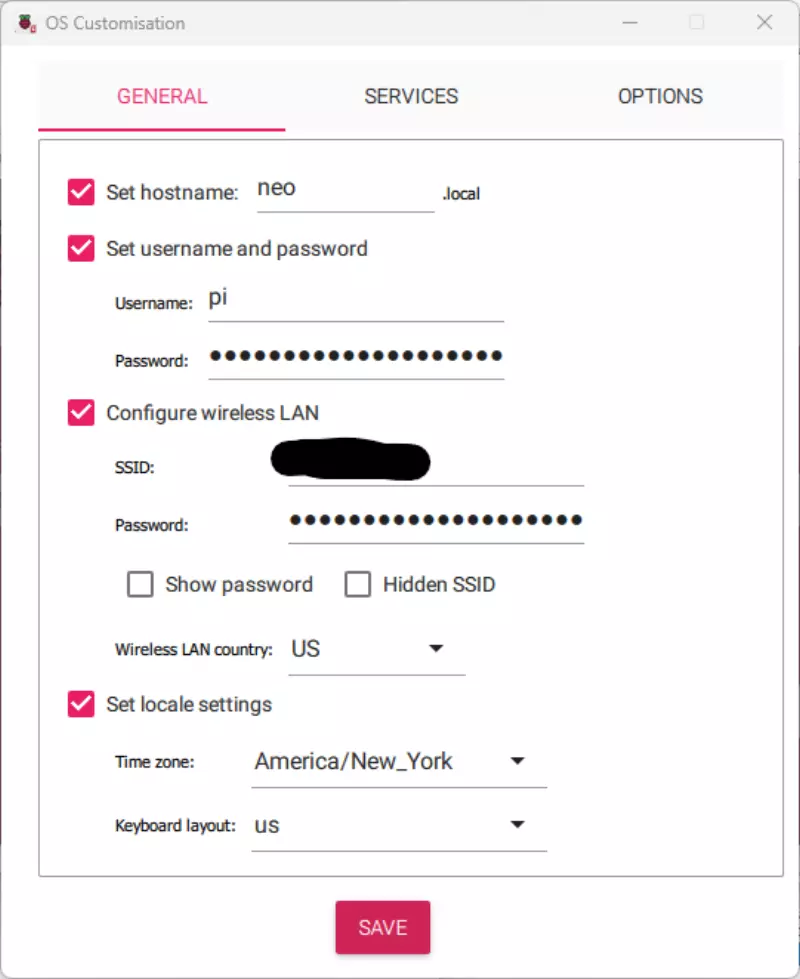
- Switch to the “SERVICES” tab
- Click “Enable SSH” and select “Use password authentication”
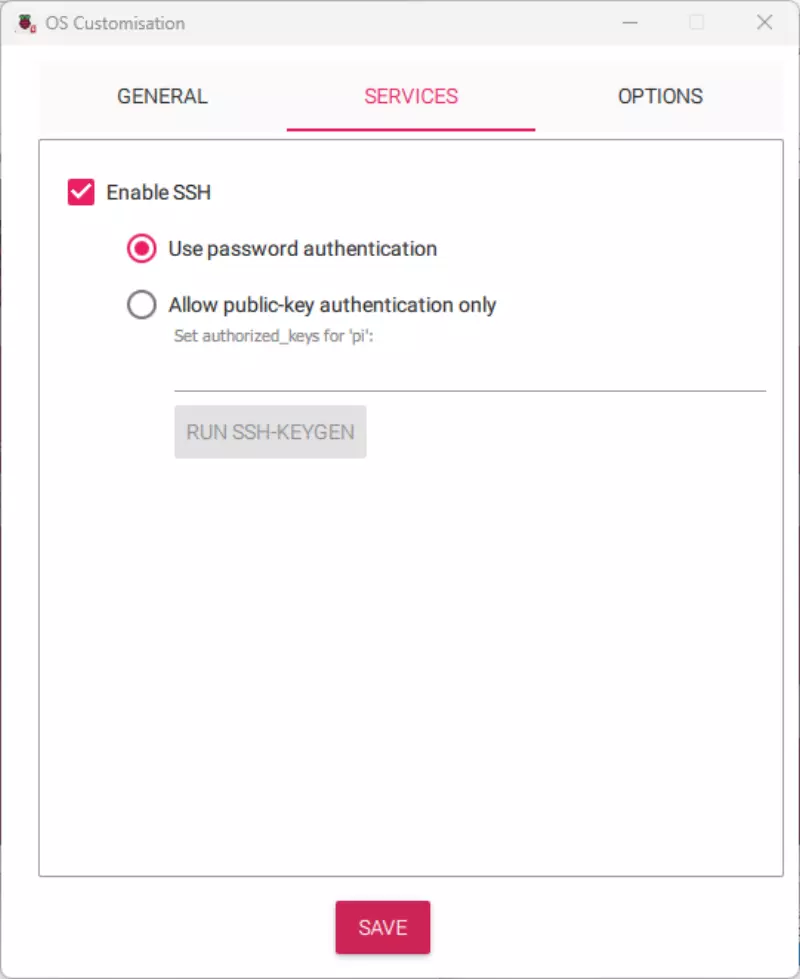
- Click “SAVE” (this returns you to the “USe OS customization? window)
- Click “YES”
- On the Warning dialog, if you are 100% positive you have selected the right driver, click “YES”
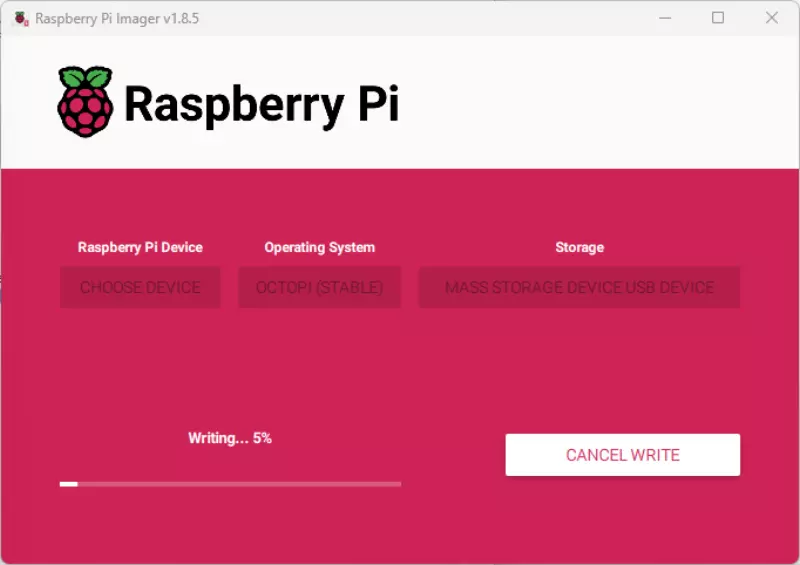
At this point the micro SD is being prepared, written to, and verified. This will take a about 5 minutes.
Booting OctoPI
- Ensure there is not an SD card in the Neo - remove it if there is.
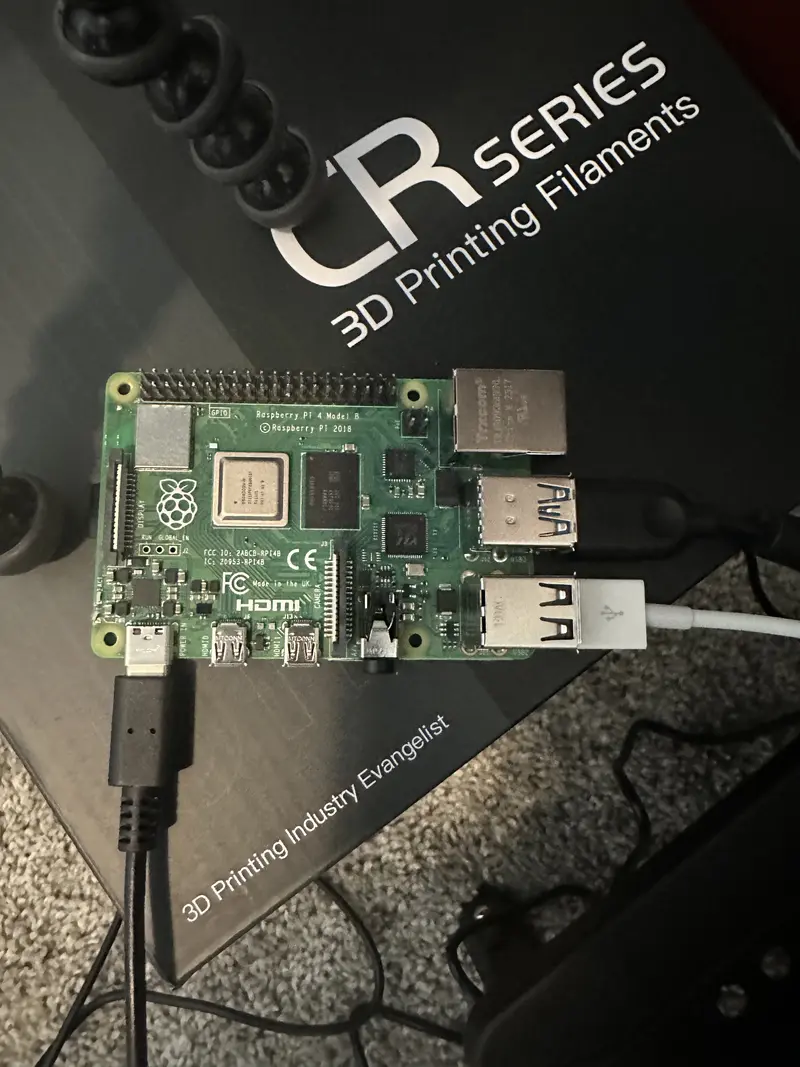
- Insert the 32GB microSD card into the SD card slot on the bottom of the Raspberry PI board.
- Insert the USB-A to USB-C cable into a black USB-A port on the Pi.
- Insert the USB-C end of that cable into the Neo
- If you have a camera, plug it into a blue USB-A port on the Pi
- Connect the USB-C power supply to the pi - It will take a few minutes for your pi to boot. Be patient!
It can take several minutes for your raspberry pi to boot. Be patient!
Visiting OctoPi
You’ve waited a few minutes and can now visit your OctoPi service on your network. While on the same wifi network you configured the device to use, visit the machine name on your network. Since I named mine “neo” the URL I will visit is http://neo.local
Notice that I used “http” and not “https”. If you want to use https, you need to add the self-signed cert to your trusted root store
Setting up OctoPi
You should now be looking at the OctoPi setup wizard.
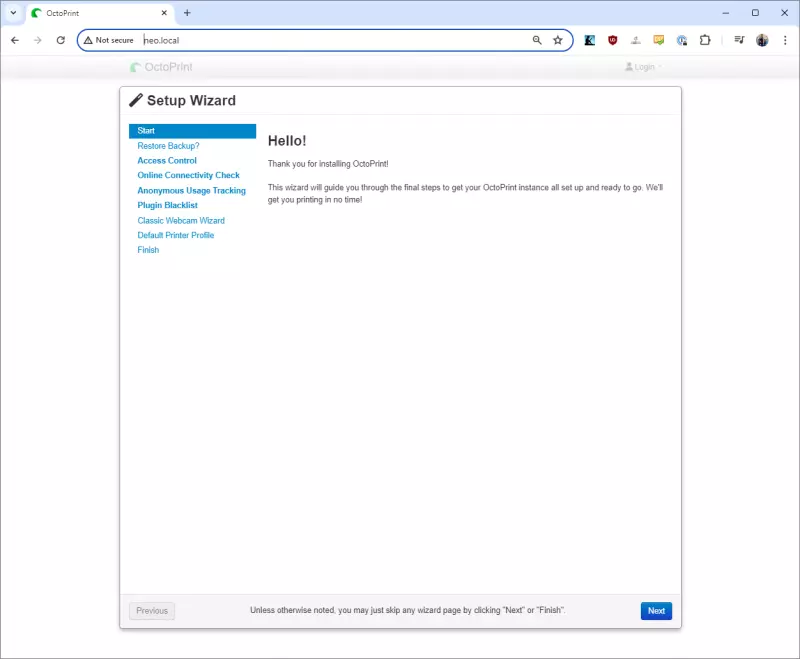
- Click “Next”
- If you are reading this, you’ve probably never setup OctoPi before so you don’t need to restore a previous config. Click “Next”
- On the “Access Control” page you will need to setup an OctoPi admin. This is not the same account you created when creating the image. This is the account you can log into the website OctoPi with. Create a username and password and make sure to remember them!
- Click “Create Account” - when it completes you will get a popup notice letting you know the account is created and you are now logged in as it.
- Click “Next”
- Since you’re connected via wifi, things are probably working but I would suggest clicking on “Test host & port” and “Test name resolution” - both should succeed.
- Click “Enable Connectivity Check” (or don’t - but I suggest it)
- Click Next
- Configuring anonymous usage tracking is totally up to you. Click an option and then click “Next”
- On the “Configure Plugin Blacklist Processing” page, click “Enable Plugin Blacklist Processing” and then click “Next” (or don’t enable it - but I did).
- If you connected a webcam during the hardware setup, at the Webcam and Timelapse Recording page, click the two “Test” buttons to make sure you can see an image from your camera.
- Click “Next”
- On the “Set up your printer profile” page, on the General tabe give your printer a name and model. These are free-form strings. I entered “Neo” for the name and “Anycubic Kobra” for the model.
- Click “print bed & build volume”
- Make sure the following are set:
- Form Factor: Rectangular
- Origin: Lower Left
- Heated Bed: Enabled
- Heated Chamber: Disabled
- Width (X): 220
- Depth (Y): 220
- Height (Z): 250
- Custom Bounding box: Disabled
- Click “Axes”
- All the defaults should be fine (6000, 6000, 200, 300)
- Click “Hotend & extruder”
- Nozzle Diameter: 0.4 (unless you have changed your nozzle)
- Number of Extruders: 1
- Default extrusion length: 5
- Click “Next”
- On the “All Done!” page, read and agree to the three points.
- Click “Next” and if prompted, reload.
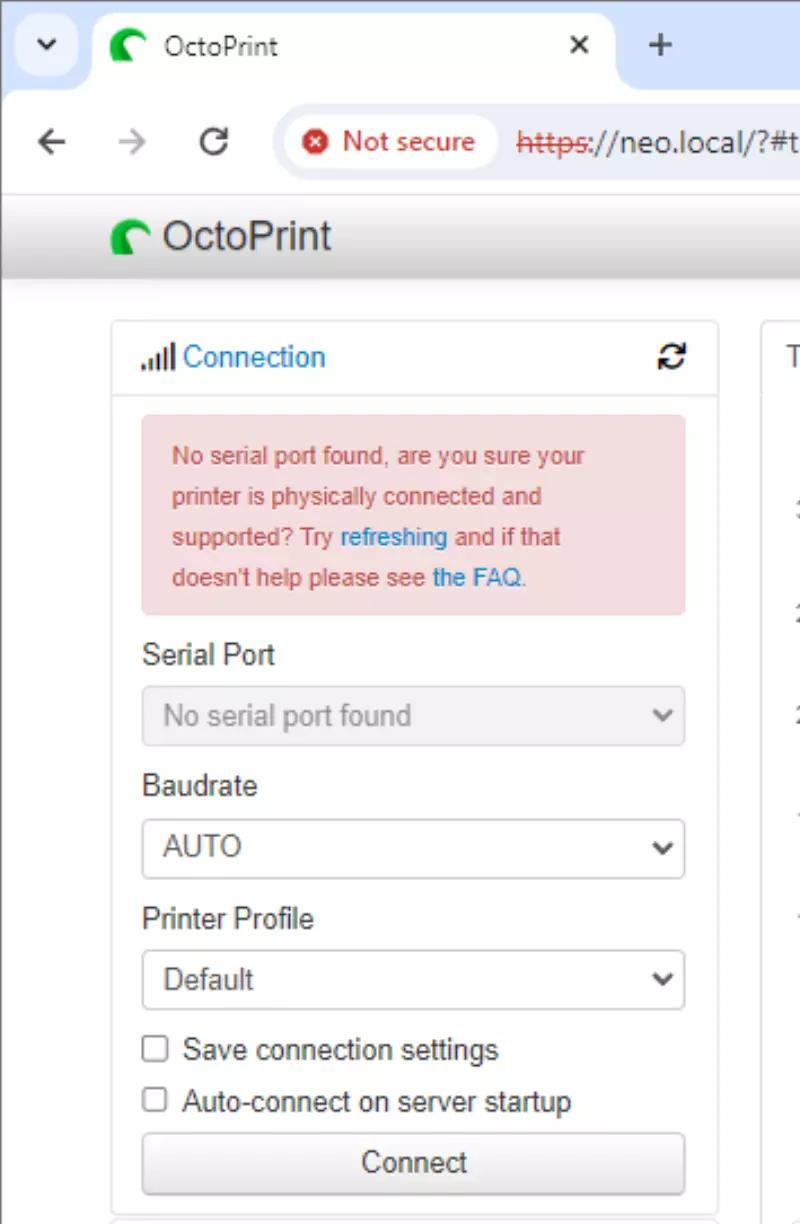
No printer connection?
If when you get to OctoPi’s main UI, you see this message:
No serial port found, are you sure your printer is physically connected and supported? Try freshing and if that doesn't help please see the FAQ
First check that your USB-A to USB-C cable is connected from the pi to the printer and that the printer is on.
Next, try another cable. You are probably using a charge-only cable and not a data-capable one.
Installing Plugins
You can install OctoPi plugins which can not only improve usability of OctoPi, but can actually improve the quality of your prints.
I would suggest the following plugins to get started:
- Themeify
- Simple Emergency Stop
- Resource Monitor
- OctoEverywhere!
- OctoPod
Connecting Your Phone
If you have an iPhone, once you’ve installed OctoEverywhere and OctoPod you can then install the OctoPod app on your iPhone. On an Android you could use OctoEverywhere.
This will allow you to view the web camera remotely (without opening a port on your router), manage your print jobs remotely, and control your printer without having to use the front control panel for many operations.
There are a bunch of possibly tools you could use - experiment with them and see what you like!
Configuring Cura
To get Cura to see OctoPi you need to install the OctoPrint Connection plug-in in Cura. Once you have done that, visit your printer setup page and click “Connect OctoPrint” and setup an API key.
This is documented on this All3DP blog post.
Your First Print
With all of this done - you are ready to use Cura to send a print directly to OctoPrint!