<?xml version="1.0" encoding="utf-8"?><feed xmlns="http://www.w3.org/2005/Atom" ><generator uri="https://jekyllrb.com/" version="4.3.3">Jekyll</generator><link href="https://www.roberthorvick.com/feed.xml" rel="self" type="application/atom+xml" /><link href="https://www.roberthorvick.com/" rel="alternate" type="text/html" /><updated>2025-12-28T18:16:53+00:00</updated><id>https://www.roberthorvick.com/feed.xml</id><entry><title type="html">Cricut Maker - Replacing Roller Wheels</title><link href="https://www.roberthorvick.com/blog/cricut-maker-replacing-rollers-step-by-step" rel="alternate" type="text/html" title="Cricut Maker - Replacing Roller Wheels" /><published>2025-12-27T00:00:00+00:00</published><updated>2025-12-27T00:00:00+00:00</updated><id>https://www.roberthorvick.com/blog/Cricut-Maker-Replacing-Rollers-Step-By-Step</id><content type="html" xml:base="https://www.roberthorvick.com/blog/cricut-maker-replacing-rollers-step-by-step"><![CDATA[<noscript>
	<style type="text/css">
		#table-of-contents { display:none; }
	</style>
</noscript>

<div id="table-of-contents">
	<div id="toc-header">On this page:</div>
</div>

<div class="tip" style="
    background-color: #ECF7FF;
    border-left: 6px solid #0065B4;
    padding: 1em 1em 1em 1em;
    display: flex;
    column-gap: 2rem;
    margin: 2em 2em 2em 2em;">
	<p class="tip-bulb" style="
		font-family: 'Font Awesome 5 Free';
	    vertical-align: middle;
	    font-weight: 900;
	    font-size: 3em;
	    color: #ff6f00;">&#xf0eb;</p>
	<p class="tip-content">This is a moderately technical repair that will void the warranty of your Cricut.</p>
</div>

<h2>What You'll Need</h2>

<p><em>Note: the following links are affiliate links to the products I actually used (or an inexpensive alternative). You probably already have most of these at your home!</em></p>

<ul>
  <li><a href="https://amzn.to/4pcp2dO">J1 Phillips-head</a></li>
  <li><a href="https://amzn.to/4pcp2dO">T9 or TR9 Torx Bit</a></li>
  <li><a href="https://amzn.to/4pcp2dO">A jimmy tool</a></li>
  <li><a href="https://amzn.to/4jilmG3">Needle-nose pliers</a></li>
  <li><a href="https://amzn.to/3MT20eG">90-degree or stubby Phillips-head</a></li>
  <li><a href="https://amzn.to/3Yyx7yR">Replacement rollers</a></li>
  <li>A work surface twice the size of the Cricut</li>
  <li>2+ hours of time</li>
</ul>

<p><img src="/images/post/cricutrollers/tools-used.webp" alt="Tools used to perform this repair" /></p>

<div class="tip" style="
    background-color: #ECF7FF;
    border-left: 6px solid #0065B4;
    padding: 1em 1em 1em 1em;
    display: flex;
    column-gap: 2rem;
    margin: 2em 2em 2em 2em;">
	<p class="tip-bulb" style="
		font-family: 'Font Awesome 5 Free';
	    vertical-align: middle;
	    font-weight: 900;
	    font-size: 3em;
	    color: #ff6f00;">&#xf0eb;</p>
	<p class="tip-content">Use screwdrivers with magnetic heads!</p>
</div>

<p>Optionally, it will be helpful to have magnetic screw storage so during the disassembly you can stay organized. You might find some glasses (for magnification and safety), some 90%+ IPA (or another cleaning agent), and something for a headache as well.</p>

<p><img src="/images/post/cricutrollers/optional-tools.webp" alt="Optional tools" /></p>

<h2>Remove The Shell</h2>
<h3>The Cover</h3>

<p>Open the lid and using a jimmy tool (or flat-head screwdriver), pry up the plastic strip</p>

<p><img src="/images/post/cricutrollers/lid-cover.webp" alt="Image showing the cover to remove on a Cricut Maker" /></p>

<p>Use the jimmy tool to pry this up. It is held in place by tension and some plastic nubs. Go slow, don’t muscle it or you might break them off.</p>

<p>Once you have them off you’ll see four screws with a torx head. These are holding the lid onto the body. Remove them.</p>

<p><img src="/images/post/cricutrollers/lid-screws-removed.webp" alt="Image of the lid screws removed" /></p>

<p>With the screws removed the lid will now lift off. It is held in place by those four screws and some alignment tabs. Just carefully lift it up - it will come out easily.</p>

<h3>Bottom Screws</h3>

<p>Now we need to remove the 4 bottom screws that are hidden underneath the rubber feet.</p>

<p>Using the jimmy tool (or a screwdriver), gently remove the four feet (they are not glued down - just a tension fit). Under each foot is a Phillips-head screw. Go ahead and remove those.</p>

<p><img src="/images/post/cricutrollers/feet-removed.webp" alt="Image of the feet removed" /></p>

<p>Do not try to remove the top yet! It’s about to get annoying.</p>

<h3>The Interior Screws</h3>

<p>There are several more screws that need to be removed - the problem is that they are not visible from the outside. You will need to experiment with whatever angles work best for you (especially if you have large hands). You will need a 90-degree screwdriver or a very small stubby one. A magnetic one will make this much easier (mine was not).</p>

<p>The screws are inside the cutting bay at vaguely the locations shown.</p>

<p><img src="/images/post/cricutrollers/hidden-screws.webp" alt="Map of the screw locations" /></p>

<p>Here are some of them - they are not all easy (or even possible) to see. You might need to use your fingers to find a few and you will need to move the cutting head as it will cover at least once no matter where it is.</p>

<p><img src="/images/post/cricutrollers/interior-screws.webp" alt="Image of the interior screws" /></p>

<div class="tip" style="
    background-color: #ECF7FF;
    border-left: 6px solid #0065B4;
    padding: 1em 1em 1em 1em;
    display: flex;
    column-gap: 2rem;
    margin: 2em 2em 2em 2em;">
	<p class="tip-bulb" style="
		font-family: 'Font Awesome 5 Free';
	    vertical-align: middle;
	    font-weight: 900;
	    font-size: 3em;
	    color: #ff6f00;">&#xf0eb;</p>
	<p class="tip-content">Keep that Advil nearby. It's harder getting them back in.</p>
</div>

<h3>Remove the Lid (SLOWLY!)</h3>

<p>When you have all three of these steps done, the white shell will lift off the base but you need to go slow. The buttons on the lid are connected via a ribbon cable to the base - if you yank too hard you might break the cables. There is enough slack that you can lay the lid to the side or behind the unit. You do not need to disconnect any wiring for any part of this repair.</p>

<h2>Remove the Bar</h2>

<p>With the lid removed it’s time to get the bar out.</p>

<h3>Right Side</h3>

<div class="tip" style="
    background-color: #ECF7FF;
    border-left: 6px solid #0065B4;
    padding: 1em 1em 1em 1em;
    display: flex;
    column-gap: 2rem;
    margin: 2em 2em 2em 2em;">
	<p class="tip-bulb" style="
		font-family: 'Font Awesome 5 Free';
	    vertical-align: middle;
	    font-weight: 900;
	    font-size: 3em;
	    color: #ff6f00;">&#xf0eb;</p>
	<p class="tip-content">This might be a good time to put on those glasses - we don't want anything flying into your eyes.</p>
</div>

<p><img src="/images/post/cricutrollers/right-side-assembled.webp" alt="Image of the feet removed" /></p>

<p>First, use your needle-nose pliers to remove the spring. Grasp it at the top and lift it up to unhook it from the frame. It will take some strength. Just be careful not to let it go flying.</p>

<p>When the spring is removed the bracket can now move up and down a little but you can’t remove it yet. There is an e-clip holding it in place (and a flange behind that - we’ll be taking that off too but it’s easy).</p>

<p>Removing this e-clip can be done pretty easily or it might be really hard. It kind of depends on what tools you have. If you have snap-ring pliers with the right size head maybe you can just get at it in 5 seconds. If you, like me, do not - it might take a little longer.</p>

<p>E-clips have a large opening (this is to get it on and off) and two small holes on the opposite side. What you want to do is get the tip of your needle-nose pliers into one of those small holes and carefully (slowly!) pry it off the bar. It will come easily - you don’t need a lot of force - but it may take several tries.</p>

<p>If you lose the e-clip it is a 3/16” e-clip and you can get them from your local hardware store.</p>

<p>With the clip and spring removed the bracket can now slide off. There is a flange in the bracket - as you take it off just leave it be. It will come out (you want that) but you don’t need to do anything with it (just don’t lose it).</p>

<h3>Left Side</h3>

<p>OK - now we need to do the same thing on the left side. Now don’t get mad at me - I’m just delivering the message.</p>

<p>The right side was the easy-mode version of what we’re about to do. But it’s OK - we’ll get there :)</p>

<p>First we need to get that motor out of the way.</p>

<p><img src="/images/post/cricutrollers/left-side.webp" alt="Left side fully assembled" /></p>

<ul>
  <li>Remove the two silver screws</li>
  <li>Remove the two black screws</li>
  <li>Lift the motor bracket out of the way</li>
  <li>Lift the motor out of the way</li>
  <li>Try not to touch the sticky mess over and over</li>
</ul>

<p>Now with the motor removed you can see a large white gear and the spring (there is more than one on this side - make sure you remove the right one).</p>

<p><img src="/images/post/cricutrollers/left-side-spring.webp" alt="Left side spring" /></p>

<p>You should notice that the same spring and bracket configuration are on this side - but that dang gear is in front of them.</p>

<ul>
  <li>Remove the spring</li>
  <li>Notice the gear can slide in and out a little but cannot be removed because there is a part blocking it.</li>
</ul>

<div class="tip" style="
    background-color: #ECF7FF;
    border-left: 6px solid #0065B4;
    padding: 1em 1em 1em 1em;
    display: flex;
    column-gap: 2rem;
    margin: 2em 2em 2em 2em;">
	<p class="tip-bulb" style="
		font-family: 'Font Awesome 5 Free';
	    vertical-align: middle;
	    font-weight: 900;
	    font-size: 3em;
	    color: #ff6f00;">&#xf0eb;</p>
	<p class="tip-content">If you want to waste a bunch of time you can try and remove the thing blocking the gear but it's easier if you just work around it.</p>
</div>

<ul>
  <li>Remove the e-clip. You’ll need to go slow and don’t put much pressure on the gear. It will slide out far enough to allow you to get needle-nose pliers in there. You’ll get it. Be super careful not to drop it or it might get lost in the body. But if you do … just buy a 3/16 e-clip and move on (make sure it’s not in the gear, though, it would ruin that).</li>
</ul>

<p>That was the hardest part of the whole repair.</p>

<p>I’m proud of you!</p>

<h3>Lift it Out</h3>

<p>Now let’s get the bar out.  With the e-clip removed you can slide the bar out but it doesn’t slide much.</p>

<p>Go back to the right side of the machine and slide the bar out about 3/4 of an inch - as far as it will go. You’ll need to give it a little push and might need to lift it slightly.</p>

<p><img src="/images/post/cricutrollers/bar-slide-out.webp" alt="The bar pushed through the right side" /></p>

<p>When it’s like this it is now free from the left side. So go back to the left side and gently lift the bar up and you can find an angle where it clears the body and can be fully removed.</p>

<p><img src="/images/post/cricutrollers/bar-lifted.webp" alt="The bar being lifted over the left side" /></p>

<p>Notice that the bar is not symmetrical. The left side has a single nub and the right side has multiple levels. Just keep that in mind when you put it back in.</p>

<h2>Replace the Rollers</h2>

<p><em>I was so excited to be at this spot that I forgot to take pictures - but this is the easiest part!</em></p>

<p>Using the needle-nose pliers, grip one of the black rollers and stretch it a little. Now slide it off the bar.</p>

<p>Do the same on the other side (replace both!)</p>

<p>Make sure you leave the white plastic rollers on the bar. They can slide around - you’ll adjust them later.</p>

<div class="tip" style="
    background-color: #ECF7FF;
    border-left: 6px solid #0065B4;
    padding: 1em 1em 1em 1em;
    display: flex;
    column-gap: 2rem;
    margin: 2em 2em 2em 2em;">
	<p class="tip-bulb" style="
		font-family: 'Font Awesome 5 Free';
	    vertical-align: middle;
	    font-weight: 900;
	    font-size: 3em;
	    color: #ff6f00;">&#xf0eb;</p>
	<p class="tip-content">Now would be a good time to clean the bar with some 90%+ IPA or detergent.</p>
</div>

<p>Now go to your kitchen and get a cup of water in a measuring cup or coffee mug - whatever. Put it in the microwave until it just starts bubbling. You don’t want it boiling - 170°F (77°C) is fine.</p>

<p>Once the water is hot put the new rollers in the water and let them sit for a minute or two to heat up.</p>

<p>Carefully remove one with a spoon and slide it onto the bar so it settles in the groove. Repeat for the other side. Don’t use any lubrication or stretch them out. If they are heated enough they will slide on with some force.</p>

<h2>Now Do it All In Reverse</h2>

<p>OK - we’re officially halfway done!</p>

<p>Doing it all in reverse is all pretty straightforward but a few pieces of advice.</p>

<ul>
  <li>When putting the e-clips back on, start on the left side. Like before, you need to work around the gear. Basically you want to slide it onto the bar after the flange - there is a slight groove in it. I found it easiest to get it seated with my finger and then push on it gently with needle-nose pliers. Go slow and don’t drop it.</li>
  <li>When putting the right-side clip on you might need to push the flange to get enough spacing for the e-clip.</li>
  <li>Remember the silver screws go on the left side and the black screws go on the right and hold the motor bracket down.</li>
  <li>When putting the body back on, pay attention to how everything is lining up. The back of the body has alignment grooves you need to get lined up correctly. Once you get those interior screws in you don’t want to realize there is an issue and have to remove them (ask me how I know!)</li>
  <li>Make sure you don’t have any leftover screws.</li>
  <li>Give the whole thing a wipe down with some IPA and a paper towel - you probably transferred some grease around.</li>
</ul>

<p>You did it!</p>

<h2>Final Check</h2>

<p>With everything reassembled, now is a good time to do a quick sanity check.</p>

<p>First, feed a cutting mat with some paper on it into the machine. You should be able to load and unload without any issues. The rubber wheels should be staying in place and gripping the mat correctly.</p>

<p>Next, create a simple design in Design Studio and sent it to be cut. Again, watch the rollers for any sign that something is wrong. They should not be “walking” around and should be properly gripping the mat.</p>

<p>If everything looks good - great! If not - start debugging! I’m confident you’ll figure it out.</p>]]></content><author><name></name></author><category term="DIY#DIY" /><summary type="html"><![CDATA[A step-by-step overview of how to change the roller wheels on a Cricut Maker]]></summary></entry><entry><title type="html">Setting up OctoPi with Your Printer (I am using an Anycubic Neo)</title><link href="https://www.roberthorvick.com/blog/setting-up-octopi-on-anycubic-neo-first-gen" rel="alternate" type="text/html" title="Setting up OctoPi with Your Printer (I am using an Anycubic Neo)" /><published>2024-04-29T00:00:00+00:00</published><updated>2024-04-29T00:00:00+00:00</updated><id>https://www.roberthorvick.com/blog/setting-up-octopi-on-anycubic-neo-first-gen</id><content type="html" xml:base="https://www.roberthorvick.com/blog/setting-up-octopi-on-anycubic-neo-first-gen"><![CDATA[<noscript>
	<style type="text/css">
		#table-of-contents { display:none; }
	</style>
</noscript>

<div id="table-of-contents">
	<div id="toc-header">On this page:</div>
</div>

<div class="tip" style="
    background-color: #ECF7FF;
    border-left: 6px solid #0065B4;
    padding: 1em 1em 1em 1em;
    display: flex;
    column-gap: 2rem;
    margin: 2em 2em 2em 2em;">
	<p class="tip-bulb" style="
		font-family: 'Font Awesome 5 Free';
	    vertical-align: middle;
	    font-weight: 900;
	    font-size: 3em;
	    color: #ff6f00;">&#xf0eb;</p>
	<p class="tip-content">This entire setup process will work for many 3D printers however I am writing this in the context of an Anycubic Kobra Neo (First Gen). The main thing you need to know is that the printer setup, including print area dimensions, may differ for your printer. Additionally, your printer might have a different USB connection or capabilities. The raspberry pi and OctoPi installation will be the same for any printer</p>
</div>

<h2>Why You Want This</h2>

<p>Printing via the Anycubic Neo is a little bit of a pain. Sure, you can connect a USB cable to a nearby PC and use Cura, but this means you need to have your printer near your computer and it makes it quite a bit more difficult to monitor or send jobs remotely.</p>

<p>OctoPi solves these problems by having a service that can run on a USB-powered Raspberry Pi device (the size of a deck of cards) that you can install right with the printer and now manage the printer remotely with a suite of plugins that don’t just make management easier but can actually improve the quality of your prints.</p>

<h2>How Hard is This?</h2>

<p>This is probably 3/10 on the difficulty scale. All you need is the hardware (described below), a computer (to configure the pi and run your slicer - Cura in this document), and about an hour of time.</p>

<h2>What You Need to Buy (if you don't have it)</h2>

<p>There are a lot of options but if you want a specific recomendations, this is what I am using:</p>

<ul>
  <li><a href="https://www.adafruit.com/product/4292">Raspberry Pi 4 Model B (2GB)</a></li>
  <li><a href="https://www.adafruit.com/product/4298">USB-c Power Supply (5v)</a> (you cannot power the pi off the Neo’s USB port as that is needed for the data connection)</li>
  <li><a href="https://www.adafruit.com/product/4474">USB Type A to Type C cable</a>. This cable must support data transfer and not just charging as this will connect the pi to the printer.</li>
  <li><a href="https://www.amazon.com/PNY-Elite-microSDHC-Memory-P-SDU32GU185GW-GE/dp/B07R8GVGN9/">32GB microSDHC Card (DOS format)</a></li>
  <li>MicroSD Reader - <a href="https://www.adafruit.com/product/939">USB-A adaptor</a>, <a href="https://www.adafruit.com/product/5212">USB-C adaptor</a>. The Neo came with one so you might not need this.</li>
  <li><a href="https://community.octoprint.org/t/usb-webcams-known-to-work-with-mjpg-streamer/21149">(Optional) USB-A Web Camera</a>. If you have a spare USB web cam, there is a good chance it will already work with Raspberry PI. I’m using a Logi 925e Business Webcam.</li>
  <li><a href="https://www.adafruit.com/product/1322">(Optional) Micro-HDMI to HDMI cable</a>. Not needed for setup, but a nice-to-have if you ever need to connect a monitor.</li>
</ul>

<h2>Installing OctoPi</h2>

<p>The steps to install OctoPi are:</p>

<ol>
  <li>Insert the microSD card into the adpator and plug into your computer.</li>
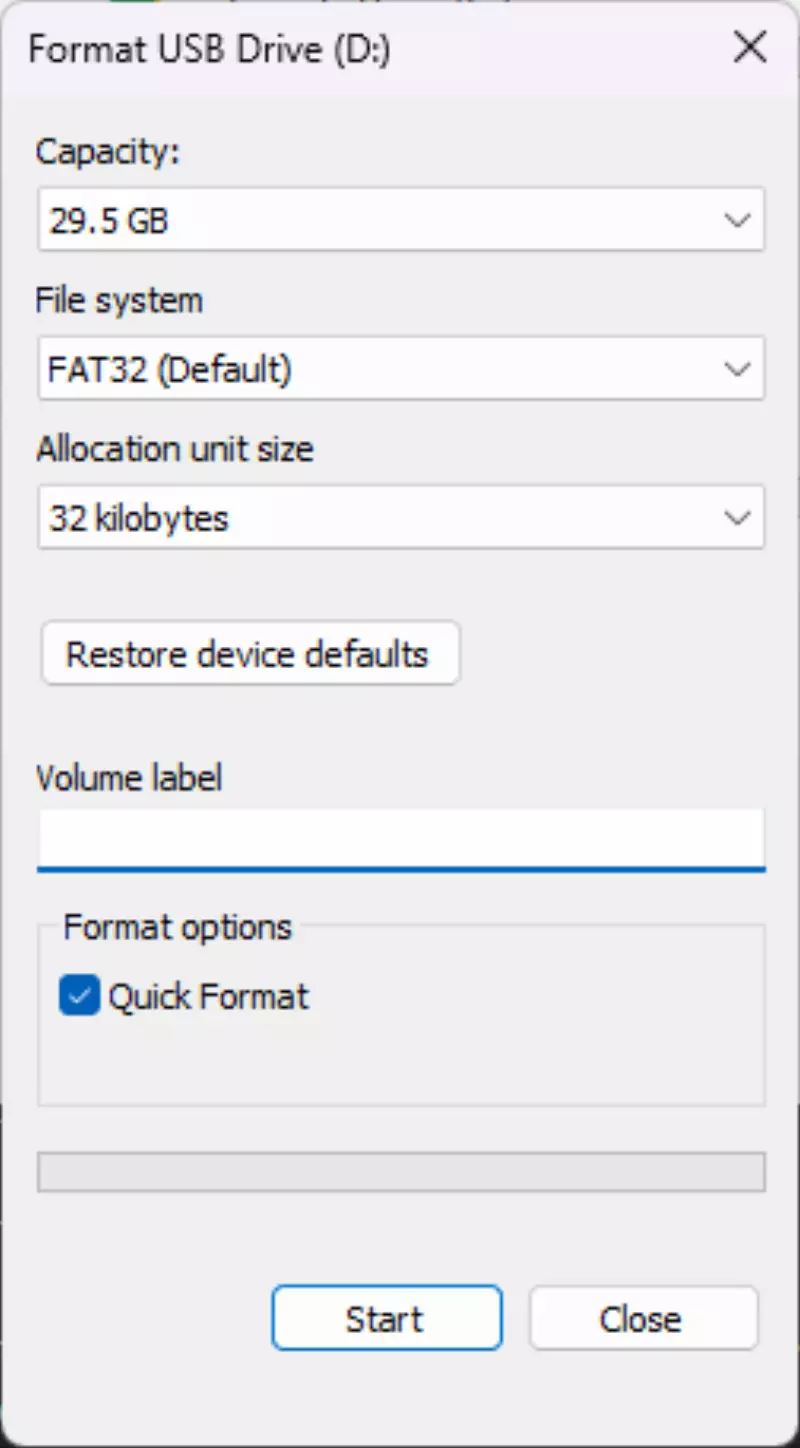
  <li>If the card is not already FAT32 formatted, use the Windows drive format tool to format as FAT32.
  <img src="/images/post/octopi/microsd-format-screenshot.webp" alt="windows format tool screenshot" /></li>
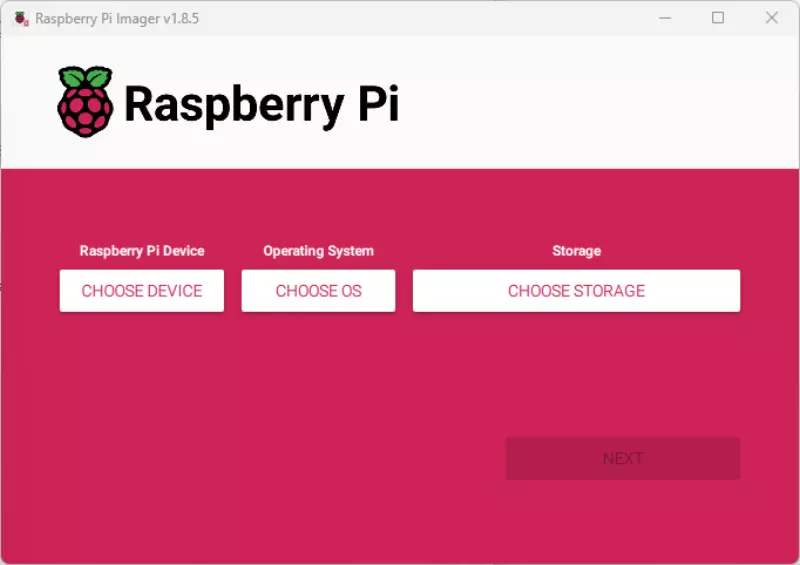
  <li>Download the <a href="https://www.raspberrypi.com/software/">Raspberry Pi Imager</a> for your platform (I’m on Windows).</li>
  <li>Install the imager application.</li>
  <li>Run the imager application
  <img src="/images/post/octopi/pi-imager-home-screen.webp" alt="pi imager tool home screen screenshot" /></li>
  <li>Click “CHOOSE OS”</li>
  <li>Scroll down to “other specific-purpose OS”</li>
  <li>Choose “3D printing”</li>
  <li>Choose “OctoPi”</li>
  <li>Choose “OptoPi (stable)” (this should bring you back to the main screen)</li>
  <li>Click “CHOOSE STORAGE”</li>
  <li>Choose your USB device that has the micro SD card (make sure you get the right device - this WILL overwrite your drive)</li>
  <li>Click “NEXT”</li>
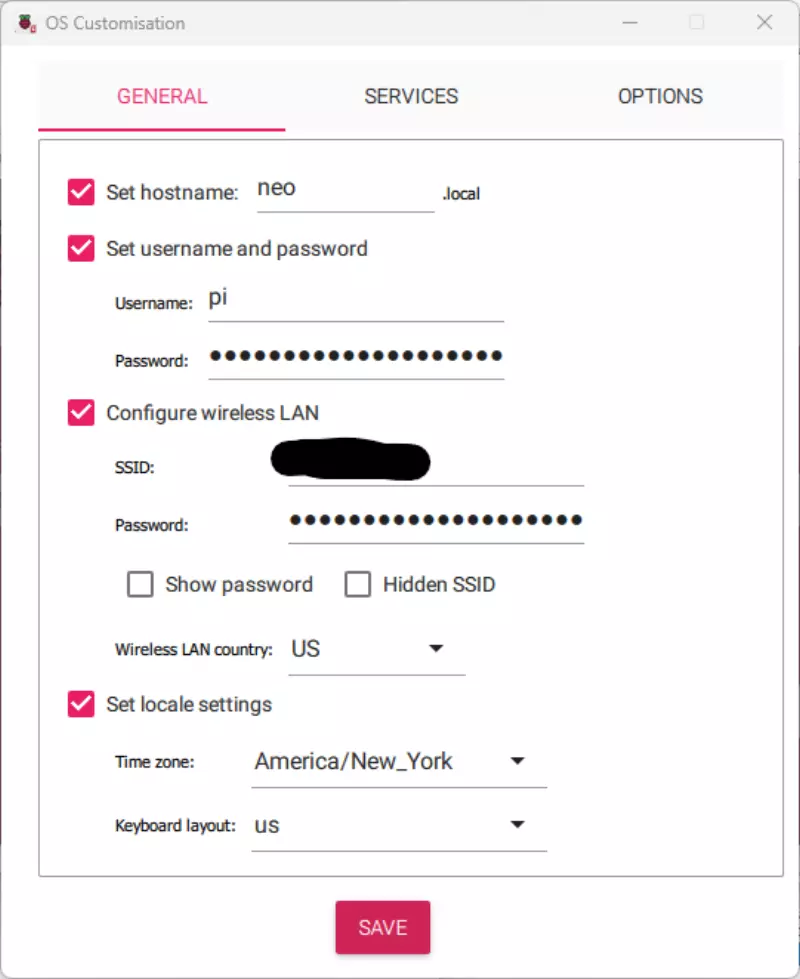
  <li>On the “Use OS customization” window, click “EDIT SETTINGS”
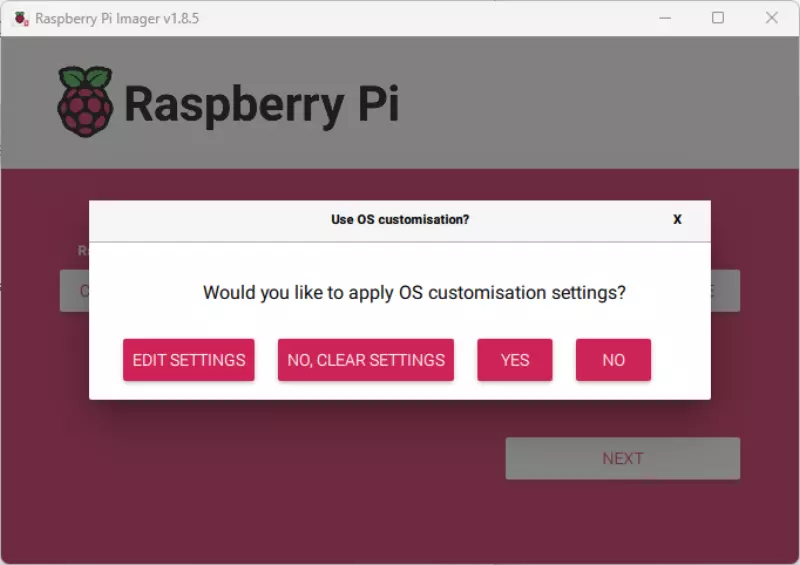
  <img src="/images/post/octopi/pi-imager-customize.webp" alt="use os customization screen screenshot" /></li>
  <li>Set the hostname (this will be the name of the raspberry pi on your network) - you need to remember this!</li>
  <li>Set the username to “pi” and set a password</li>
  <li>Configure the wireless LAN with your wifi details</li>
  <li>Optionally, set the locale settings
  <img src="/images/post/octopi/pi-imager-settings-1.webp" alt="customizaing screen screenshot" /></li>
  <li>Switch to the “SERVICES” tab</li>
  <li>Click “Enable SSH” and select “Use password authentication”
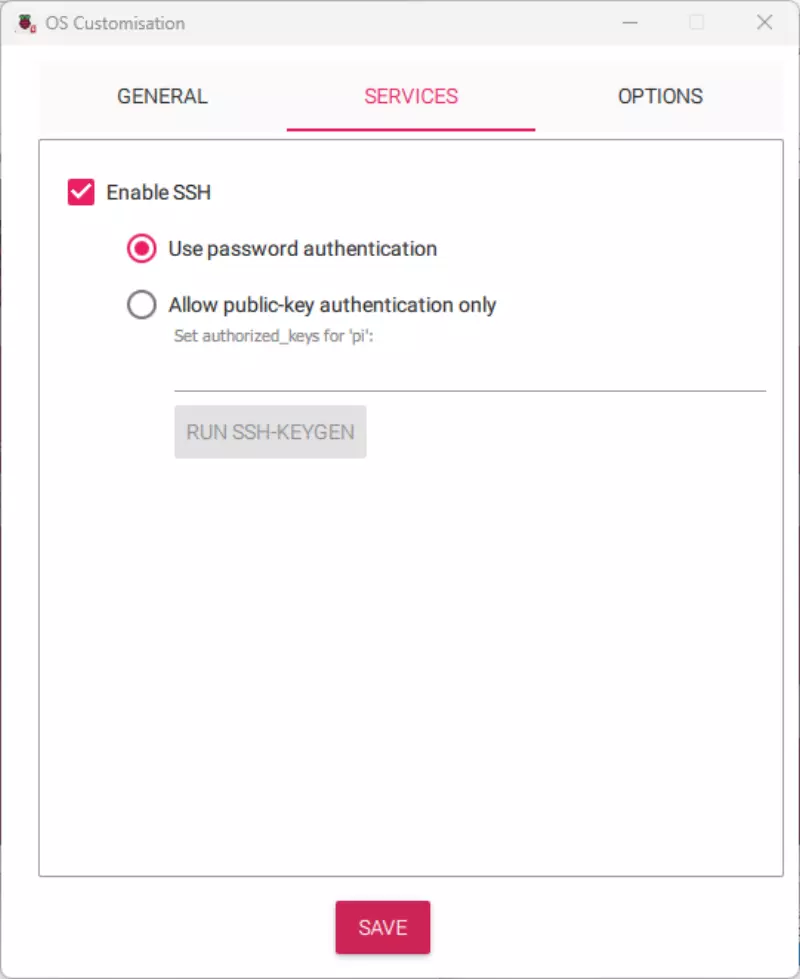
  <img src="/images/post/octopi/pi-imager-enable-ssh.webp" alt="enabling ssh screenshot" /></li>
  <li>Click “SAVE” (this returns you to the “USe OS customization? window)</li>
  <li>Click “YES”</li>
  <li>On the Warning dialog, if you are 100% positive you have selected the right driver, click “YES”
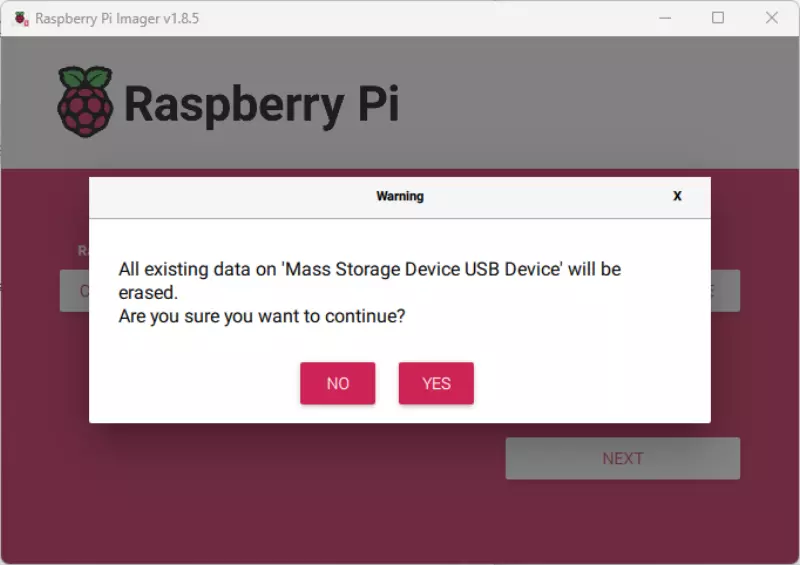
  <img src="/images/post/octopi/pi-imager-are-you-sure.webp" alt="are you sure screenshot" /></li>
</ol>

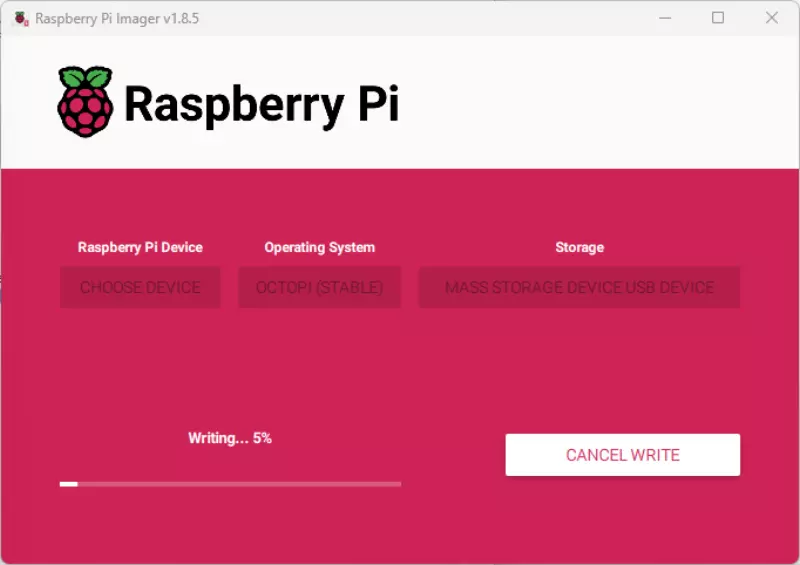
<p>At this point the micro SD is being prepared, written to, and verified. This will take a about 5 minutes.</p>

<p><img src="/images/post/octopi/pi-imager-sdcard-writing.webp" alt="sd card writing and verifying" /></p>

<h2>Booting OctoPI</h2>

<ol>
  <li>Ensure there is not an SD card in the Neo - remove it if there is.</li>
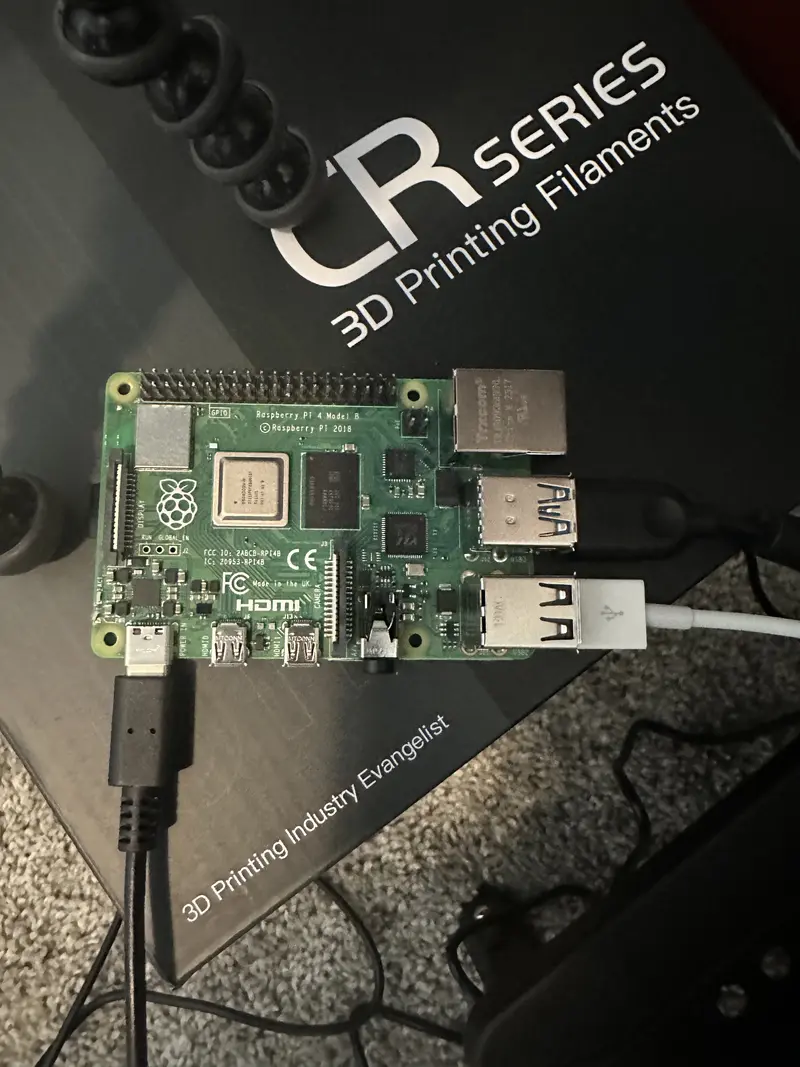
  <li>Insert the 32GB microSD card into the SD card slot on the bottom of the Raspberry PI board.</li>
  <li>Insert the USB-A to USB-C cable into a black USB-A port on the Pi.</li>
  <li>Insert the USB-C end of that cable into the Neo</li>
  <li>If you have a camera, plug it into a blue USB-A port on the Pi</li>
  <li>Connect the USB-C power supply to the pi - It will take a few minutes for your pi to boot. Be patient!</li>
</ol>

<div class="tip" style="
    background-color: #ECF7FF;
    border-left: 6px solid #0065B4;
    padding: 1em 1em 1em 1em;
    display: flex;
    column-gap: 2rem;
    margin: 2em 2em 2em 2em;">
	<p class="tip-bulb" style="
		font-family: 'Font Awesome 5 Free';
	    vertical-align: middle;
	    font-weight: 900;
	    font-size: 3em;
	    color: #ff6f00;">&#xf0eb;</p>
	<p class="tip-content">It can take several minutes for your raspberry pi to boot. Be patient!</p>
</div>

<p><img src="/images/post/octopi/octopi-device.webp" alt="octopi physically connected to printer" /></p>

<h2>Visiting OctoPi</h2>

<p>You’ve waited a few minutes and can now visit your OctoPi service on your network. While on the same wifi network you configured the device to use, visit the machine name on your network. Since I named mine “neo” the URL I will visit is http://neo.local</p>

<div class="tip" style="
    background-color: #ECF7FF;
    border-left: 6px solid #0065B4;
    padding: 1em 1em 1em 1em;
    display: flex;
    column-gap: 2rem;
    margin: 2em 2em 2em 2em;">
	<p class="tip-bulb" style="
		font-family: 'Font Awesome 5 Free';
	    vertical-align: middle;
	    font-weight: 900;
	    font-size: 3em;
	    color: #ff6f00;">&#xf0eb;</p>
	<p class="tip-content">Notice that I used &ldquo;http&rdquo; and not &ldquo;https&rdquo;. If you want to use https, you need to <a href="https://www.pico.net/kb/how-do-you-get-chrome-to-accept-a-self-signed-certificate/">add the self-signed cert to your trusted root store</a></p>
</div>

<h2>Setting up OctoPi</h2>

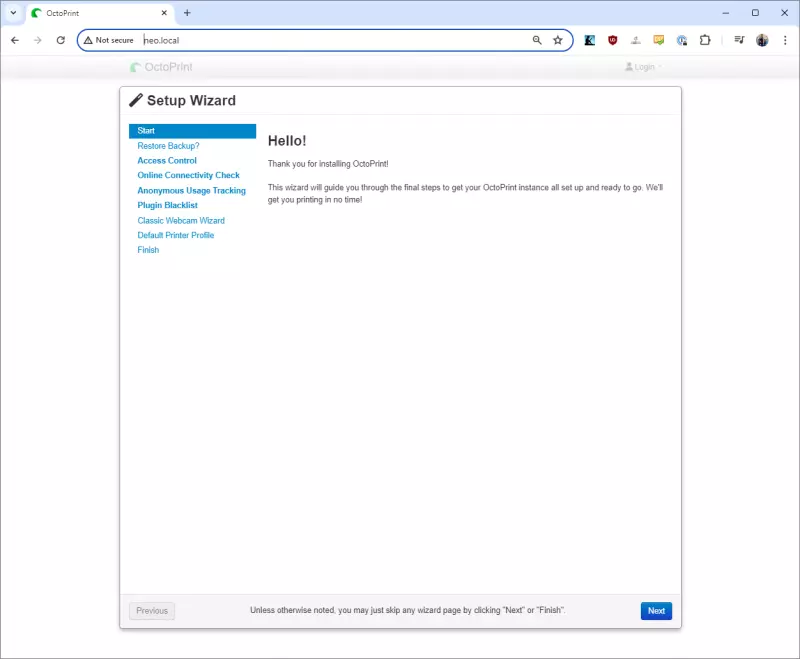
<p>You should now be looking at the OctoPi setup wizard.</p>

<p><img src="/images/post/octopi/octopi-setup-wizard-start.webp" alt="octopi setup wizard screenshot" /></p>

<ul>
  <li>Click “Next”</li>
  <li>If you are reading this, you’ve probably never setup OctoPi before so you don’t need to restore a previous config. Click “Next”</li>
  <li>On the “Access Control” page you will need to setup an OctoPi admin. This is not the same account you created when creating the image. This is the account you can log into the website OctoPi with. Create a username and password and make sure to remember them!</li>
  <li>Click “Create Account” - when it completes you will get a popup notice letting you know the account is created and you are now logged in as it.</li>
  <li>Click “Next”</li>
  <li>Since you’re connected via wifi, things are probably working but I would suggest clicking on “Test host &amp; port” and “Test name resolution” - both should succeed.</li>
  <li>Click “Enable Connectivity Check” (or don’t - but I suggest it)</li>
  <li>Click Next</li>
  <li>Configuring anonymous usage tracking is totally up to you. Click an option and then click “Next”</li>
  <li>On the “Configure Plugin Blacklist Processing” page, click “Enable Plugin Blacklist Processing” and then click “Next” (or don’t enable it - but I did).</li>
  <li>If you connected a webcam during the hardware setup, at the Webcam and Timelapse Recording page, click the two “Test” buttons to make sure you can see an image from your camera.</li>
  <li>Click “Next”</li>
  <li>On the “Set up your printer profile” page, on the General tabe give your printer a name and model. These are free-form strings. I entered “Neo” for the name and “Anycubic Kobra” for the model.</li>
  <li>Click “print bed &amp; build volume”</li>
  <li>Make sure the following are set:
    <ul>
      <li>Form Factor: Rectangular</li>
      <li>Origin: Lower Left</li>
      <li>Heated Bed: Enabled</li>
      <li>Heated Chamber: Disabled</li>
      <li>Width (X): <b>220</b></li>
      <li>Depth (Y): <b>220</b></li>
      <li>Height (Z): <b>250</b></li>
      <li>Custom Bounding box: Disabled</li>
    </ul>
  </li>
  <li>Click “Axes”</li>
  <li>All the defaults should be fine (6000, 6000, 200, 
 300)</li>
  <li>Click “Hotend &amp; extruder”</li>
  <li>Nozzle Diameter: 0.4 (unless you have changed your nozzle)</li>
  <li>Number of Extruders: 1</li>
  <li>Default extrusion length: 5</li>
  <li>Click “Next”</li>
  <li>On the “All Done!” page, read and agree to the three points.</li>
  <li>Click “Next” and if prompted, reload.</li>
</ul>

<h2>No printer connection?</h2>

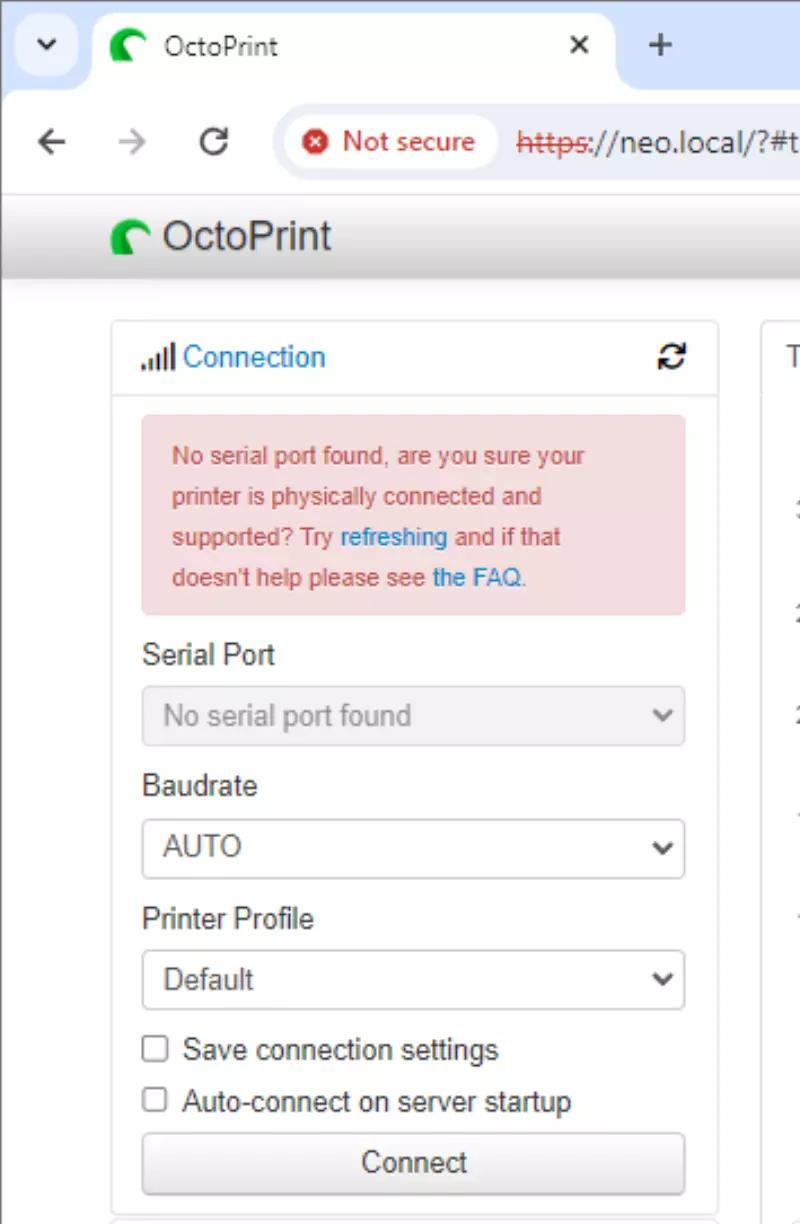
<p>If when you get to OctoPi’s main UI, you see this message:</p>

<div class="tip" style="
    background-color: #ECF7FF;
    border-left: 6px solid #0065B4;
    padding: 1em 1em 1em 1em;
    display: flex;
    column-gap: 2rem;
    margin: 2em 2em 2em 2em;">
	<p class="tip-bulb" style="
		font-family: 'Font Awesome 5 Free';
	    vertical-align: middle;
	    font-weight: 900;
	    font-size: 3em;
	    color: #ff6f00;">&#xf0eb;</p>
	<p class="tip-content">No serial port found, are you sure your printer is physically connected and supported? Try freshing and if that doesn't help please see the FAQ</p>
</div>

<p>First check that your USB-A to USB-C cable is connected from the pi to the printer and that the printer is on.</p>

<p>Next, try another cable. You are probably using a charge-only cable and not a data-capable one.</p>

<p><img src="/images/post/octopi/octopi-no-serial-port.webp" alt="error due to serial port error" /></p>

<h2>Installing Plugins</h2>

<p>You can <a href="https://plugins.octoprint.org/help/installation/">install OctoPi plugins</a> which can not only improve usability of OctoPi, but can actually improve the quality of your prints.</p>

<p>I would suggest the following plugins to get started:</p>

<ul>
  <li>Themeify</li>
  <li>Simple Emergency Stop</li>
  <li>Resource Monitor</li>
  <li>OctoEverywhere!</li>
  <li>OctoPod</li>
</ul>

<h2>Connecting Your Phone</h2>

<p>If you have an iPhone, once you’ve installed OctoEverywhere and OctoPod you can then install the OctoPod app on your <a href="https://apps.apple.com/us/app/octopod-for-octoprint/id1412557625">iPhone</a>. On an Android you could use <a href="https://play.google.com/store/apps/details?id=com.qlabs.octoeverywhere.twa&amp;hl=en_US&amp;gl=US&amp;pli=1">OctoEverywhere</a>.</p>

<p>This will allow you to view the web camera remotely (without opening a port on your router), manage your print jobs remotely, and control your printer without having to use the front control panel for many operations.</p>

<p>There are a bunch of possibly tools you could use - experiment with them and see what you like!</p>

<h2>Configuring Cura</h2>

<p>To get Cura to see OctoPi you need to install the <a href="https://marketplace.ultimaker.com/app/cura/plugins/fieldofview/OctoPrintPlugin">OctoPrint Connection</a> plug-in in Cura. Once you have done that, visit your printer setup page and click “Connect OctoPrint” and setup an API key.</p>

<p>This is documented on this <a href="https://all3dp.com/2/cura-octoprint-plugin-connection/">All3DP blog post</a>.</p>

<h2>Your First Print</h2>

<p>With all of this done - you are ready to use Cura to send a print directly to OctoPrint!</p>]]></content><author><name></name></author><category term="3DPrinting#Anycubic" /><summary type="html"><![CDATA[A brief, but relatively complete, guide for buying what you will need, installing and configuring software, and getting your first successful print on your Anycubic Kobra Neo with OctoPi on a Raspberry Pi.]]></summary></entry><entry><title type="html">A Simple Floor Stand for a 3D Printer</title><link href="https://www.roberthorvick.com/blog/a-simple-floor-stand-for-a-small-3d-printer" rel="alternate" type="text/html" title="A Simple Floor Stand for a 3D Printer" /><published>2024-04-26T00:00:00+00:00</published><updated>2024-04-26T00:00:00+00:00</updated><id>https://www.roberthorvick.com/blog/a-simple-floor-stand-for-a-small-3d-printer</id><content type="html" xml:base="https://www.roberthorvick.com/blog/a-simple-floor-stand-for-a-small-3d-printer"><![CDATA[<h2>The Stand</h2>

<p>The Neo was occupying too much space on the desk but I had the perfect corner I could stick it into. The only problem was that it needed to be less than 6 inches off the floor so it could tuck under some other things. This ruled out most printer stands and tables that are commonly used (like the Ikea LACK).</p>

<p>So instead, I bought a two-pack of the <a href="https://www.amazon.com/dp/B089B1QHFR?psc=1&amp;ref=ppx_yo2ov_dt_b_product_details">EVOOMI Back Saver Monitor Stands</a>. These are all-metal monitor stands that are rated for 20kg each and have three adjustable heights: 3.9”, 4.7”, 5.5”. I left it at the base - 3.9”.</p>

<h2>The Problem</h2>

<p>The main problem was that having them just sitting side-by-side meant that over time they might drift apart and cause a problem. I wanted a simple way to connect them. The simpliest way would have been zip ties. But that would not have bvbeen fun.</p>

<p>Instead I threw together a <a href="https://www.thingiverse.com/thing:6596710">quick model</a> that press fits into the hex holes spanning the gap between the two units. This locked them tightly together (to the point you can lift one and they both lift staying parallel to each other) and the printer fits over them.</p>

<p>It now all stands at the right height on a stable platform.</p>]]></content><author><name></name></author><category term="3DPrinting#Hacks" /><summary type="html"><![CDATA[I needed a low profile stand for an AnyCubic Neo and this was my solution]]></summary></entry><entry><title type="html">Anycubic Kobra Neo (First Generation) Braindump</title><link href="https://www.roberthorvick.com/blog/anycubic-kobra-neo-first-gen-1-braindump" rel="alternate" type="text/html" title="Anycubic Kobra Neo (First Generation) Braindump" /><published>2024-04-19T00:00:00+00:00</published><updated>2024-04-19T00:00:00+00:00</updated><id>https://www.roberthorvick.com/blog/anycubic-kobra-neo-first-gen-1-braindump</id><content type="html" xml:base="https://www.roberthorvick.com/blog/anycubic-kobra-neo-first-gen-1-braindump"><![CDATA[<noscript>
	<style type="text/css">
		#table-of-contents { display:none; }
	</style>
</noscript>

<div id="table-of-contents">
	<div id="toc-header">On this page:</div>
</div>

<h2>Missing All Hardware</h2>

<p>When I picked up this printer it was missing all the hardware (screws and washers), half of the tools (hex key and wrench), a calibration tool, the IEC power cord, all paperwork, and the SD card.</p>

<p>The biggest problem was the hardware.</p>

<p>I made my way over to the <a href="https://wiki.anycubic.com/en/fdm-3d-printer/kobra-neo">Anycubic Kobra Neo Wiki</a> where I found the <a href="https://cdn.shopify.com/s/files/1/0245/5519/2380/files/Anycubic_Kobra_Neo_Assembly_Instruction-220906-C_8a82d4d2-241a-481b-9eb2-4e5f9c87ac85.pdf?v=1688984387">assembly instructions</a> which, thankfully, included the entire packing list.  I needed:</p>

<ul>
  <li>M3x8 (4)</li>
  <li>M4x6 (2)</li>
  <li>M4x16 (2)</li>
  <li>M5x25 (2)</li>
  <li>M5x45 (2)</li>
  <li>M5 spring washer (4)</li>
</ul>

<p>These should all be socket hex head screws - and these are all available at Home Depot (so was the IEC cable). So I stopped by and about $15 later I had what I needed.  Returning home, I performed the assembly and was able to power on the printer.</p>

<h2>Connecting via USB</h2>

<p>Since I did not have the SD card, I wanted to connect via USB. The printer has a USB-C port but it cannot read a USB drive from it - it seems it can only be used for external control.</p>

<p>I went back to the wiki and found the <a href="https://wiki.anycubic.com/en/fdm-3d-printer/kobra-neo#:~:text=%C2%B6-,Driver,-CH341">CH341 driver</a> which I installed on my printer control computer (I have a dedicated mini computer for printer control to keep random software off my personal computer and isolated from the rest of the network).</p>

<p>After installing, I was able to see that it was using COM4 (you can see this in Device Manager in windows - look at the COM ports for the one with CH341 in the name) and now I would connect via Cura and Pronterface.</p>

<p>With this done I sent a test print … and it was horrible.</p>

<h2>Printhead way too high (Z offset adjustment)</h2>

<p>I should have taken a picture of how bad this was - but you’ll just have to imagine it. The first print was just strings of glop dropped from about 1.5-2mm above the bed. I was printing a 50x50x0.20 test print and it looked like I was just running the extruder randomly while playing with the X/Y controls.</p>

<p>Given my other printer is a P1S, I haven’t actually had to deal with this before so I did a little reading to understand that the problem was Z axis height. This is where the missing SD card is a bit of a pain. Anycubic includes a Z-axis adjustment process in the manual but it requires some pre-loaded gcode on the card. Since I didn’t have that, and they don’t link it on the wiki, I basically tried to recreate the process by hand.</p>

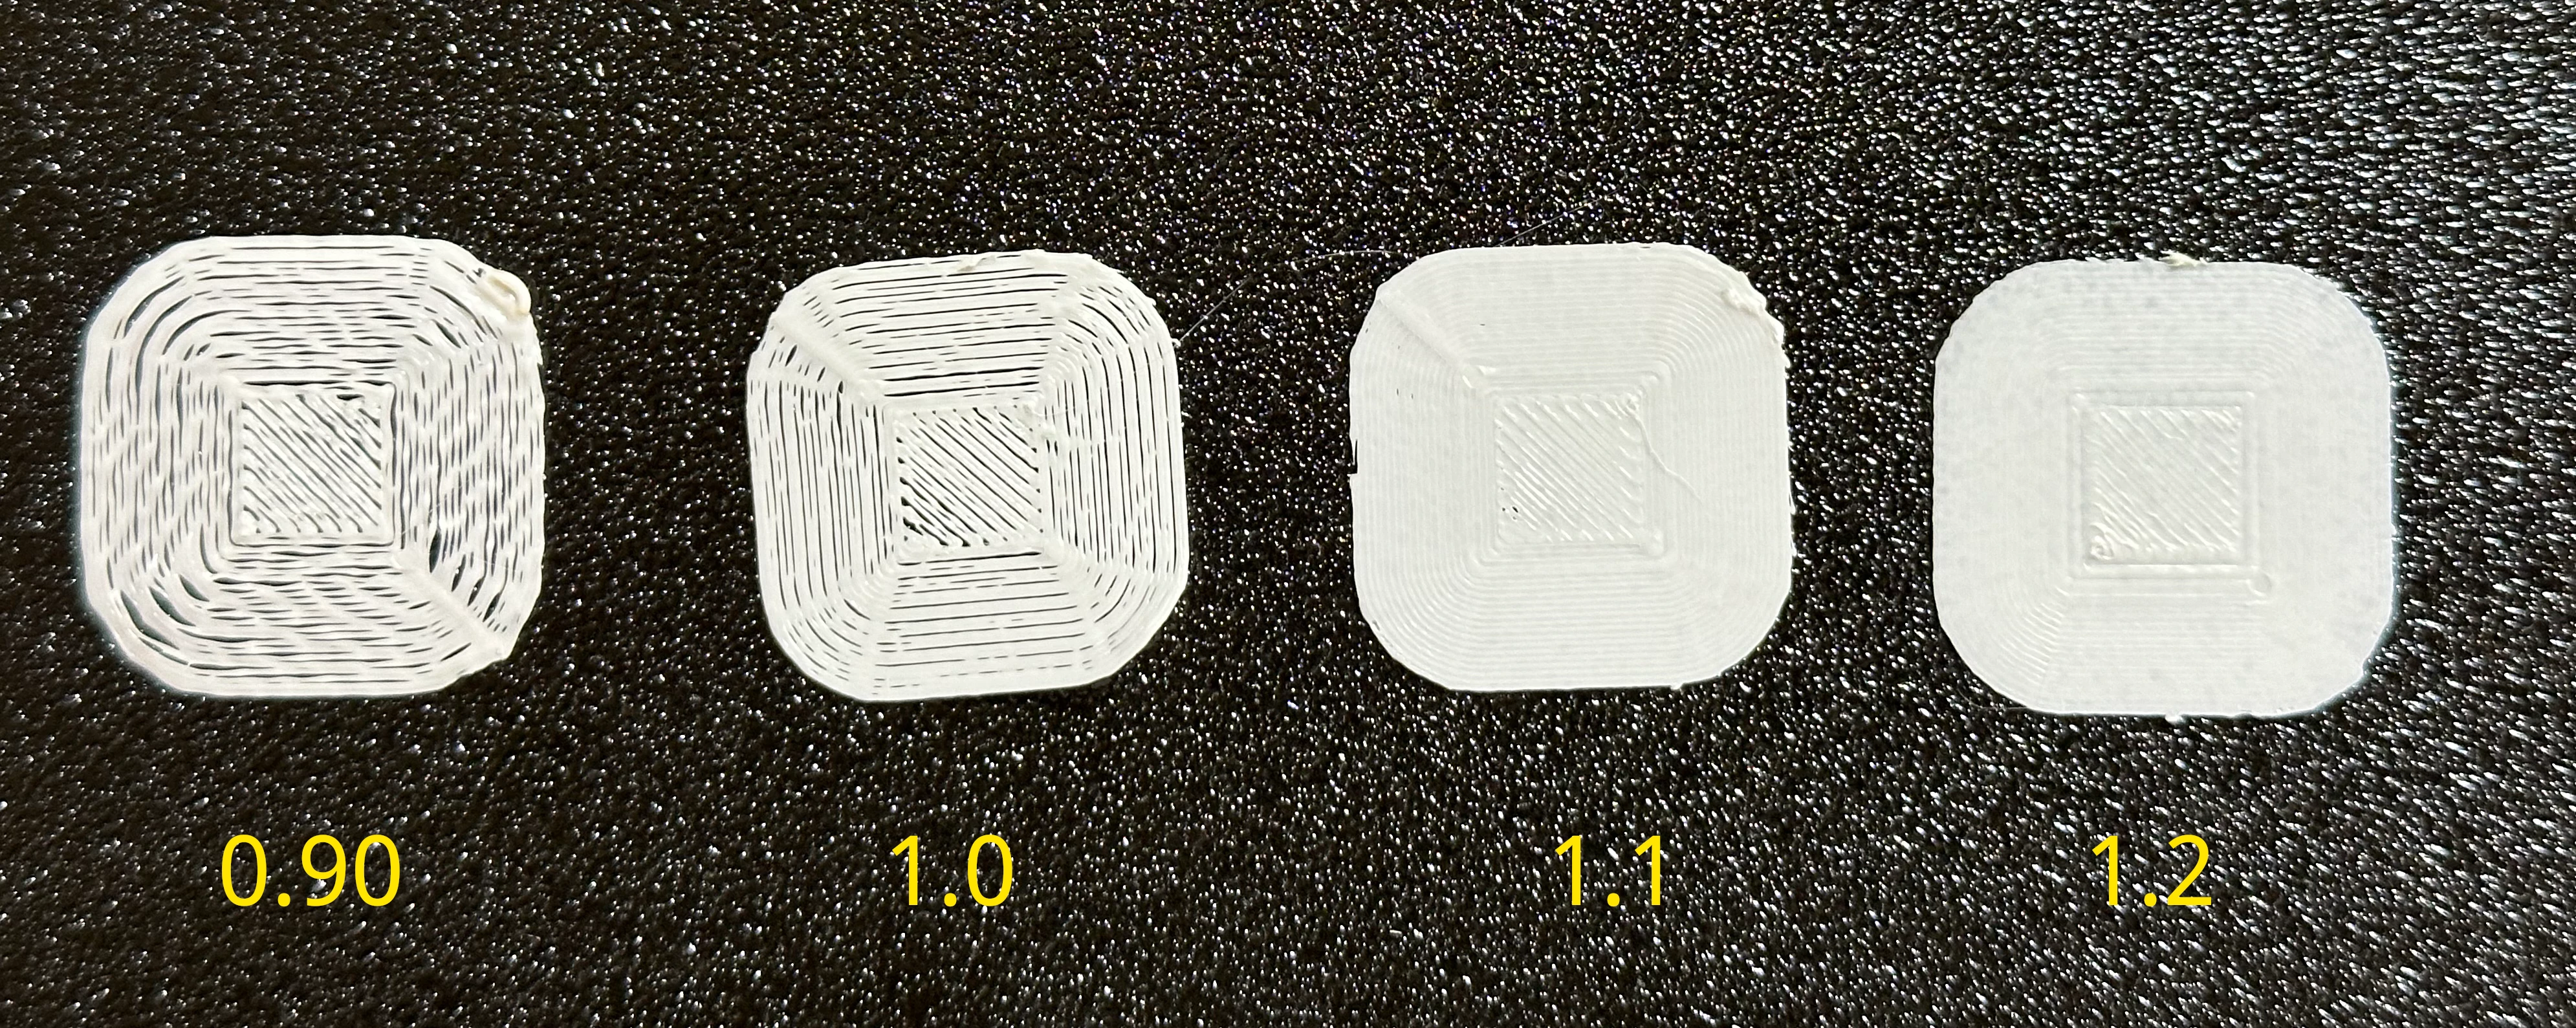
<p>Since the default of 0 was way too high, I started by going to -0.90 and doing 10x10mm test prints at 0.9, 1.0, 1.1, and 1.2.  The results were this:</p>

<p><img src="/images/post/z-axis.samples.webp" alt="Four sample prints showing various z-axis settings" /></p>

<p>After this I fiddle a bit more and finally ended on -1.14 as my height adjustment and for now it’s fine - I’ll move on to the next steps.</p>

<h2>Filament extruding at wrong speed (E-step calibration)</h2>

<p>While doing some test prints I noticed there was some under extrusion going on - you can see it above in the z-axis adjustment section.</p>

<p>I decided to do an e-step adjustment to make sure the right amount of filament is coming out. To do this, I followed the process described <a href="https://all3dp.com/2/extruder-calibration-calibrate-e-steps/">at all3dp.com</a>.</p>

<p>The following was all done in Pronterface connected to the printer via USB.</p>

<ol>
  <li>Send the M503 command to get the settings - this returned (among many other things) this information:</li>
</ol>

<div class="language-text highlighter-rouge"><div class="highlight"><pre class="highlight"><code>echo:; Steps per unit:
echo: M92 X80.00 Y80.00 Z400.00 E390.00
</code></pre></div></div>

<p>So we have 390 e-steps per mm of filament.</p>

<ol>
  <li>
    <p>Use a ruler and sharpie to add a line to the filament exactly 120mm above the print head.</p>
  </li>
  <li>
    <p>Send the following:</p>
  </li>
</ol>

<pre><code class="language-gcode">M83;
M18 S60;
M109 T0 R200; 
G1 E100 F100; 
G4 S90; 
M104 S0; 
</code></pre>

<p>Now, this is where things didn’t work. The printer returned an error on the line <code class="language-plaintext highlighter-rouge">G1 E100 F100;</code> complaining that the values were out of range.</p>

<p>So I used the UI to set the extrude length to 100, the speed to 100 (this is mm per minute), and then hit the extrude button manually - and that worked fine.</p>

<ol>
  <li>Measure and calculate the new value</li>
</ol>

<p>With that done I measured from the top of print head to my line (it was drawn at 120 but I only sent 100), and found there was a 30mm gap. So it only sent 90 of the 100 I asked for.</p>

<p>Since we saw earlier that there are 390 e-steps per mm - it did exactly 39,000 steps (390 * 100). But it acted like it only did 35100 (390 * 90). So we can now divide 39000 / 90 and we get 433.3.</p>

<ol>
  <li>Update the setting</li>
</ol>

<p>To update the setting I simply send the following gcode:</p>

<pre><code class="language-gcode">M92 E433.3
M500
</code></pre>

<p>That set the new value to 433.3 and then saved it.</p>

<ol>
  <li>Verify</li>
</ol>

<p>I re-ran the extrusion test by marking the filament at 120mm and then extruding 100mm and this time when I meausured, it was right at 20mm remaining - so I asked for 100 and I got 100.</p>

<h2>FYI - Updating the firmware resets Z-axis and e-steps</h2>

<p>I updated the firmware from 1.2.8 to 1.3.3 and noticed immediately that z axis was reset to 0 but it took a little more poking to realize that e-steps were also reset from 433 to 390 causing significant under extrusion.</p>

<p>Just something to keep in mind when you update.</p>]]></content><author><name></name></author><category term="3DPrinting#AnycubicKobraNeo" /><summary type="html"><![CDATA[Notes I took for myself that others might find helpful as well]]></summary></entry><entry><title type="html">Bambulab P1S Braindump</title><link href="https://www.roberthorvick.com/blog/bambulab-p1s-braindump" rel="alternate" type="text/html" title="Bambulab P1S Braindump" /><published>2024-04-19T00:00:00+00:00</published><updated>2024-04-19T00:00:00+00:00</updated><id>https://www.roberthorvick.com/blog/bambulab-p1s-braindump</id><content type="html" xml:base="https://www.roberthorvick.com/blog/bambulab-p1s-braindump"><![CDATA[<noscript>
	<style type="text/css">
		#table-of-contents { display:none; }
	</style>
</noscript>

<div id="table-of-contents">
	<div id="toc-header">On this page:</div>
</div>

<h2>Error Message: HMS_WARN_07ff_2000_0002_0004</h2>

<p>I have an AMS unit but wanted to print some TPU. While there are situations where TPU can be loaded into the AMS, it was easier (I thought) to just use the rear feeder. So I unhooked the AMS and loaded the TPU. No problem. After the print I went through the unload process, removing the TPU, and then I got this message.</p>

<p>For some people it seems benign - they just reboot the printer and update Bambu Studio to reset the external filament and then everything is great. But for me there was something else going on.</p>

<p>I tried a bunch of stuff (power cycling, hitting “Retry”, even factory resetting the printer) but nothing would convince the printer that it was OK to print with the AMS. It would not even load filament if I did it manually.</p>

<p>To solve this, I loaded PLA in the rear and went through the complete load cycle, extruding until the new filament came out (there was still quite a bit of TPU in there). Then I went through the unload process again and finally I reset the rear filament in Bambu studio.</p>

<p>Once that was done, I was then able to load filament via the AMS and am back to printing.</p>]]></content><author><name></name></author><category term="3DPrinting#P1S" /><summary type="html"><![CDATA[Notes I took for myself that others might find helpful as well]]></summary></entry><entry><title type="html">Solved: Plex Video Plays Audio but Not Video on Amazon FireTV</title><link href="https://www.roberthorvick.com/blog/solved-plex-plays-audio-but-not-video-on-lg-television-and-amazon-fire-stick" rel="alternate" type="text/html" title="Solved: Plex Video Plays Audio but Not Video on Amazon FireTV" /><published>2022-12-27T00:00:00+00:00</published><updated>2022-12-27T00:00:00+00:00</updated><id>https://www.roberthorvick.com/blog/solved-plex-plays-audio-but-not-video-on-lg-television-and-amazon-fire-stick</id><content type="html" xml:base="https://www.roberthorvick.com/blog/solved-plex-plays-audio-but-not-video-on-lg-television-and-amazon-fire-stick"><![CDATA[<noscript>
	<style type="text/css">
		#table-of-contents { display:none; }
	</style>
</noscript>

<div id="table-of-contents">
	<div id="toc-header">On this page:</div>
</div>

<h2>Why Doesn't it Work?</h2>

<p>Over the holidays we made an effort to clean up our family movie collection. Cutting multi-hour videos into smaller chunks, catagorizing by people, renaming from MAH1982983.MPG to something sensible like “Evelyn is Sally Ride.MPG”.</p>

<p>Along the way we noticed there were playback issues that seemed inconsistent across devices.  For example some files worked great everywhere</p>

<table>
  <thead>
    <tr>
      <th>Media</th>
      <th>LG TV</th>
      <th>FireTV</th>
      <th>Mac</th>
      <th>PC</th>
    </tr>
  </thead>
  <tbody>
    <tr>
      <td>Audio</td>
      <td>✔</td>
      <td>✔</td>
      <td>✔</td>
      <td>✔</td>
    </tr>
    <tr>
      <td>Video</td>
      <td>✔</td>
      <td>✔</td>
      <td>✔</td>
      <td>✔</td>
    </tr>
    <tr>
      <td>Preview</td>
      <td>✔</td>
      <td>✔</td>
      <td>✔</td>
      <td>✔</td>
    </tr>
  </tbody>
</table>

<p>But other videos were less consistent - they partially rendered or only rendered on some platforms</p>

<table>
  <thead>
    <tr>
      <th>Media</th>
      <th>LG TV</th>
      <th>FireTV</th>
      <th>Mac</th>
      <th>PC</th>
    </tr>
  </thead>
  <tbody>
    <tr>
      <td>Audio</td>
      <td>✔</td>
      <td>✔</td>
      <td>X</td>
      <td>✔</td>
    </tr>
    <tr>
      <td>Video</td>
      <td>X</td>
      <td>X</td>
      <td>X</td>
      <td>✔</td>
    </tr>
    <tr>
      <td>Preview</td>
      <td>X</td>
      <td>✔</td>
      <td>X</td>
      <td>✔</td>
    </tr>
  </tbody>
</table>

<p>This is obviously some issue where the video or audio codec is incompatible with the player but I didn’t really want to spend any time thinking about it. So decided to bulk convert everything to H.264 MP4’s with a 128bit AAC audio stream.</p>

<p>To do this I used <a href="https://ffmpeg.org/">ffmpeg</a>.</p>

<h2>Converting a Single File</h2>

<p>Here is an example of an <a href="https://ffmpeg.org/ffprobe.html">ffprobe</a> output for one of the videos that would play audio, but not video, over the FireTV Plex client:</p>

<div class="language-plaintext highlighter-rouge"><div class="highlight"><pre class="highlight"><code>Input #0, mpeg, from 'Evelyn is Sally Ride.MPG':
  Duration: 00:00:33.80, start: 0.110000, bitrate: 2914 kb/s
  Stream #0:0[0x1c0]: Audio: mp2, 32000 Hz, mono, s16p, 64 kb/s
  Stream #0:1[0x1e0]: Video: mpeg1video, yuv420p(tv), 640x480 [SAR 1:1 DAR 4:3], 104857 kb/s, 25 fps, 25 tbr, 90k tbn
</code></pre></div></div>

<p>To convert this file to something that would play both video and audio, I ran the following command:</p>

<div class="language-plaintext highlighter-rouge"><div class="highlight"><pre class="highlight"><code>ffmpeg -i "Evelyn is Sally Ride.MPG" -c:v libx264 -preset slow -crf 20 -c:a aac -b:a 128k -vf format=yuv420p -movflags +faststart "converted\Evelyn is Sally Ride.mp4"
</code></pre></div></div>

<p>Which created an file whose ffprobe output is:</p>

<div class="language-plaintext highlighter-rouge"><div class="highlight"><pre class="highlight"><code>Input #0, mov,mp4,m4a,3gp,3g2,mj2, from 'Evelyn is Sally Ride.mp4':
  Metadata:
    major_brand     : isom
    minor_version   : 512
    compatible_brands: isomiso2avc1mp41
    encoder         : Lavf59.16.100
  Duration: 00:00:33.84, start: 0.000000, bitrate: 1645 kb/s
  Stream #0:0[0x1](und): Video: h264 (High) (avc1 / 0x31637661), yuv420p(progressive), 640x480 [SAR 1:1 DAR 4:3], 1509 kb/s, 25 fps, 25 tbr, 12800 tbn (default)
    Metadata:
      handler_name    : VideoHandler
      vendor_id       : [0][0][0][0]
  Stream #0:1[0x2](und): Audio: aac (LC) (mp4a / 0x6134706D), 32000 Hz, mono, fltp, 129 kb/s (default)
    Metadata:
      handler_name    : SoundHandler
      vendor_id       : [0][0][0][0]
</code></pre></div></div>

<p>And now when added back to the NAS and synced to Plex, everything works exactly as desired with no noticable change in audio or video quality.</p>

<h2>Bulk Converting using ffmpeg</h2>

<p>to do this in bulk, I wrote the following batch file:</p>

<div class="language-bat highlighter-rouge"><div class="highlight"><pre class="highlight"><code><span class="k">if</span> <span class="ow">not</span> <span class="ow">exist</span> <span class="kd">converted</span> <span class="nb">mkdir</span> <span class="kd">converted</span>
<span class="k">if</span> <span class="ow">exist</span> <span class="kd">converted</span>\temp.mp4 <span class="nb">del</span> <span class="kd">converted</span>\temp.mp4

<span class="k">for</span> <span class="vm">%%I</span> <span class="k">in</span> <span class="o">(*)</span> <span class="k">do</span> <span class="o">(</span>
  <span class="k">if</span> <span class="ow">exist</span> <span class="s2">"converted\</span><span class="vm">%%~nI</span><span class="s2">.mp4"</span> <span class="nb">del</span> <span class="s2">"converted\</span><span class="vm">%%~nI</span><span class="s2">.mp4"</span>

  <span class="kd">ffmpeg</span> <span class="na">-i </span><span class="s2">"</span><span class="vm">%%I</span><span class="s2">"</span> <span class="na">-c</span><span class="nl">:v</span> <span class="kd">libx264</span> <span class="na">-preset </span><span class="kd">slow</span> <span class="na">-crf </span><span class="m">20</span> <span class="na">-c</span><span class="nl">:a</span> <span class="kd">aac</span> <span class="na">-b</span><span class="nl">:a</span> <span class="m">128</span><span class="kd">k</span> <span class="na">-vf </span><span class="nb">format</span><span class="o">=</span><span class="kd">yuv420p</span> <span class="na">-movflags +faststart </span><span class="kd">converted</span>\temp.mp4

  <span class="nb">move</span> <span class="kd">converted</span>\temp.mp4 <span class="s2">"converted\</span><span class="vm">%%~nI</span><span class="s2">.mp4"</span>
<span class="o">)</span>
</code></pre></div></div>

<p>This is pretty straight-forward.</p>

<p>Basically conversion is done for every file in a source folder and a temporary output file is created. Using a temp output file means I can kill the process mid-way through a conversation and I won’t leave a partially rendered artifact in place. Should I have needed to cancel the operation, or if it failed, it would be easier to be able to restart the process and skip things that had already successfully converted.</p>]]></content><author><name></name></author><category term="Programming#Web" /><summary type="html"><![CDATA[A brief tutorial on how I bulk-converted media from various formats to a single, compatible, format to allow Plex to serve on my Amazon FireTV and LG television]]></summary></entry><entry><title type="html">My Process for Recording Screencast Content for Pluralsight</title><link href="https://www.roberthorvick.com/blog/my-process-for-recording-screencast-content-for-pluralsight" rel="alternate" type="text/html" title="My Process for Recording Screencast Content for Pluralsight" /><published>2022-04-15T00:00:00+00:00</published><updated>2022-04-15T00:00:00+00:00</updated><id>https://www.roberthorvick.com/blog/my-process-for-recording-screencast-content-for-pluralsight</id><content type="html" xml:base="https://www.roberthorvick.com/blog/my-process-for-recording-screencast-content-for-pluralsight"><![CDATA[<noscript>
	<style type="text/css">
		#table-of-contents { display:none; }
	</style>
</noscript>

<div id="table-of-contents">
	<div id="toc-header">On this page:</div>
</div>

<p>When it comes to recording training content, I used to just wing it. I’d make the slides from the ideas in my head and when recording I would just say what I thought to say.  This ended in a lot of editing, re-recording, more editing, and some disappointments. Over the last decade I’ve learned from others and refined my approach. This is a brief description of what I do today.</p>

<h2>Outline and Slides</h2>

<p>I start by defining the course outline down to the clip level. This include the clips intention, lesson(s) taught, and estimated length in the course outline. I don’t do any scripting here but I do add notes that I think might be helpful later.</p>

<p>Next, I create the slides for each module using the clip descriptions in the course outline as the guide. By this time I usually have a pretty good idea of the <em>what</em> so it is more a matter of <em>how</em>. This is often the hardest part as I will come up with a pattern to convey an idea that I will reuse throughout the module/course. When I inevitably want to change that pattern, I need to apply the change across a lot of slides. Because of this I try to focus on a single module at first. When I am done with it and the patterns are defined, I can now work on the rest of the modules more easily.</p>

<div class="tip" style="
    background-color: #ECF7FF;
    border-left: 6px solid #0065B4;
    padding: 1em 1em 1em 1em;
    display: flex;
    column-gap: 2rem;
    margin: 2em 2em 2em 2em;">
	<p class="tip-bulb" style="
		font-family: 'Font Awesome 5 Free';
	    vertical-align: middle;
	    font-weight: 900;
	    font-size: 3em;
	    color: #ff6f00;">&#xf0eb;</p>
	<p class="tip-content">I prefer to use slide transitions, not animations, to create flow and movement. Animations are great and a little more powerful than transitions, but they make creating print-ready slides more difficult since you have to rethink how to convey an idea without the animation.</p>
</div>

<h2>Scripting and Audio</h2>

<p>Once I have the slides complete, I begin to write the script for the module going clip by clip. This usually means I am iterating between the script and slides to improve both until I’m happy. It is usually here that I discover how I need to change patterns in the slides (described above).</p>

<p>I watch my word count and think about how many words per minute I speak so that I can confirm my clip lengths are aligned with my estimates in the outline.  If they aren’t, I need to decide what to do. Maybe this needs to be two clips, or maybe two clips should be one. Maybe I need to remove details or perhaps I have a little room to go deeper. The most common outcome is that one clip will be a little short and I’ll steal that time for a clip that went a little long.</p>

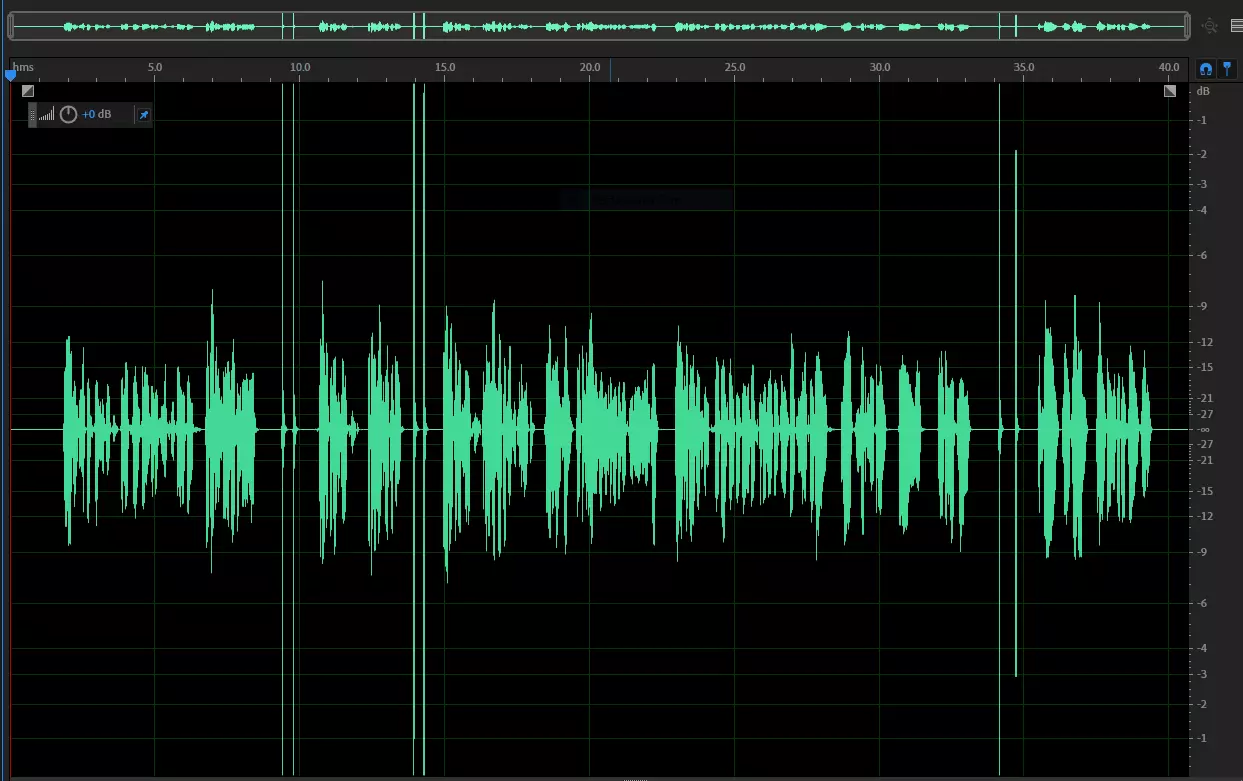
<p>Next, I record and edit the audio. I record clip-by-clip, snapping my fingers near the mic anytime I make a mistake or want to try something two ways.  This makes my waveform really easy to navigate since snaps are visually obvious which allows me to jump between edit points very quickly.</p>

<p><img src="/images/post/audio-waveform-snap.webp" alt="Audio waveform showing peaks where I have snapped" />.</p>

<p>I also make sure that anytime I need to make an edit, I don’t try and do it mid-sentence. I repeat at least the whole sentence, and often the whole paragraph. A lot of my mistakes are not the wrong words but the wrong tone or inflection. If I don’t re-record the whole paragraph it can often be obvious a new ending was punched in as inflection isn’t just on a single phrase or word - there is a lead-in to it that I can hear.</p>

<p>At this point I have my audio completely edited.</p>

<h2>Recording Slides</h2>

<p>I record the slides by playing the audio for the clip and moving through the slides in sync (as close as possible) to the audio. My Camtasia recording will capture both the screen showing the slides and also the audio via the system audio input. You can’t play the audio in Camtasia while recording so you will need to play it in an external tool.</p>

<p>When this is done I have 2 tracks - the slides+system audio and the production audio.</p>

<p>Now I split the slides+system audio into two tracks. Then I slide the production audio to align with the recorded system audio. This will never be perfect but I get it to the point that it sounds like only a single voice is speaking but there’s a weird stereo effect. I will then trim the video recording to align with the start of the audio (there is always a few seconds of me clicking things, starting the slides, etc - but I don’t have the system audio playing until the slides are running correctly).</p>

<p><img src="/images/post/camtasia-editing.webp" alt="Screenshot of Camtasia editor window" /></p>

<p>With those align I will delete the recorded system audio and can now edit the slide recording and production audio together. Since I recorded the slides against this audio, there is usually only minor editing to do and it’s almost always a timing issue.</p>

<p>When I’m happy, I group all the edits into a single group and then render that group.</p>

<h2>Recording Demos</h2>

<p>I record demos on a virtual machine (Hyper-V). This is really important to me because (a) I want to lock the version of Windows and Visual Studio that I am using and (b) I want to be able to use that virtual machine, in that exact state, if I ever need to make updates to the course. Having to do an edit a year later requires getting everything setup exactly as before - this makes it so much easier. I don’t worry about the VM for the slides.</p>

<p>For demos, I invert the order that I record the audio and video. I get my demo code prepared and think about the major momoents in the demo (changing files, scrolling, editing text, running the program, etc).</p>

<div class="tip" style="
    background-color: #ECF7FF;
    border-left: 6px solid #0065B4;
    padding: 1em 1em 1em 1em;
    display: flex;
    column-gap: 2rem;
    margin: 2em 2em 2em 2em;">
	<p class="tip-bulb" style="
		font-family: 'Font Awesome 5 Free';
	    vertical-align: middle;
	    font-weight: 900;
	    font-size: 3em;
	    color: #ff6f00;">&#xf0eb;</p>
	<p class="tip-content">Demos showing source code require a large font. Check ahead of time what your maximum line length will be in your rendered code (do this in your production sample) and stick to that max line length as much as possible.</p>
</div>

<p>When recording the demos I don’t worry about the audio timing at all - what will be a 4 minute demo clip might only be 30 seconds of recorded time.  I do focus on:</p>

<ul>
  <li>Cursor and mouse location. This is critical - you don’t want a cursor just hanging out in the middle of our editor.</li>
  <li>Scrolling.  I use the arrow keys and try to click 2 lines per second - during editing I will adjust clip speed to be 5x when scrolling.</li>
  <li>Getting the relevant code centered</li>
  <li>Inputting new text</li>
  <li>Pausing between major moments (scrolling, typing, etc) so that I can use that as an edit point</li>
</ul>

<p>For text input I use <a href="https://www.autohotkey.com/">AutoHotKey</a> macros. For example, here is a macro that enters some content with a key delay that feels like a fast, but natural, typing speed.</p>

<div class="language-text highlighter-rouge"><div class="highlight"><pre class="highlight"><code>SetKeyDelay,22,,,

!1::
SendRaw, txt_Contents.Text = txt_Contents.Text.Replace(before, after);
return
</code></pre></div></div>

<div class="tip" style="
    background-color: #ECF7FF;
    border-left: 6px solid #0065B4;
    padding: 1em 1em 1em 1em;
    display: flex;
    column-gap: 2rem;
    margin: 2em 2em 2em 2em;">
	<p class="tip-bulb" style="
		font-family: 'Font Awesome 5 Free';
	    vertical-align: middle;
	    font-weight: 900;
	    font-size: 3em;
	    color: #ff6f00;">&#xf0eb;</p>
	<p class="tip-content">When possible, minimize anything that identifies the specific version of your OS or text editor. They can make a course seem dated even if the content is relevant.</p>
</div>

<p>With the video recorded, I now use the outline and video to create the script. Sometimes this means I need to go back and re-record something but this usually works. I’ve found it’s easier to record the video than the audio so I bias towards that. When the script is ready I record it using the process I described above.</p>

<p>Next I go through the demo and I cut the video at the major points (see bullet above).  I then align those major moments to the appropriate audio and apply the 5x clip speed to any scrolling moments.  This leaves me with the audio-aligned-moments and a bunch of gaps that need to be filled.  I fill them by extending a single frame over that time (Camtasia and Premiere can do this). It takes some tweaking to make things seem natural. You don’t want a mouse cursor appearing out of nowhere (at least obviously), and transitions (changing source file, etc) need to be considered. But eventually you end up with a demo that feels like you were talking while typing and you are just somehow really good at scrolling.</p>

<p>As before, I now group all the fragments into a clip and I render the clip.</p>

<h2>Other Random Advice</h2>

<p>My other advice is:</p>

<ul>
  <li>Create and submit your easiest module first regardless of module order. Get a quick win under your belt.</li>
  <li>Avoid applying any updates (especially major versions) to your tooling during the recording process.</li>
  <li>If you are using Camtasia, save early and save often. It crashes a lot. The latest version really has trouble with rendering between markers. And if you’re using Camtasia on a Mac, it is missing some features Windows has (like batch rendering).</li>
  <li>Don’t forget that the Overview/Summary slide has both words - Overview and Summary - on it.  You need to delete the appropriate word depending on the context. I forget every time.</li>
</ul>]]></content><author><name></name></author><category term="Training#Pluralsight" /><summary type="html"><![CDATA[A highlevel overview of my current process for going from idea to recorded content]]></summary></entry><entry><title type="html">Conway’s Game of Life in 200 Lines of JavaScript+Jquery</title><link href="https://www.roberthorvick.com/blog/conways-game-of-life-in-javascript-jquery-under-200-lines" rel="alternate" type="text/html" title="Conway’s Game of Life in 200 Lines of JavaScript+Jquery" /><published>2022-03-30T00:00:00+00:00</published><updated>2022-03-30T00:00:00+00:00</updated><id>https://www.roberthorvick.com/blog/conways-game-of-life-in-javascript-jquery-under-200-lines</id><content type="html" xml:base="https://www.roberthorvick.com/blog/conways-game-of-life-in-javascript-jquery-under-200-lines"><![CDATA[<noscript>
	<style type="text/css">
		#table-of-contents { display:none; }
	</style>
</noscript>

<div id="table-of-contents">
	<div id="toc-header">On this page:</div>
</div>

<p>This began yesterday morning when I started reading <a href="https://leanpub.com/4rulesofsimpledesign/">Understanding the 4 Rules of Simple Design</a> by <a href="https://twitter.com/coreyhaines">Corey Haines</a>. On page 9 there is the suggestion to stop and write out your own implementation of <a href="https://en.wikipedia.org/wiki/Conway%27s_Game_of_Life">Conway’s Game of Life</a> so I paused and did that.</p>

<div class="tip" style="
    background-color: #ECF7FF;
    border-left: 6px solid #0065B4;
    padding: 1em 1em 1em 1em;
    display: flex;
    column-gap: 2rem;
    margin: 2em 2em 2em 2em;">
	<p class="tip-bulb" style="
		font-family: 'Font Awesome 5 Free';
	    vertical-align: middle;
	    font-weight: 900;
	    font-size: 3em;
	    color: #ff6f00;">&#xf0eb;</p>
	<p class="tip-content">If you just want to see the final output - you can <a href="/static/life.html" target="_blank">try it here</a> or <a href="https://github.com/bubbafat/bubbafat.github.io/blob/main/static/life.html">view the source</a></p>
</div>

<h2>My Objective</h2>

<p>I have done very little UI-focused work. My only experience with Javascript is working on Node (and that was limited). I have never worked with jQuery. I know next to nothing about CSS. So I thought I’d start working in that realm.</p>

<p>My goals were:</p>

<ul>
  <li>Implement a solution that renders in a web browser</li>
  <li>Retain minimimal state</li>
  <li>Use HTML, Javascript and jQuery - nothing else</li>
  <li>Under 200 lines of code (it’s exactly 200 including comments)</li>
  <li>Have something working in under 2 hours</li>
</ul>

<p>I ultimately met each but backed away from retaining minimal state as part of improving performance.</p>

<h2>My Thought Process</h2>

<p>I believed the following were true:</p>

<ol>
  <li>I could draw a grid dynamically using javascript and CSS</li>
  <li>I could use some state of the cell to track if it was alive or not</li>
  <li>I could access the grid in a (row,column) fashion to check neighbor state</li>
  <li>There must be some mechanism to run events (steps) on a timer</li>
  <li>I could improve performance as needed (it was needed)</li>
</ol>

<p>I didn’t know how to do those things so let’s get to it.</p>

<h2>The Globals</h2>

<p>Heck yeah I used globals. I didn’t know I’d use these all upfront but it’s easier to show them up front since they are sprinkled through the remainder of the code samples.</p>

<div class="language-js highlighter-rouge"><div class="highlight"><pre class="highlight"><code><span class="kd">var</span> <span class="nx">initialFillPercent</span> <span class="o">=</span> <span class="mf">0.25</span><span class="p">;</span>
<span class="kd">var</span> <span class="nx">fps</span> <span class="o">=</span> <span class="mi">10</span><span class="p">;</span>
<span class="kd">var</span> <span class="nx">size</span> <span class="o">=</span> <span class="mi">100</span>

<span class="kd">var</span> <span class="nx">running</span> <span class="o">=</span> <span class="kc">false</span><span class="p">;</span>   <span class="c1">// toggled by the start/pause button</span>
<span class="kd">var</span> <span class="nx">intervalId</span> <span class="o">=</span> <span class="kc">null</span><span class="p">;</span> <span class="c1">// set and cleared by start/pause</span>
<span class="kd">var</span> <span class="nx">stepCount</span> <span class="o">=</span> <span class="mi">0</span><span class="p">;</span>     <span class="c1">// just used to display the step</span>

<span class="c1">// the cells will be in an array where the cell at (row = r, column = c)</span>
<span class="c1">// can be found at items[r * size + c]</span>
<span class="kd">var</span> <span class="nx">items</span> <span class="o">=</span> <span class="p">[];</span>
<span class="kd">var</span> <span class="nx">toKill</span> <span class="o">=</span> <span class="p">[];</span>
<span class="kd">var</span> <span class="nx">toBirth</span> <span class="o">=</span> <span class="p">[];</span>
</code></pre></div></div>

<p>They will be explained below.</p>

<h2>Drawing the Grid</h2>

<p>My goal here was to figure out how to draw a grid that would fit into the viewable portion of the browser window and resize dynamically.</p>

<p>Where I started was just making a 3x3 of divs like:</p>

<div class="language-html highlighter-rouge"><div class="highlight"><pre class="highlight"><code><span class="nt">&lt;div</span> <span class="na">id=</span><span class="s">"board"</span><span class="nt">&gt;</span>
  <span class="nt">&lt;div</span> <span class="na">class=</span><span class="s">"row"</span><span class="nt">&gt;</span>
      <span class="nt">&lt;div</span> <span class="na">class=</span><span class="s">"cell"</span><span class="nt">&gt;&lt;/div&gt;</span>
      <span class="nt">&lt;div</span> <span class="na">class=</span><span class="s">"cell"</span><span class="nt">&gt;&lt;/div&gt;</span>
      <span class="nt">&lt;div</span> <span class="na">class=</span><span class="s">"cell"</span><span class="nt">&gt;&lt;/div&gt;</span>
  <span class="nt">&lt;/div&gt;</span>
  <span class="nt">&lt;div</span> <span class="na">class=</span><span class="s">"row"</span><span class="nt">&gt;</span>
      <span class="nt">&lt;div</span> <span class="na">class=</span><span class="s">"cell"</span><span class="nt">&gt;&lt;/div&gt;</span>
      <span class="nt">&lt;div</span> <span class="na">class=</span><span class="s">"cell"</span><span class="nt">&gt;&lt;/div&gt;</span>
      <span class="nt">&lt;div</span> <span class="na">class=</span><span class="s">"cell"</span><span class="nt">&gt;&lt;/div&gt;</span>
  <span class="nt">&lt;/div&gt;</span>
  <span class="nt">&lt;div</span> <span class="na">class=</span><span class="s">"row"</span><span class="nt">&gt;</span>
      <span class="nt">&lt;div</span> <span class="na">class=</span><span class="s">"cell"</span><span class="nt">&gt;&lt;/div&gt;</span>
      <span class="nt">&lt;div</span> <span class="na">class=</span><span class="s">"cell"</span><span class="nt">&gt;&lt;/div&gt;</span>
      <span class="nt">&lt;div</span> <span class="na">class=</span><span class="s">"cell"</span><span class="nt">&gt;&lt;/div&gt;</span>
  <span class="nt">&lt;/div&gt;</span>
<span class="nt">&lt;/div&gt;</span>
</code></pre></div></div>

<p>Then I played around with it.</p>

<p>I’m going to skip over a lot of steps and show you where I ended up.  There are three pieces to it.</p>

<h3>Grid HTML</h3>

<p>I added a wrapper so that I could use it to constrain the overall size of the grid to ensure it stayed within the visible space of the browser window. The animation isn’t fun to look at if you can only see half of it.</p>

<p>I also added a button that can be clicked to start/pause/continue the game and a span that simple displays the step count.  These aren’t part of the grid but they are part of the overall UI.</p>

<div class="language-html highlighter-rouge"><div class="highlight"><pre class="highlight"><code>  <span class="nt">&lt;div</span> <span class="na">id=</span><span class="s">"wrapper"</span><span class="nt">&gt;</span>
    <span class="nt">&lt;div&gt;</span>
      <span class="nt">&lt;button</span> <span class="na">id=</span><span class="s">"toggle"</span><span class="nt">&gt;</span>Start<span class="nt">&lt;/button&gt;</span>
      <span class="nt">&lt;span</span> <span class="na">id=</span><span class="s">"step"</span><span class="nt">&gt;&lt;/span&gt;</span>
    <span class="nt">&lt;/div&gt;</span>

    <span class="nt">&lt;div</span> <span class="na">id=</span><span class="s">"board"</span><span class="nt">&gt;</span>

    <span class="nt">&lt;/div&gt;</span>
  <span class="nt">&lt;/div&gt;</span>
</code></pre></div></div>

<h3>Grid CSS</h3>

<p>The wrapper uses a width and height of 95vmin (95% of viewport minimum) to ensure that the entire grid will be visible (leaving room for button/step prompt). I learned this technique from a <a href="https://stackoverflow.com/questions/60391447/css-fit-a-div-inside-viewport-while-keeping-aspect-ratio">StackOverflow post</a>.</p>

<p>There is one bit of styling (grid-template-columns) which will be set dynamically but I’ve shown it here so that it makes sense. The 100 is because there will be 100 columns per row and each cell will be 1fr (fractional unit) in width. It is the size (100) that is set dynamically based on the size of the grid.</p>

<p>The board’s display mode is grid.</p>

<p>The cells are 1fr in size (see the note about grid-template-columns) and have some coloring applied and the cell:after is used to ensure they are squares.  I learned this trick from <a href="https://www.linkedin.com/in/bkilpat/">Bobby Kilpatrick’s</a> post <a href="https://spin.atomicobject.com/2015/07/14/css-responsive-square/">How to Create a Responsive Square with CSS</a>. And I decided that when cells are “live” they would have the .live class and be dark red.  Overall, pretty straight forward</p>

<div class="language-css highlighter-rouge"><div class="highlight"><pre class="highlight"><code><span class="nf">#wrapper</span> <span class="p">{</span>
  <span class="nl">width</span><span class="p">:</span> <span class="m">95vmin</span><span class="p">;</span>
  <span class="nl">height</span><span class="p">:</span> <span class="m">95</span><span class="n">vim</span><span class="p">;</span>
  <span class="nl">margin</span><span class="p">:</span> <span class="nb">auto</span><span class="p">;</span>
<span class="p">}</span>

  <span class="nf">#board</span> <span class="p">{</span>
    <span class="nl">display</span><span class="p">:</span> <span class="n">grid</span><span class="p">;</span>
    <span class="py">grid-template-columns</span><span class="p">:</span> <span class="nb">repeat</span><span class="p">(</span><span class="m">100</span><span class="p">,</span> <span class="m">1</span><span class="n">fr</span><span class="p">);</span> <span class="c">/* added dynamically */</span>
<span class="p">}</span>

<span class="nc">.cell</span> <span class="p">{</span>
    <span class="nl">background-color</span><span class="p">:</span> <span class="n">rgba</span><span class="p">(</span><span class="m">255</span><span class="p">,</span> <span class="m">255</span><span class="p">,</span> <span class="m">255</span><span class="p">,</span> <span class="m">0.8</span><span class="p">);</span>
    <span class="nl">border</span><span class="p">:</span> <span class="m">1px</span> <span class="nb">solid</span><span class="p">;</span>
    <span class="nl">width</span><span class="p">:</span> <span class="m">1</span><span class="n">fr</span><span class="p">;</span>
<span class="p">}</span>

<span class="nc">.cell</span><span class="nd">:after</span> <span class="p">{</span>
  <span class="nl">content</span><span class="p">:</span>  <span class="s1">""</span><span class="p">;</span>
  <span class="nl">display</span><span class="p">:</span>  <span class="nb">block</span><span class="p">;</span>
  <span class="nl">padding-bottom</span><span class="p">:</span> <span class="m">100%</span><span class="p">;</span>
<span class="p">}</span>

<span class="nc">.cell.live</span> <span class="p">{</span>
  <span class="nl">background-color</span><span class="p">:</span> <span class="no">darkred</span><span class="p">;</span>
<span class="p">}</span>
</code></pre></div></div>

<h3>Generating the Table (Javascript)</h3>

<p>This is my fourth iteration of this approach.</p>

<p>First I had a structure like this.</p>

<div class="language-html highlighter-rouge"><div class="highlight"><pre class="highlight"><code><span class="nt">&lt;div</span> <span class="na">id=</span><span class="s">"board"</span><span class="nt">&gt;</span>
  <span class="nt">&lt;div</span> <span class="na">class=</span><span class="s">"row"</span> <span class="na">id=</span><span class="s">'r-1'</span><span class="nt">&gt;</span>
      <span class="nt">&lt;div</span> <span class="na">class=</span><span class="s">"cell"</span> <span class="na">id=</span><span class="s">'c-1'</span><span class="nt">&gt;&lt;/div&gt;</span>
      <span class="nt">&lt;div</span> <span class="na">class=</span><span class="s">"cell"</span> <span class="na">id=</span><span class="s">'c-2'</span><span class="nt">&gt;&lt;/div&gt;</span>
      <span class="nt">&lt;div</span> <span class="na">class=</span><span class="s">"cell"</span> <span class="na">id=</span><span class="s">'c-3'</span><span class="nt">&gt;&lt;/div&gt;</span>
  <span class="nt">&lt;/div&gt;</span>
  <span class="nt">&lt;div</span> <span class="na">class=</span><span class="s">"row"</span> <span class="na">id=</span><span class="s">'r-2'</span><span class="nt">&gt;</span>
      <span class="nt">&lt;div</span> <span class="na">class=</span><span class="s">"cell"</span> <span class="na">id=</span><span class="s">'c-1'</span><span class="nt">&gt;&lt;/div&gt;</span>
      <span class="nt">&lt;div</span> <span class="na">class=</span><span class="s">"cell"</span> <span class="na">id=</span><span class="s">'c-2'</span><span class="nt">&gt;&lt;/div&gt;</span>
      <span class="nt">&lt;div</span> <span class="na">class=</span><span class="s">"cell"</span> <span class="na">id=</span><span class="s">'c-3'</span><span class="nt">&gt;&lt;/div&gt;</span>
  <span class="nt">&lt;/div&gt;</span>
  ...
<span class="nt">&lt;/div&gt;</span>
</code></pre></div></div>

<p>I would use multiple jQuery selectors to first find the row div and then I would find it’s child.</p>

<p>Then I simplified to this:</p>

<div class="language-html highlighter-rouge"><div class="highlight"><pre class="highlight"><code><span class="nt">&lt;div</span> <span class="na">id=</span><span class="s">"board"</span><span class="nt">&gt;</span>
  <span class="nt">&lt;div</span> <span class="na">class=</span><span class="s">"row"</span> <span class="na">id=</span><span class="s">'r-1'</span><span class="nt">&gt;</span>
      <span class="nt">&lt;div</span> <span class="na">class=</span><span class="s">"cell"</span> <span class="na">id=</span><span class="s">'r-1c-1'</span><span class="nt">&gt;&lt;/div&gt;</span>
      <span class="nt">&lt;div</span> <span class="na">class=</span><span class="s">"cell"</span> <span class="na">id=</span><span class="s">'r-1c-2'</span><span class="nt">&gt;&lt;/div&gt;</span>
      <span class="nt">&lt;div</span> <span class="na">class=</span><span class="s">"cell"</span> <span class="na">id=</span><span class="s">'r-1c-3'</span><span class="nt">&gt;&lt;/div&gt;</span>
  <span class="nt">&lt;/div&gt;</span>
  <span class="nt">&lt;div</span> <span class="na">class=</span><span class="s">"row"</span> <span class="na">id=</span><span class="s">'r-2'</span><span class="nt">&gt;</span>
      <span class="nt">&lt;div</span> <span class="na">class=</span><span class="s">"cell"</span> <span class="na">id=</span><span class="s">'r-2c-1'</span><span class="nt">&gt;&lt;/div&gt;</span>
      <span class="nt">&lt;div</span> <span class="na">class=</span><span class="s">"cell"</span> <span class="na">id=</span><span class="s">'r-2c-2'</span><span class="nt">&gt;&lt;/div&gt;</span>
      <span class="nt">&lt;div</span> <span class="na">class=</span><span class="s">"cell"</span> <span class="na">id=</span><span class="s">'r-2c-3'</span><span class="nt">&gt;&lt;/div&gt;</span>
  <span class="nt">&lt;/div&gt;</span>
  ...
<span class="nt">&lt;/div&gt;</span>
</code></pre></div></div>

<p>With this approach I could jump straight to the specific cell I needed by ID.</p>

<p>Then I went to this:</p>

<div class="language-html highlighter-rouge"><div class="highlight"><pre class="highlight"><code><span class="nt">&lt;div</span> <span class="na">id=</span><span class="s">"board"</span><span class="nt">&gt;</span>
    <span class="nt">&lt;div</span> <span class="na">class=</span><span class="s">"cell"</span> <span class="na">id=</span><span class="s">'r-1c-1'</span><span class="nt">&gt;&lt;/div&gt;</span>
    <span class="nt">&lt;div</span> <span class="na">class=</span><span class="s">"cell"</span> <span class="na">id=</span><span class="s">'r-1c-2'</span><span class="nt">&gt;&lt;/div&gt;</span>
    <span class="nt">&lt;div</span> <span class="na">class=</span><span class="s">"cell"</span> <span class="na">id=</span><span class="s">'r-1c-3'</span><span class="nt">&gt;&lt;/div&gt;</span>
    <span class="nt">&lt;div</span> <span class="na">class=</span><span class="s">"cell"</span> <span class="na">id=</span><span class="s">'r-2c-1'</span><span class="nt">&gt;&lt;/div&gt;</span>
    <span class="nt">&lt;div</span> <span class="na">class=</span><span class="s">"cell"</span> <span class="na">id=</span><span class="s">'r-2c-2'</span><span class="nt">&gt;&lt;/div&gt;</span>
    <span class="nt">&lt;div</span> <span class="na">class=</span><span class="s">"cell"</span> <span class="na">id=</span><span class="s">'r-2c-3'</span><span class="nt">&gt;&lt;/div&gt;</span>
  ...
<span class="nt">&lt;/div&gt;</span>
</code></pre></div></div>

<p>And this was good but still relied on using jQuery selectors. This was part of me trying to retain minimal state but it came at the cost of performance. When I profiled it running for a few seconds it spent almost all of it’s time in hasClass - so I figured it was worth replacing that with something a little more primitive.</p>

<p>Ultimately I created an array of cells named <code class="language-plaintext highlighter-rouge">items</code> (see below) which I populated when I created the cells.  The first cell (row 0, column 0) was in index 0, the last (e.g., row 100, column 100) was the last index. And any cell could be found like:</p>

<p><code class="language-plaintext highlighter-rouge">var cell = items[row * size + column];</code></p>

<p>A few notes:</p>

<ol>
  <li>the variable <code class="language-plaintext highlighter-rouge">size</code> is the number of rows/columns (it’s a square so 100 would be 100x100).</li>
  <li>markDead (shown below) marks each new cell as dead. Since I need to show markDead, I also have markAlive, and isAlive shown below. The <code class="language-plaintext highlighter-rouge">live</code> class is still used for formatting.</li>
</ol>

<div class="language-js highlighter-rouge"><div class="highlight"><pre class="highlight"><code><span class="nf">$</span><span class="p">(</span><span class="nb">document</span><span class="p">).</span><span class="nf">ready</span><span class="p">(</span><span class="nf">function </span><span class="p">()</span> <span class="p">{</span>
  <span class="nf">createEmptyGrid</span><span class="p">();</span>
<span class="p">});</span>

<span class="kd">function</span> <span class="nf">createEmptyGrid</span><span class="p">()</span> <span class="p">{</span>
  <span class="k">for</span><span class="p">(</span><span class="kd">var</span> <span class="nx">i</span> <span class="o">=</span> <span class="mi">0</span><span class="p">;</span> <span class="nx">i</span> <span class="o">&lt;</span> <span class="nx">size</span> <span class="o">*</span> <span class="nx">size</span><span class="p">;</span> <span class="nx">i</span><span class="o">++</span><span class="p">)</span> <span class="p">{</span>
    <span class="kd">var</span> <span class="nx">$cell</span> <span class="o">=</span> <span class="nf">$</span><span class="p">(</span><span class="dl">"</span><span class="s2">&lt;div /&gt;</span><span class="dl">"</span><span class="p">,</span> <span class="p">{</span> <span class="na">class</span><span class="p">:</span> <span class="dl">'</span><span class="s1">cell</span><span class="dl">'</span><span class="p">});</span>
    <span class="nx">items</span><span class="p">.</span><span class="nf">push</span><span class="p">(</span><span class="nx">$cell</span><span class="p">);</span>
    <span class="nf">markDead</span><span class="p">(</span><span class="nx">$cell</span><span class="p">);</span>
    <span class="nf">$</span><span class="p">(</span><span class="dl">"</span><span class="s2">#board</span><span class="dl">"</span><span class="p">).</span><span class="nf">append</span><span class="p">(</span><span class="nx">$cell</span><span class="p">);</span>
  <span class="p">}</span>

    <span class="c1">// sets the css to ensure make our grid a square</span>
    <span class="nf">$</span><span class="p">(</span><span class="dl">"</span><span class="s2">#board</span><span class="dl">"</span><span class="p">).</span><span class="nf">css</span><span class="p">(</span><span class="dl">"</span><span class="s2">grid-template-columns</span><span class="dl">"</span><span class="p">,</span> <span class="dl">"</span><span class="s2">repeat(</span><span class="dl">"</span> <span class="o">+</span> <span class="nx">size</span> <span class="o">+</span> <span class="dl">"</span><span class="s2">, 1fr)</span><span class="dl">"</span><span class="p">);</span>
<span class="p">}</span>

<span class="kd">function</span> <span class="nf">isAlive</span><span class="p">(</span><span class="nx">$cell</span><span class="p">)</span> <span class="p">{</span>
  <span class="k">return</span> <span class="nx">$cell</span><span class="p">.</span><span class="nx">alive</span> <span class="o">==</span> <span class="mi">1</span><span class="p">;</span>
<span class="p">}</span>

<span class="kd">function</span> <span class="nf">markAlive</span><span class="p">(</span><span class="nx">$cell</span><span class="p">)</span> <span class="p">{</span>
  <span class="nx">$cell</span><span class="p">.</span><span class="nf">addClass</span><span class="p">(</span><span class="dl">'</span><span class="s1">live</span><span class="dl">'</span><span class="p">);</span>
  <span class="nx">$cell</span><span class="p">.</span><span class="nx">alive</span> <span class="o">=</span> <span class="mi">1</span><span class="p">;</span>
<span class="p">}</span>

<span class="kd">function</span> <span class="nf">markDead</span><span class="p">(</span><span class="nx">$cell</span><span class="p">)</span> <span class="p">{</span>
  <span class="nx">$cell</span><span class="p">.</span><span class="nf">removeClass</span><span class="p">(</span><span class="dl">'</span><span class="s1">live</span><span class="dl">'</span><span class="p">);</span>
  <span class="nx">$cell</span><span class="p">.</span><span class="nx">alive</span> <span class="o">=</span> <span class="mi">0</span><span class="p">;</span>  
<span class="p">}</span>
</code></pre></div></div>

<p>With that done - we know have a 100x100 grid (the size can be changed via the <code class="language-plaintext highlighter-rouge">size</code> variable) which looks like this:</p>

<p><img src="/images/post/2022-03-30/empty-board.webp" alt="100x100 empty grid" /></p>

<h2>The Game Loop</h2>

<p>With the board working it was time to build the game.</p>

<h3>Step 1: Initial Population</h3>

<p>To populate the board I determine the initial fill percentage (e.g., 25% of the cells should be marked alive) and then for each cell that should be alive I pick a random cell and mark it as alive (set the ‘live’ class and set the alive property to 1).</p>

<div class="language-js highlighter-rouge"><div class="highlight"><pre class="highlight"><code><span class="kd">function</span> <span class="nf">populateRandom</span><span class="p">()</span> <span class="p">{</span>
  <span class="k">for</span><span class="p">(</span><span class="kd">var</span> <span class="nx">i</span> <span class="o">=</span> <span class="mi">0</span><span class="p">;</span> <span class="nx">i</span> <span class="o">&lt;</span> <span class="p">(</span><span class="nx">size</span> <span class="o">*</span> <span class="nx">size</span><span class="p">)</span> <span class="o">*</span> <span class="nx">initialFillPercent</span><span class="p">;</span> <span class="nx">i</span><span class="o">++</span><span class="p">)</span> <span class="p">{</span>
    <span class="nf">markAlive</span><span class="p">(</span><span class="nf">randomCell</span><span class="p">());</span>
  <span class="p">}</span>
<span class="p">}</span>

<span class="kd">function</span> <span class="nf">randomInt</span><span class="p">(</span><span class="nx">max</span><span class="p">)</span> <span class="p">{</span>
  <span class="k">return</span> <span class="nb">Math</span><span class="p">.</span><span class="nf">floor</span><span class="p">(</span><span class="nb">Math</span><span class="p">.</span><span class="nf">random</span><span class="p">()</span> <span class="o">*</span> <span class="nx">max</span><span class="p">);</span>
<span class="p">}</span>

<span class="kd">function</span> <span class="nf">cellAt</span><span class="p">(</span><span class="nx">row</span><span class="p">,</span> <span class="nx">column</span><span class="p">)</span> <span class="p">{</span>
  <span class="k">return</span> <span class="nx">items</span><span class="p">[</span><span class="nx">row</span> <span class="o">*</span> <span class="nx">size</span> <span class="o">+</span> <span class="nx">column</span><span class="p">];</span>
<span class="p">}</span>

<span class="kd">function</span> <span class="nf">randomCell</span><span class="p">()</span> <span class="p">{</span>
  <span class="k">return</span> <span class="nf">cellAt</span><span class="p">(</span><span class="nf">randomInt</span><span class="p">(</span><span class="nx">size</span><span class="p">),</span> <span class="nf">randomInt</span><span class="p">(</span><span class="nx">size</span><span class="p">));</span>
<span class="p">}</span>
</code></pre></div></div>

<p>This method is called from the document.ready callback and gives us an initial board like this:</p>

<p><img src="/images/post/2022-03-30/populated-board.webp" alt="Randomly populated board" /></p>

<h3>Step 2: Starting the Game (Clicking Start)</h3>

<p>To get this finally going I needed to add a button handler to the document.ready method so that when the Start button is clicked the game starts.  It now looks like:</p>

<div class="language-js highlighter-rouge"><div class="highlight"><pre class="highlight"><code><span class="nf">$</span><span class="p">(</span><span class="nb">document</span><span class="p">).</span><span class="nf">ready</span><span class="p">(</span><span class="nf">function </span><span class="p">()</span> <span class="p">{</span>

  <span class="nf">createEmptyGrid</span><span class="p">();</span>

  <span class="nf">populateRandom</span><span class="p">();</span>

  <span class="nf">$</span><span class="p">(</span><span class="dl">"</span><span class="s2">#toggle</span><span class="dl">"</span><span class="p">).</span><span class="nf">click</span><span class="p">(</span><span class="kd">function</span><span class="p">()</span> <span class="p">{</span>
    <span class="k">if</span><span class="p">(</span><span class="o">!</span><span class="nx">running</span><span class="p">)</span> <span class="p">{</span>
      <span class="nf">start</span><span class="p">();</span>
    <span class="p">}</span> <span class="k">else</span> <span class="p">{</span>
      <span class="nf">pause</span><span class="p">();</span>
    <span class="p">}</span>
  <span class="p">});</span>
<span class="p">});</span>
</code></pre></div></div>

<p>The button toggles between “Start”, “Pause”, and “Continue” depending on the running state.  The start and pause functions are:</p>

<div class="language-js highlighter-rouge"><div class="highlight"><pre class="highlight"><code><span class="kd">function</span> <span class="nf">start</span><span class="p">()</span> <span class="p">{</span>
  <span class="nx">intervalId</span> <span class="o">=</span> <span class="nf">setInterval</span><span class="p">(</span><span class="kd">function</span><span class="p">()</span> <span class="p">{</span> <span class="nf">step</span><span class="p">();</span> <span class="p">},</span> <span class="mi">1000</span> <span class="o">/</span> <span class="nx">fps</span><span class="p">);</span>
  <span class="nx">running</span> <span class="o">=</span> <span class="kc">true</span><span class="p">;</span>
  <span class="nf">$</span><span class="p">(</span><span class="dl">"</span><span class="s2">#toggle</span><span class="dl">"</span><span class="p">).</span><span class="nf">html</span><span class="p">(</span><span class="dl">"</span><span class="s2">Pause</span><span class="dl">"</span><span class="p">);</span>
<span class="p">}</span>

<span class="kd">function</span> <span class="nf">pause</span><span class="p">()</span> <span class="p">{</span>
  <span class="nf">clearInterval</span><span class="p">(</span><span class="nx">intervalId</span><span class="p">);</span>
  <span class="nx">running</span> <span class="o">=</span> <span class="kc">false</span><span class="p">;</span>
  <span class="nf">$</span><span class="p">(</span><span class="dl">"</span><span class="s2">#toggle</span><span class="dl">"</span><span class="p">).</span><span class="nf">html</span><span class="p">(</span><span class="dl">"</span><span class="s2">Continue</span><span class="dl">"</span><span class="p">);</span>  
<span class="p">}</span>
</code></pre></div></div>

<p>Start creates an interval that runs on a timer (1000 ms / fps = how often to run), sets <code class="language-plaintext highlighter-rouge">running</code> to true, and changes the prompt on the button from “Start” to “Pause”.</p>

<p>Pause clears the interval, sets running to false, and changes the button text to “Continue”.</p>

<h3>Step 3: Running a Step</h3>

<p>The step function is called everytime the interval fires - so let’s look there next:</p>

<div class="language-js highlighter-rouge"><div class="highlight"><pre class="highlight"><code><span class="kd">function</span> <span class="nf">step</span><span class="p">()</span> <span class="p">{</span>
  <span class="nf">applyRules</span><span class="p">();</span>

  <span class="nf">processChanges</span><span class="p">();</span>

  <span class="nf">$</span><span class="p">(</span><span class="dl">"</span><span class="s2">#step</span><span class="dl">"</span><span class="p">).</span><span class="nf">html</span><span class="p">(</span><span class="nx">stepCount</span><span class="o">++</span><span class="p">);</span>
<span class="p">}</span>
</code></pre></div></div>

<p>Step is a two-step process and it needs to be this way to function correctly.</p>

<p>The rules of Conway’s Game of Life require the current cell to live, die, or birth based on the state of neighboring cells so to run you first need to look at each cell and decide if it’s state will change and only once those decisions are made do you apply the changes.  If you applied them while looking a the cell, then that change would affect any future cell you checked.</p>

<h3>Step 4: Applying the Rules</h3>

<p>The rules are pretty simple - look at every cell, figure out how many living neighbors it has, and then decide what to do.  The cell is alive 2 or 3 living neighbors, it lives (otherwise it dies).  If a cell is dead and has exactly 3 neighbors, it will come to life.</p>

<p>This loop does that.  For every row (rows are just a logical concept that make <code class="language-plaintext highlighter-rouge">cellAt</code> easier to implement), and for every column in that row:</p>

<ol>
  <li>Get the current cell</li>
  <li>Count it’s living neighbors</li>
  <li>Apply Conway’s rules</li>
  <li>If the cell will be kill, push it onto the kill queue</li>
  <li>If the cell should be birthed, push it onto the birth queue</li>
</ol>

<p>In a previous iteration of this I used CSS classes to track whether to kill or birth.  I have class=toggle-kill and class=toggle-live.  Then I’d do:</p>

<div class="language-js highlighter-rouge"><div class="highlight"><pre class="highlight"><code><span class="nf">$</span><span class="p">(</span><span class="dl">'</span><span class="s1">.toggle-kill</span><span class="dl">'</span><span class="p">).</span><span class="nf">removeClass</span><span class="p">(</span><span class="dl">'</span><span class="s1">live</span><span class="dl">'</span><span class="p">);</span>
<span class="nf">$</span><span class="p">(</span><span class="dl">'</span><span class="s1">.toggle-kill</span><span class="dl">'</span><span class="p">).</span><span class="nf">removeClass</span><span class="p">(</span><span class="dl">'</span><span class="s1">toggle-kill</span><span class="dl">'</span><span class="p">);</span>
<span class="nf">$</span><span class="p">(</span><span class="dl">'</span><span class="s1">.toggle-live</span><span class="dl">'</span><span class="p">).</span><span class="nf">addClass</span><span class="p">(</span><span class="dl">'</span><span class="s1">live</span><span class="dl">'</span><span class="p">);</span>
<span class="nf">$</span><span class="p">(</span><span class="dl">'</span><span class="s1">.toggle-live</span><span class="dl">'</span><span class="p">).</span><span class="nf">removeClass</span><span class="p">(</span><span class="dl">'</span><span class="s1">toggle-live</span><span class="dl">'</span><span class="p">);</span>
</code></pre></div></div>

<p>And this worked but it was pretty slow. It was limited to about 6FPS at 128x128. I moved instead to kill and birth queues (cell arrays).</p>

<div class="language-js highlighter-rouge"><div class="highlight"><pre class="highlight"><code><span class="kd">function</span> <span class="nf">applyRules</span><span class="p">()</span> <span class="p">{</span>
  <span class="c1">// We need to figure out what cells live, die, or are born</span>
  <span class="c1">// but we don't want to change their state during this loop</span>
  <span class="c1">// as that will impact their neighbors</span>
  <span class="c1">// Add the cell to an array of items to birth and kill</span>
  <span class="c1">// and process them after this (processChanges)</span>
  <span class="k">for</span><span class="p">(</span><span class="kd">var</span> <span class="nx">r</span> <span class="o">=</span> <span class="mi">0</span><span class="p">;</span> <span class="nx">r</span> <span class="o">&lt;</span> <span class="nx">size</span><span class="p">;</span> <span class="nx">r</span><span class="o">++</span><span class="p">)</span> <span class="p">{</span>
    <span class="k">for</span><span class="p">(</span><span class="kd">var</span> <span class="nx">c</span> <span class="o">=</span> <span class="mi">0</span><span class="p">;</span> <span class="nx">c</span> <span class="o">&lt;</span> <span class="nx">size</span><span class="p">;</span> <span class="nx">c</span><span class="o">++</span><span class="p">)</span> <span class="p">{</span>
      <span class="kd">var</span> <span class="nx">$cell</span> <span class="o">=</span> <span class="nf">cellAt</span><span class="p">(</span><span class="nx">r</span><span class="p">,</span> <span class="nx">c</span><span class="p">);</span>
      <span class="kd">var</span> <span class="nx">neighbors</span> <span class="o">=</span> <span class="nf">livingNeighbors</span><span class="p">(</span><span class="nx">r</span><span class="p">,</span> <span class="nx">c</span><span class="p">);</span>

      <span class="k">if</span><span class="p">(</span><span class="nf">isAlive</span><span class="p">(</span><span class="nx">$cell</span><span class="p">))</span> <span class="p">{</span>
        <span class="k">if</span><span class="p">(</span><span class="nx">neighbors</span> <span class="o">&lt;</span> <span class="mi">2</span> <span class="o">||</span> <span class="nx">neighbors</span> <span class="o">&gt;</span> <span class="mi">3</span><span class="p">)</span> <span class="p">{</span>
          <span class="nx">toKill</span><span class="p">.</span><span class="nf">push</span><span class="p">(</span><span class="nx">$cell</span><span class="p">);</span>
        <span class="p">}</span> 
      <span class="p">}</span> <span class="k">else</span> <span class="p">{</span>
        <span class="k">if</span><span class="p">(</span><span class="nx">neighbors</span> <span class="o">==</span> <span class="mi">3</span><span class="p">)</span> <span class="p">{</span>
          <span class="nx">toBirth</span><span class="p">.</span><span class="nf">push</span><span class="p">(</span><span class="nx">$cell</span><span class="p">);</span>
        <span class="p">}</span>
      <span class="p">}</span>
    <span class="p">}</span>
  <span class="p">}</span> 
<span class="p">}</span>
</code></pre></div></div>

<p>cellAt does the calculation into the items array to find the cell by row and column, and livingNeighbors simply looks at each adjacent cell and checks if it is alive or not and returns the sum of living cells.</p>

<div class="language-js highlighter-rouge"><div class="highlight"><pre class="highlight"><code><span class="kd">function</span> <span class="nf">cellAt</span><span class="p">(</span><span class="nx">row</span><span class="p">,</span> <span class="nx">column</span><span class="p">)</span> <span class="p">{</span>
  <span class="k">return</span> <span class="nx">items</span><span class="p">[</span><span class="nx">row</span> <span class="o">*</span> <span class="nx">size</span> <span class="o">+</span> <span class="nx">column</span><span class="p">];</span>
<span class="p">}</span>

<span class="kd">function</span> <span class="nf">livingNeighbors</span><span class="p">(</span><span class="nx">row</span><span class="p">,</span> <span class="nx">column</span><span class="p">)</span> <span class="p">{</span>
  <span class="kd">var</span> <span class="nx">count</span> <span class="o">=</span> <span class="mi">0</span><span class="p">;</span>

  <span class="k">for</span><span class="p">(</span><span class="kd">var</span> <span class="nx">r</span> <span class="o">=</span> <span class="nx">row</span><span class="o">-</span><span class="mi">1</span><span class="p">;</span> <span class="nx">r</span> <span class="o">&lt;=</span> <span class="nx">row</span><span class="o">+</span><span class="mi">1</span><span class="p">;</span> <span class="nx">r</span><span class="o">++</span><span class="p">)</span> <span class="p">{</span>
    <span class="k">for</span><span class="p">(</span><span class="kd">var</span> <span class="nx">c</span> <span class="o">=</span> <span class="nx">column</span> <span class="o">-</span> <span class="mi">1</span><span class="p">;</span> <span class="nx">c</span> <span class="o">&lt;=</span> <span class="nx">column</span><span class="o">+</span><span class="mi">1</span><span class="p">;</span> <span class="nx">c</span><span class="o">++</span><span class="p">)</span> <span class="p">{</span>

      <span class="c1">// skip self</span>
      <span class="k">if</span><span class="p">(</span><span class="nx">r</span> <span class="o">==</span> <span class="nx">row</span> <span class="o">&amp;&amp;</span> <span class="nx">c</span> <span class="o">==</span> <span class="nx">column</span><span class="p">)</span> <span class="k">continue</span><span class="p">;</span>

      <span class="c1">// stay inbounds</span>
      <span class="k">if</span><span class="p">(</span><span class="nx">r</span> <span class="o">&lt;</span> <span class="mi">0</span> <span class="o">||</span> <span class="nx">c</span> <span class="o">&lt;</span> <span class="mi">0</span> <span class="o">||</span> <span class="nx">r</span> <span class="o">&gt;=</span> <span class="nx">size</span> <span class="o">||</span> <span class="nx">c</span> <span class="o">&gt;=</span> <span class="nx">size</span><span class="p">)</span> <span class="k">continue</span><span class="p">;</span>

      <span class="kd">var</span> <span class="nx">$cell</span> <span class="o">=</span> <span class="nf">cellAt</span><span class="p">(</span><span class="nx">r</span><span class="p">,</span> <span class="nx">c</span><span class="p">);</span>

      <span class="k">if</span><span class="p">(</span><span class="nf">isAlive</span><span class="p">(</span><span class="nx">$cell</span><span class="p">))</span> <span class="nx">count</span><span class="o">++</span><span class="p">;</span>
    <span class="p">}</span>
  <span class="p">}</span>

  <span class="k">return</span> <span class="nx">count</span><span class="p">;</span>
<span class="p">}</span>
</code></pre></div></div>

<h3>Step 5: Process Changes</h3>

<p>Now that we’ve queued up the kill and birth queues, we just need to process them.</p>

<div class="language-js highlighter-rouge"><div class="highlight"><pre class="highlight"><code><span class="kd">function</span> <span class="nf">processChanges</span><span class="p">()</span> <span class="p">{</span>

  <span class="nx">toBirth</span><span class="p">.</span><span class="nf">forEach</span><span class="p">(</span><span class="kd">function</span><span class="p">(</span><span class="nx">$cell</span><span class="p">)</span> <span class="p">{</span> <span class="nf">markAlive</span><span class="p">(</span><span class="nx">$cell</span><span class="p">);</span> <span class="p">});</span>
  <span class="nx">toKill</span><span class="p">.</span><span class="nf">forEach</span><span class="p">(</span><span class="kd">function</span><span class="p">(</span><span class="nx">$cell</span><span class="p">)</span> <span class="p">{</span> <span class="nf">markDead</span><span class="p">(</span><span class="nx">$cell</span><span class="p">);</span> <span class="p">});</span>

  <span class="nx">toKill</span> <span class="o">=</span> <span class="p">[];</span>
  <span class="nx">toBirth</span> <span class="o">=</span> <span class="p">[];</span>
<span class="p">}</span>
</code></pre></div></div>

<p>Mark them all appropriately and empty the arrays.</p>

<p>Now you just need to load the page, click start, and watch the show.</p>

<h2>The Show</h2>

<p><img src="/images/post/2022-03-30/conways-life.webp" alt="30 second loop of Conway's Game of Life" /></p>

<p>And you can try it for yourself <a href="/static/life.html" target="_blank">here</a>.</p>]]></content><author><name></name></author><category term="Programming#Web" /><summary type="html"><![CDATA[200 lines of HTML and Javascript]]></summary></entry><entry><title type="html">Creating Animated WebP Files Using img2webp</title><link href="https://www.roberthorvick.com/blog/creating-animated-webp-files-using-img2webp" rel="alternate" type="text/html" title="Creating Animated WebP Files Using img2webp" /><published>2022-03-17T00:00:00+00:00</published><updated>2022-03-17T00:00:00+00:00</updated><id>https://www.roberthorvick.com/blog/creating-animated-webp-files-using-img2webp</id><content type="html" xml:base="https://www.roberthorvick.com/blog/creating-animated-webp-files-using-img2webp"><![CDATA[<noscript>
	<style type="text/css">
		#table-of-contents { display:none; }
	</style>
</noscript>

<div id="table-of-contents">
	<div id="toc-header">On this page:</div>
</div>

<p>I frequently find myself needing to create videos from a series of rendered frames. I have been using ffmpeg to generated mp4’s but it would be nice to be able to create GIF’s - or in this case animated WebP files.  The biggest benefits of this are that I don’t need to rely on an external hosting service for the video and that they can be used anywhere an image is used.</p>

<p>To do this I’ll be using <a href="https://developers.google.com/speed/webp/docs/img2webp">img2webp</a> from the Google WebP image format tools.</p>

<h2>Creating the Animated WebP File</h2>

<p>Say I have a collection of images named in a sortable manner - for example:</p>

<div class="language-plaintext highlighter-rouge"><div class="highlight"><pre class="highlight"><code>frame-001.png    frame-002.png   frame-003.png   ...
...
frame-075.png    frame-076.png   frame-077.png   ...
...
frame-298.png    frame-299.png   frame-300.png
</code></pre></div></div>

<p>In this case I want to create a 10 second video (30 FPS) with the 300 frames listed above.</p>

<div class="tip" style="
    background-color: #ECF7FF;
    border-left: 6px solid #0065B4;
    padding: 1em 1em 1em 1em;
    display: flex;
    column-gap: 2rem;
    margin: 2em 2em 2em 2em;">
	<p class="tip-bulb" style="
		font-family: 'Font Awesome 5 Free';
	    vertical-align: middle;
	    font-weight: 900;
	    font-size: 3em;
	    color: #ff6f00;">&#xf0eb;</p>
	<p class="tip-content">The input files must be lexically sorted for img2web to properly order them. A simple way to do this is using leading zeros.</p>
</div>

<p>The arguments I’ll use are:</p>

<table>
  <thead>
    <tr>
      <th>argument</th>
      <th>value</th>
      <th>meaning</th>
    </tr>
  </thead>
  <tbody>
    <tr>
      <td>-d</td>
      <td>33</td>
      <td>33 ms per frame (1000 / 30)</td>
    </tr>
    <tr>
      <td>-loop</td>
      <td>0</td>
      <td>Loops (0 is continuous)</td>
    </tr>
    <tr>
      <td> </td>
      <td>frame-*</td>
      <td>The file pattern (leading zero matters for sorting)</td>
    </tr>
    <tr>
      <td>-o</td>
      <td>gen100.webp</td>
      <td>Output file name</td>
    </tr>
  </tbody>
</table>

<div class="language-zsh highlighter-rouge"><div class="highlight"><pre class="highlight"><code>img2webp <span class="nt">-d</span> 33 <span class="nt">-loop</span> 0 frame-<span class="k">*</span> <span class="nt">-o</span> gen100.webp
</code></pre></div></div>

<div class="tip" style="
    background-color: #ECF7FF;
    border-left: 6px solid #0065B4;
    padding: 1em 1em 1em 1em;
    display: flex;
    column-gap: 2rem;
    margin: 2em 2em 2em 2em;">
	<p class="tip-bulb" style="
		font-family: 'Font Awesome 5 Free';
	    vertical-align: middle;
	    font-weight: 900;
	    font-size: 3em;
	    color: #ff6f00;">&#xf0eb;</p>
	<p class="tip-content">It is not possible to resize an animated webp file using cwebp. If you want to resize the output you can either resize the inputs before creation or use `webpmux` to extract the individual frames from the animated webp file.</p>
</div>

<p>And the output is an animated WebP image file shown here:</p>

<div class="image-wrap">
  <figure class="image">
    <img style="vertical-align: top;" src="/images/post/gen100.webp" alt="An example animated WebP file" />
    <figcaption style="text-align: center;">
      
        An example animated WebP file
      
    </figcaption>
  </figure>
</div>

<h2>Warning: Performance on iOS is Terrible</h2>

<p>The following video shows the above animated webp playing on an iPhone XR (iOS 15.4) in Brave with the same experience in Safari.  Notice that the performance isn’t just linearly bad - it seems to actually get worse as the image plays.</p>

<iframe src="https://player.vimeo.com/video/689260744?h=9c70f93fab&amp;badge=0&amp;autopause=0&amp;player_id=0&amp;app_id=58479" width="296" height="640" frameborder="0" allow="autoplay; fullscreen; picture-in-picture" allowfullscreen="" title="animated-webp-ios-slowness"></iframe>]]></content><author><name></name></author><category term="Programming#Web" /><summary type="html"><![CDATA[Animating collections of images into the animated webp format]]></summary></entry><entry><title type="html">Dynamically Creating a Table of Contents Using AnchorJS Elements</title><link href="https://www.roberthorvick.com/blog/dynamically-creating-table-of-contents-from-anchorjs-elements" rel="alternate" type="text/html" title="Dynamically Creating a Table of Contents Using AnchorJS Elements" /><published>2022-03-17T00:00:00+00:00</published><updated>2022-03-17T00:00:00+00:00</updated><id>https://www.roberthorvick.com/blog/dynamically-creating-table-of-contents-from-anchorjs-elements</id><content type="html" xml:base="https://www.roberthorvick.com/blog/dynamically-creating-table-of-contents-from-anchorjs-elements"><![CDATA[<noscript>
	<style type="text/css">
		#table-of-contents { display:none; }
	</style>
</noscript>

<div id="table-of-contents">
	<div id="toc-header">On this page:</div>
</div>

<p>When I’m creating blog posts that describe a process I like to use headers to seperate the main steps. I use &lt;h2&gt; for my groups and &lt;h3&gt; for sub-topics. So when I recently began using <a href="https://twitter.com/BryanEBraun">Bryan Braun’s</a> <a href="https://www.bryanbraun.com/anchorjs/">AnchorJS</a> to automatically create linkable anchors, it did not take long for me to want to also add a table of contents based on those anchors.</p>

<h2>Using AnchorJS</h2>

<p>After looking at a few options I landed on <a href="https://www.bryanbraun.com/anchorjs/">AnchorJS</a> because I wanted something simple that “just worked” and did not require any Jekyll plugins.</p>

<p>I wanted to add the AnchorJS reference right at the end of the body section so I opened <code class="language-plaintext highlighter-rouge">_layouts/default.html</code> and <a href="https://github.com/bubbafat/bubbafat.github.io/blob/9ad78db0e23f0691eac0aa949f7f3e7d9534416d/_layouts/default.html#L124">added the following</a> before &lt;/body&gt;</p>

<div class="language-html highlighter-rouge"><div class="highlight"><pre class="highlight"><code><span class="nt">&lt;script </span><span class="na">src=</span><span class="s">"https://cdn.jsdelivr.net/npm/anchor-js/anchor.min.js"</span><span class="nt">&gt;&lt;/script&gt;</span>
</code></pre></div></div>

<p>Next I added a file named <a href="https://github.com/bubbafat/bubbafat.github.io/blob/9ad78db0e23f0691eac0aa949f7f3e7d9534416d/js/anchorjs-toc.js"><code class="language-plaintext highlighter-rouge">js/anchorjs-toc.js</code></a> and I added the following content to is:</p>

<div class="language-js highlighter-rouge"><div class="highlight"><pre class="highlight"><code><span class="nx">anchors</span><span class="p">.</span><span class="nx">options</span><span class="p">.</span><span class="nx">visible</span> <span class="o">=</span> <span class="dl">'</span><span class="s1">always</span><span class="dl">'</span><span class="p">;</span>
<span class="nx">anchors</span><span class="p">.</span><span class="nf">add</span><span class="p">(</span><span class="dl">'</span><span class="s1">h2, h3</span><span class="dl">'</span><span class="p">);</span>
</code></pre></div></div>

<p>And in <a href="https://github.com/bubbafat/bubbafat.github.io/blob/9ad78db0e23f0691eac0aa949f7f3e7d9534416d/_layouts/default.html#L125"><code class="language-plaintext highlighter-rouge">_layouts/default.html</code></a> I added the following immediately after the anchor.min.js included a moment ago.</p>

<div class="language-html highlighter-rouge"><div class="highlight"><pre class="highlight"><code><span class="nt">&lt;script </span><span class="na">src=</span><span class="s">"/js/anchorjs-toc.js"</span><span class="nt">&gt;&lt;/script&gt;</span>
</code></pre></div></div>

<p>I choose these options because I like the look of always-on link icons and I only wanted these on the h2 and h3 headers. The post/page title in the hero area is the h1 header and h4+ are too granular.</p>

<h3>Optional: Disabling Dynamic Content Rendering</h3>

<p>Sometimes the header links would render and sometimes they wouldn’t. I set a breakpoint and found that sometimes the content was rendered already (allowing anchorjs to find the headers) and sometimes it wasn’t (so it couldn’t). Assuming it was some lazy rendering thing, I found the <code class="language-plaintext highlighter-rouge">_data/settings.yml</code> <a href="https://github.com/bubbafat/bubbafat.github.io/blob/9ad78db0e23f0691eac0aa949f7f3e7d9534416d/_data/settings.yml">ajax_loading</a> setting was <code class="language-plaintext highlighter-rouge">true</code> so I changed it to <code class="language-plaintext highlighter-rouge">false</code> and now it was reliably rendering anchor links correctly.</p>

<p>This is likely only relevant to Jekyll and possibly only to the theme I’m using. Just keep it in mind, though, if your links are not rendering consistently.</p>

<h2>Creating the Table of Contents</h2>

<h3>Using JavaScript to Generate the Content</h3>

<p>Now that AnchorJS is installed and working correctly, I followed the <a href="https://jsfiddle.net/bryanbraun/nc6rL9hk/">jsfiddle</a> template that Bryan created as an example. I copied the functions <code class="language-plaintext highlighter-rouge">generatedTableofContents</code> and <code class="language-plaintext highlighter-rouge">addNavItem</code> into the <a href="https://github.com/bubbafat/bubbafat.github.io/blob/9ad78db0e23f0691eac0aa949f7f3e7d9534416d/js/anchorjs-toc.js">js/anchor-toc.js</a> file I created in the previous steps (I did change them slightly - see the note below the code).</p>

<p>I also added a call to <a href="https://github.com/bubbafat/bubbafat.github.io/blob/9ad78db0e23f0691eac0aa949f7f3e7d9534416d/js/anchorjs-toc.js#L3">generateTableOfContents</a>.</p>

<p>The contents of the file are:</p>

<div class="language-js highlighter-rouge"><div class="highlight"><pre class="highlight"><code><span class="nx">anchors</span><span class="p">.</span><span class="nx">options</span><span class="p">.</span><span class="nx">visible</span> <span class="o">=</span> <span class="dl">'</span><span class="s1">always</span><span class="dl">'</span><span class="p">;</span>
<span class="nx">anchors</span><span class="p">.</span><span class="nf">add</span><span class="p">(</span><span class="dl">'</span><span class="s1">h2, h3</span><span class="dl">'</span><span class="p">);</span>
<span class="nf">generateTableOfContents</span><span class="p">(</span><span class="nx">anchors</span><span class="p">.</span><span class="nx">elements</span><span class="p">);</span>

<span class="c1">// External code for generating a simple dynamic Table of Contents</span>
<span class="kd">function</span> <span class="nf">generateTableOfContents</span><span class="p">(</span><span class="nx">els</span><span class="p">)</span> <span class="p">{</span>
  <span class="kd">var</span> <span class="nx">anchoredElText</span><span class="p">,</span>
      <span class="nx">anchoredElHref</span><span class="p">,</span>
      <span class="nx">ul</span> <span class="o">=</span> <span class="nb">document</span><span class="p">.</span><span class="nf">createElement</span><span class="p">(</span><span class="dl">'</span><span class="s1">UL</span><span class="dl">'</span><span class="p">);</span>

  <span class="nb">document</span><span class="p">.</span><span class="nf">getElementById</span><span class="p">(</span><span class="dl">'</span><span class="s1">table-of-contents</span><span class="dl">'</span><span class="p">).</span><span class="nf">appendChild</span><span class="p">(</span><span class="nx">ul</span><span class="p">);</span>

  <span class="k">for </span><span class="p">(</span><span class="kd">var</span> <span class="nx">i</span> <span class="o">=</span> <span class="mi">0</span><span class="p">;</span> <span class="nx">i</span> <span class="o">&lt;</span> <span class="nx">els</span><span class="p">.</span><span class="nx">length</span><span class="p">;</span> <span class="nx">i</span><span class="o">++</span><span class="p">)</span> <span class="p">{</span>
    <span class="nx">anchoredElText</span> <span class="o">=</span> <span class="nx">els</span><span class="p">[</span><span class="nx">i</span><span class="p">].</span><span class="nx">textContent</span><span class="p">;</span>
    <span class="nx">anchoredElHref</span> <span class="o">=</span> <span class="nx">els</span><span class="p">[</span><span class="nx">i</span><span class="p">].</span><span class="nf">querySelector</span><span class="p">(</span><span class="dl">'</span><span class="s1">.anchorjs-link</span><span class="dl">'</span><span class="p">).</span><span class="nf">getAttribute</span><span class="p">(</span><span class="dl">'</span><span class="s1">href</span><span class="dl">'</span><span class="p">);</span>
    <span class="nf">addNavItem</span><span class="p">(</span><span class="nx">ul</span><span class="p">,</span> <span class="nx">anchoredElHref</span><span class="p">,</span> <span class="nx">anchoredElText</span><span class="p">,</span> <span class="dl">'</span><span class="s1">toc-li-</span><span class="dl">'</span><span class="p">.</span><span class="nf">concat</span><span class="p">(</span><span class="nx">els</span><span class="p">[</span><span class="nx">i</span><span class="p">].</span><span class="nx">tagName</span><span class="p">));</span>
  <span class="p">}</span>
<span class="p">}</span>

<span class="kd">function</span> <span class="nf">addNavItem</span><span class="p">(</span><span class="nx">ul</span><span class="p">,</span> <span class="nx">href</span><span class="p">,</span> <span class="nx">text</span><span class="p">,</span> <span class="nx">listClass</span><span class="p">)</span> <span class="p">{</span>
  <span class="kd">var</span> <span class="nx">listItem</span> <span class="o">=</span> <span class="nb">document</span><span class="p">.</span><span class="nf">createElement</span><span class="p">(</span><span class="dl">'</span><span class="s1">LI</span><span class="dl">'</span><span class="p">),</span>
      <span class="nx">anchorItem</span> <span class="o">=</span> <span class="nb">document</span><span class="p">.</span><span class="nf">createElement</span><span class="p">(</span><span class="dl">'</span><span class="s1">A</span><span class="dl">'</span><span class="p">),</span>
      <span class="nx">textNode</span> <span class="o">=</span> <span class="nb">document</span><span class="p">.</span><span class="nf">createTextNode</span><span class="p">(</span><span class="nx">text</span><span class="p">);</span>
      <span class="nx">listItem</span><span class="p">.</span><span class="nx">className</span> <span class="o">=</span> <span class="nx">listClass</span><span class="p">;</span>
  
  <span class="nx">anchorItem</span><span class="p">.</span><span class="nx">href</span> <span class="o">=</span> <span class="nx">href</span><span class="p">;</span>
  <span class="nx">ul</span><span class="p">.</span><span class="nf">appendChild</span><span class="p">(</span><span class="nx">listItem</span><span class="p">);</span>
  <span class="nx">listItem</span><span class="p">.</span><span class="nf">appendChild</span><span class="p">(</span><span class="nx">anchorItem</span><span class="p">);</span>
  <span class="nx">anchorItem</span><span class="p">.</span><span class="nf">appendChild</span><span class="p">(</span><span class="nx">textNode</span><span class="p">);</span>
<span class="p">}</span>
</code></pre></div></div>

<p>Please note that I have made two changes to this file.</p>

<ol>
  <li>I changed <a href="https://github.com/bubbafat/bubbafat.github.io/blob/9ad78db0e23f0691eac0aa949f7f3e7d9534416d/js/anchorjs-toc.js#L16">line 16</a> to pass <code class="language-plaintext highlighter-rouge">'toc-li-'.concat(els[i].tagName)</code> as a fourth parameter to addNavItem. This string will be toc-li-h2 or toc-li-h3 depending on whether we are at an h2 or h3 tag.</li>
  <li>I added <a href="https://github.com/bubbafat/bubbafat.github.io/blob/9ad78db0e23f0691eac0aa949f7f3e7d9534416d/js/anchorjs-toc.js#L24">line 24</a> <code class="language-plaintext highlighter-rouge">listItem.className = listClass;</code> to addNavItem</li>
</ol>

<p>These two changes ensure that the list items for the table of content include different classes for h2 and h3 tags. I’ll be using this information to format them differently.</p>

<h3>Creating the Table of Contents Include</h3>

<p>Knowing I would want a repeatable ToC, I next added <code class="language-plaintext highlighter-rouge">_includes/toc.html</code> which contains the following:</p>

<div class="language-html highlighter-rouge"><div class="highlight"><pre class="highlight"><code><span class="nt">&lt;noscript&gt;</span>
  <span class="nt">&lt;style </span><span class="na">type=</span><span class="s">"text/css"</span><span class="nt">&gt;</span>
    <span class="nf">#table-of-contents</span> <span class="p">{</span> <span class="nl">display</span><span class="p">:</span><span class="nb">none</span><span class="p">;</span> <span class="p">}</span>
  <span class="nt">&lt;/style&gt;</span>
<span class="nt">&lt;/noscript&gt;</span>

<span class="nt">&lt;div</span> <span class="na">id=</span><span class="s">"table-of-contents"</span><span class="nt">&gt;</span>
  <span class="nt">&lt;div</span> <span class="na">id=</span><span class="s">"toc-header"</span><span class="nt">&gt;</span>On this page:<span class="nt">&lt;/div&gt;</span>
<span class="nt">&lt;/div&gt;</span>
</code></pre></div></div>

<div class="tip" style="
    background-color: #ECF7FF;
    border-left: 6px solid #0065B4;
    padding: 1em 1em 1em 1em;
    display: flex;
    column-gap: 2rem;
    margin: 2em 2em 2em 2em;">
	<p class="tip-bulb" style="
		font-family: 'Font Awesome 5 Free';
	    vertical-align: middle;
	    font-weight: 900;
	    font-size: 3em;
	    color: #ff6f00;">&#xf0eb;</p>
	<p class="tip-content">The noscript section hides the ToC div when javascript is disabled - I try to have a reasonable no-js experience.</p>
</div>

<p>And this can be included on <a href="https://github.com/bubbafat/bubbafat.github.io/blob/126832a92b787a757979edbed90804c4ab944417/_posts/2022-03-17-creating-animated-webp-files-using-img2webp.md?plain=1#L11">any page</a> like so:</p>

<div class="language-liquid highlighter-rouge"><div class="highlight"><pre class="highlight"><code>
<span class="cp">{%</span><span class="w"> </span><span class="nt">include</span><span class="w"> </span>toc.html<span class="w"> </span><span class="cp">%}</span>

</code></pre></div></div>

<p>Now when page is rendered, the table of contents display - but they are kind of ugly.</p>

<h2>Formatting the Table of Contents</h2>

<p>To format the table of contents I started with the example <a href="https://www.tipsandtricks-hq.com/simple-table-of-contents-toc-using-pure-html-and-css-code-9217">here</a> and created the file <a href="https://github.com/bubbafat/bubbafat.github.io/blob/9ad78db0e23f0691eac0aa949f7f3e7d9534416d/_sass/_includes/_toc.scss"><code class="language-plaintext highlighter-rouge">_scss/_includes/_toc.sccs</code></a> which included the following:</p>

<div class="language-css highlighter-rouge"><div class="highlight"><pre class="highlight"><code><span class="nf">#table-of-contents</span> <span class="p">{</span>
    <span class="nl">float</span><span class="p">:</span> <span class="nb">right</span><span class="p">;</span>
    <span class="nl">background</span><span class="p">:</span> <span class="m">#f9f9f9</span> <span class="nb">none</span> <span class="nb">repeat</span> <span class="nb">scroll</span> <span class="m">0</span> <span class="m">0</span><span class="p">;</span>
    <span class="nl">border</span><span class="p">:</span> <span class="m">1px</span> <span class="nb">solid</span> <span class="m">#aaa</span><span class="p">;</span>
    <span class="nl">display</span><span class="p">:</span> <span class="n">table</span><span class="p">;</span>
    <span class="nl">margin</span><span class="p">:</span> <span class="m">20px</span> <span class="m">1em</span> <span class="m">1em</span> <span class="m">1em</span><span class="p">;</span>
    <span class="nl">padding</span><span class="p">:</span> <span class="m">10px</span><span class="p">;</span>
    <span class="nl">width</span><span class="p">:</span> <span class="nb">auto</span><span class="p">;</span>
    <span class="nl">max-width</span><span class="p">:</span> <span class="m">35%</span><span class="p">;</span>
<span class="p">}</span>

<span class="nf">#toc-header</span> <span class="p">{</span>
    <span class="nl">font-weight</span><span class="p">:</span> <span class="m">900</span><span class="p">;</span>
    <span class="nl">font-size</span><span class="p">:</span> <span class="m">125%</span><span class="p">;</span>
<span class="p">}</span>

<span class="nf">#table-of-contents</span> <span class="nt">li</span><span class="o">,</span> <span class="nf">#table-of-contents</span> <span class="nt">ul</span><span class="o">,</span> <span class="nf">#table-of-contents</span> <span class="nt">ul</span> <span class="nt">li</span><span class="p">{</span>
    <span class="nl">list-style</span><span class="p">:</span> <span class="nb">outside</span> <span class="nb">none</span> <span class="nb">none</span> <span class="cp">!important</span><span class="p">;</span>
<span class="p">}</span>

<span class="nt">li</span><span class="nc">.toc-li-H2</span> <span class="p">{</span>
    <span class="nl">margin-left</span><span class="p">:</span> <span class="m">1em</span><span class="p">;</span>    
<span class="p">}</span>

<span class="nt">li</span><span class="nc">.toc-li-H3</span> <span class="p">{</span>
    <span class="nl">margin-left</span><span class="p">:</span> <span class="m">2em</span><span class="p">;</span>
    <span class="nl">font-size</span><span class="p">:</span> <span class="m">85%</span><span class="p">;</span>
    <span class="nl">filter</span><span class="p">:</span> <span class="n">brightness</span><span class="p">(</span><span class="m">2.50</span><span class="p">);</span>
<span class="p">}</span>
</code></pre></div></div>

<p>Basically, this creates a box in which the table of contents will exist. It floats that box to the right and applies some margin and padding. Next, I apply some formatting to the “On this page” header.  Finally, I use the li’s class (toc-li-h2 or toc-li-h3) to conditionally format the entries to approximate the look of a hierarchy. The h2’s are slightly larger than the h3’s, the h3’s are slightly more indented, and the h3’s are slightly lighter in color.</p>

<p>I also needed to make sure this file was included when the site was built so I added:</p>

<div class="language-sass highlighter-rouge"><div class="highlight"><pre class="highlight"><code><span class="k">@import</span> <span class="s">"_includes/toc"</span>
</code></pre></div></div>

<p>To <a href="https://github.com/bubbafat/bubbafat.github.io/blob/9ad78db0e23f0691eac0aa949f7f3e7d9534416d/css/style.scss#L139">css/style.scss</a>.</p>

<p>And this pulled it all together into a table of contents that renders the way I preferred.</p>

<div class="image-wrap">
  <figure class="image">
    <img style="vertical-align: top;" src="/images/post/tableofcontents.webp" alt="Screenshot of the table of contents" />
    <figcaption style="text-align: center;">
      
        Screenshot of the table of contents
      
    </figcaption>
  </figure>
</div>]]></content><author><name></name></author><category term="Programming#Web" /><summary type="html"><![CDATA[Integrating AnchorJS and dynamic table of content creation into my Jekyll blog hosted on GitHub pages]]></summary></entry></feed>