This is a moderately technical repair that will void the warranty of your Cricut.
What You'll Need
Note: the following links are affiliate links to the products I actually used (or an inexpensive alternative). You probably already have most of these at your home!
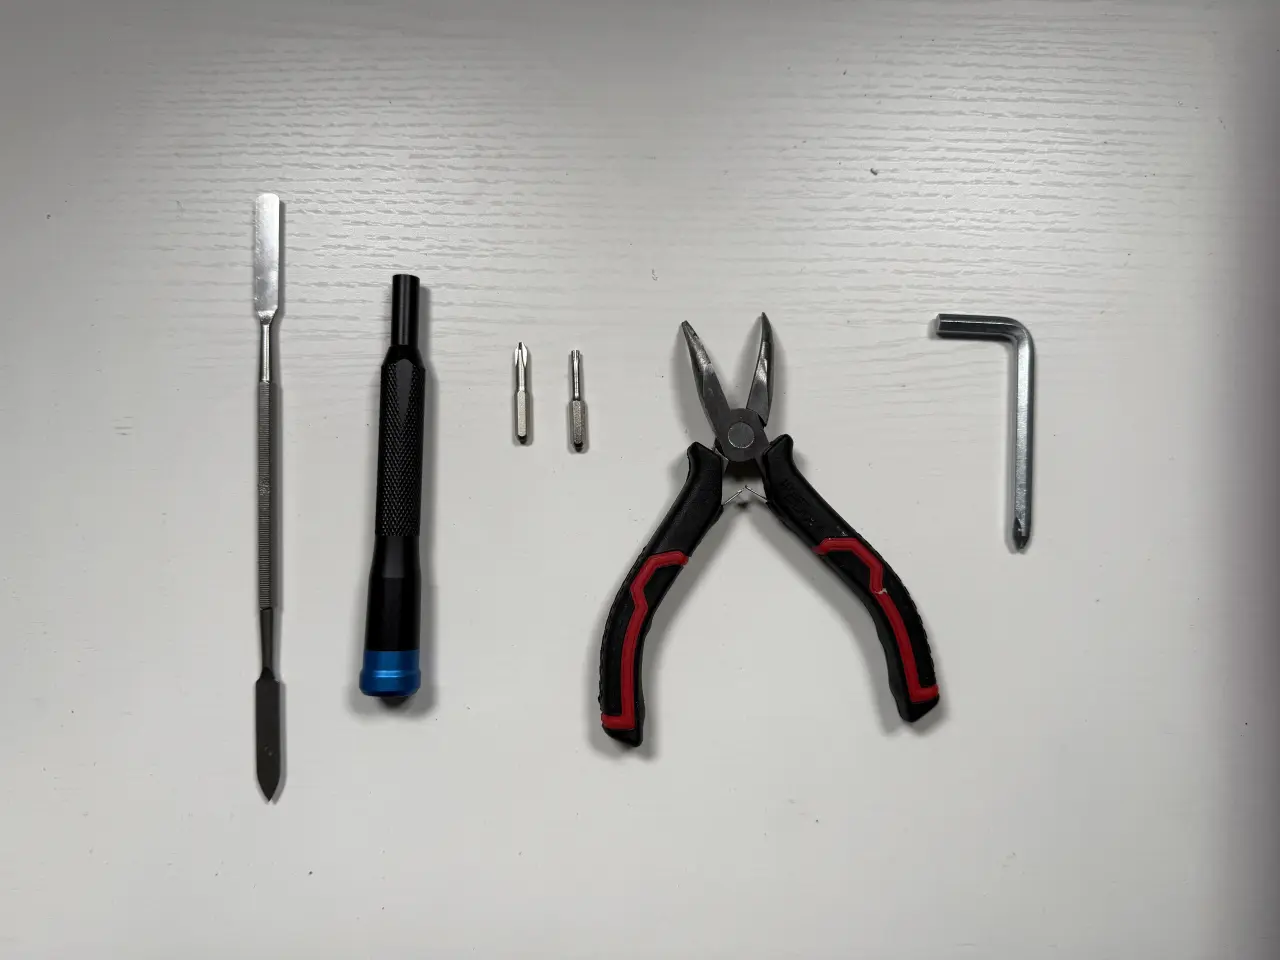
- J1 Phillips-head
- T9 or TR9 Torx Bit
- A jimmy tool
- Needle-nose pliers
- 90-degree or stubby Phillips-head
- Replacement rollers
- A work surface twice the size of the Cricut
- 2+ hours of time
Use screwdrivers with magnetic heads!
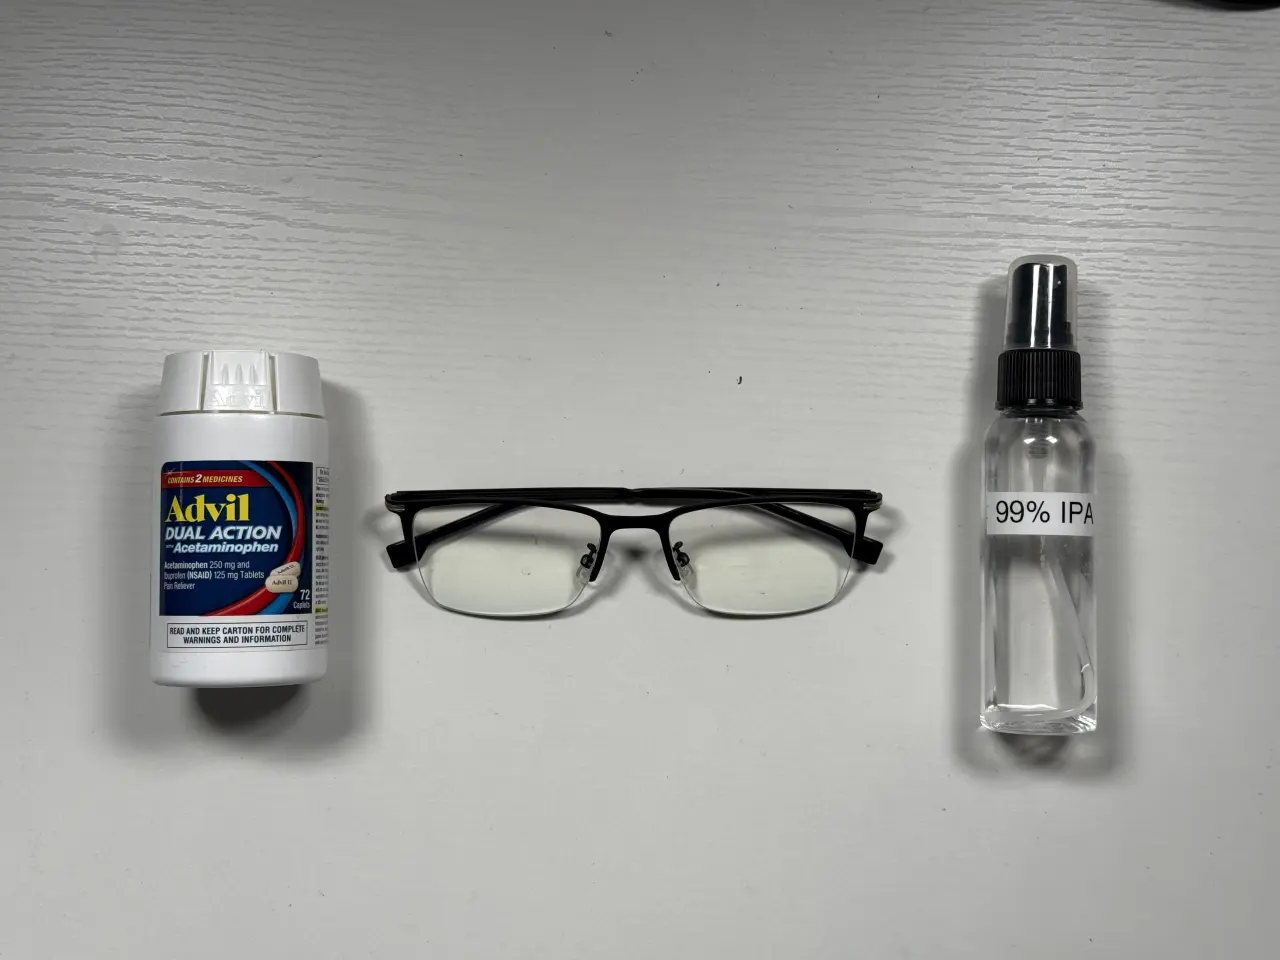
Optionally, it will be helpful to have magnetic screw storage so during the disassembly you can stay organized. You might find some glasses (for magnification and safety), some 90%+ IPA (or another cleaning agent), and something for a headache as well.
Remove The Shell
The Cover
Open the lid and using a jimmy tool (or flat-head screwdriver), pry up the plastic strip
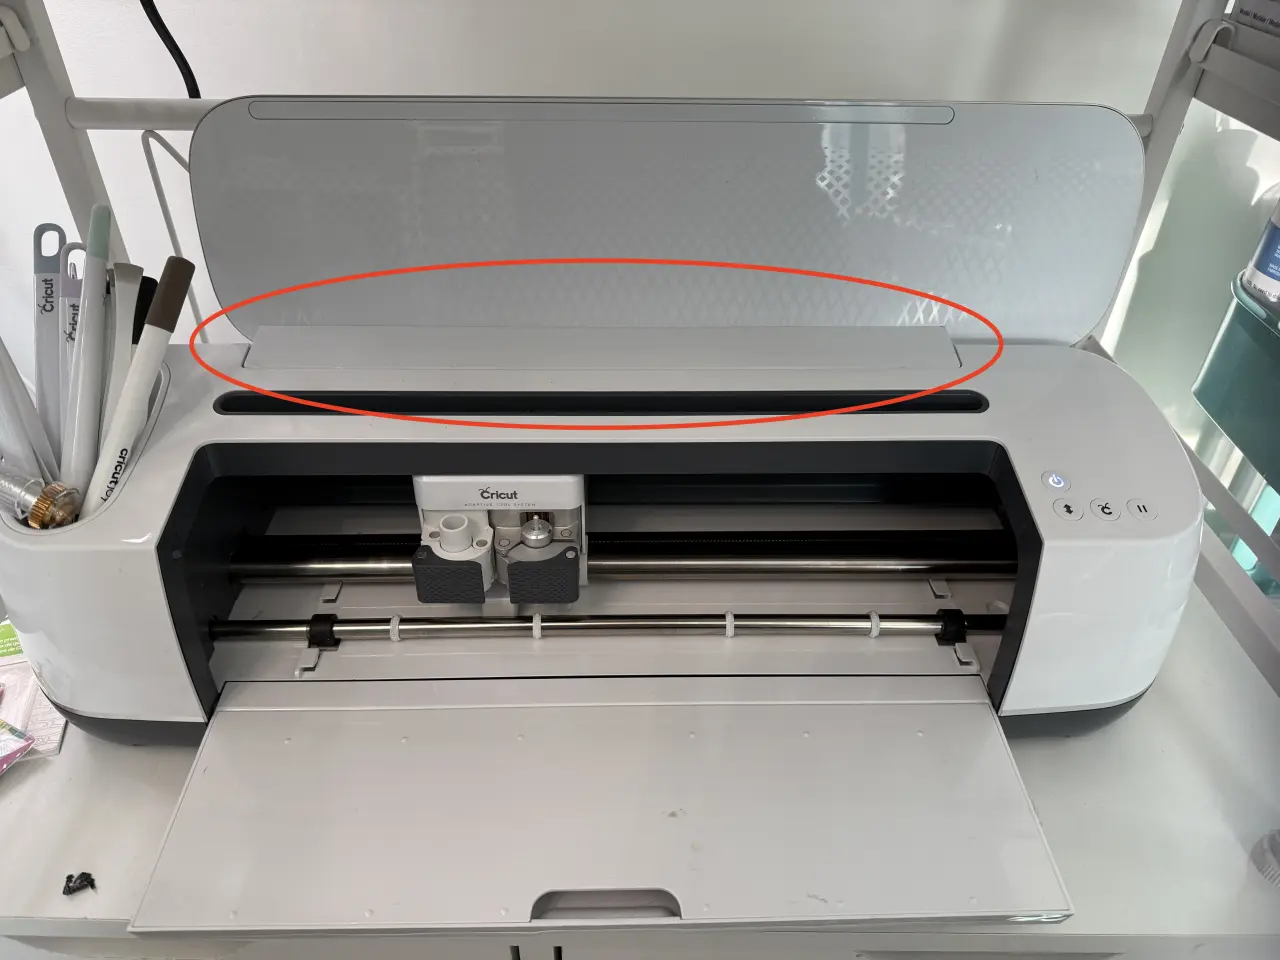
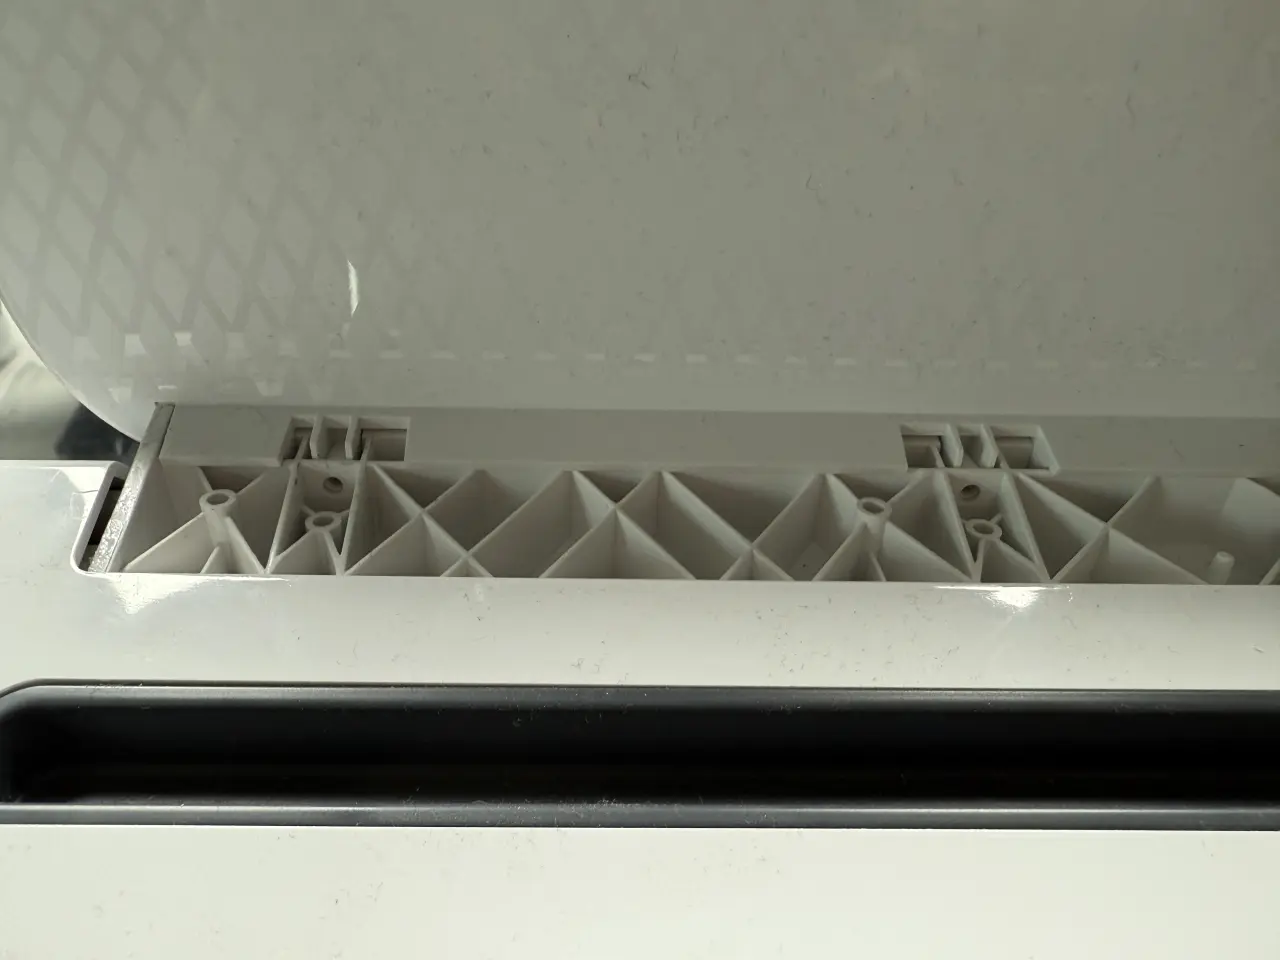
Use the jimmy tool to pry this up. It is held in place by tension and some plastic nubs. Go slow, don’t muscle it or you might break them off.
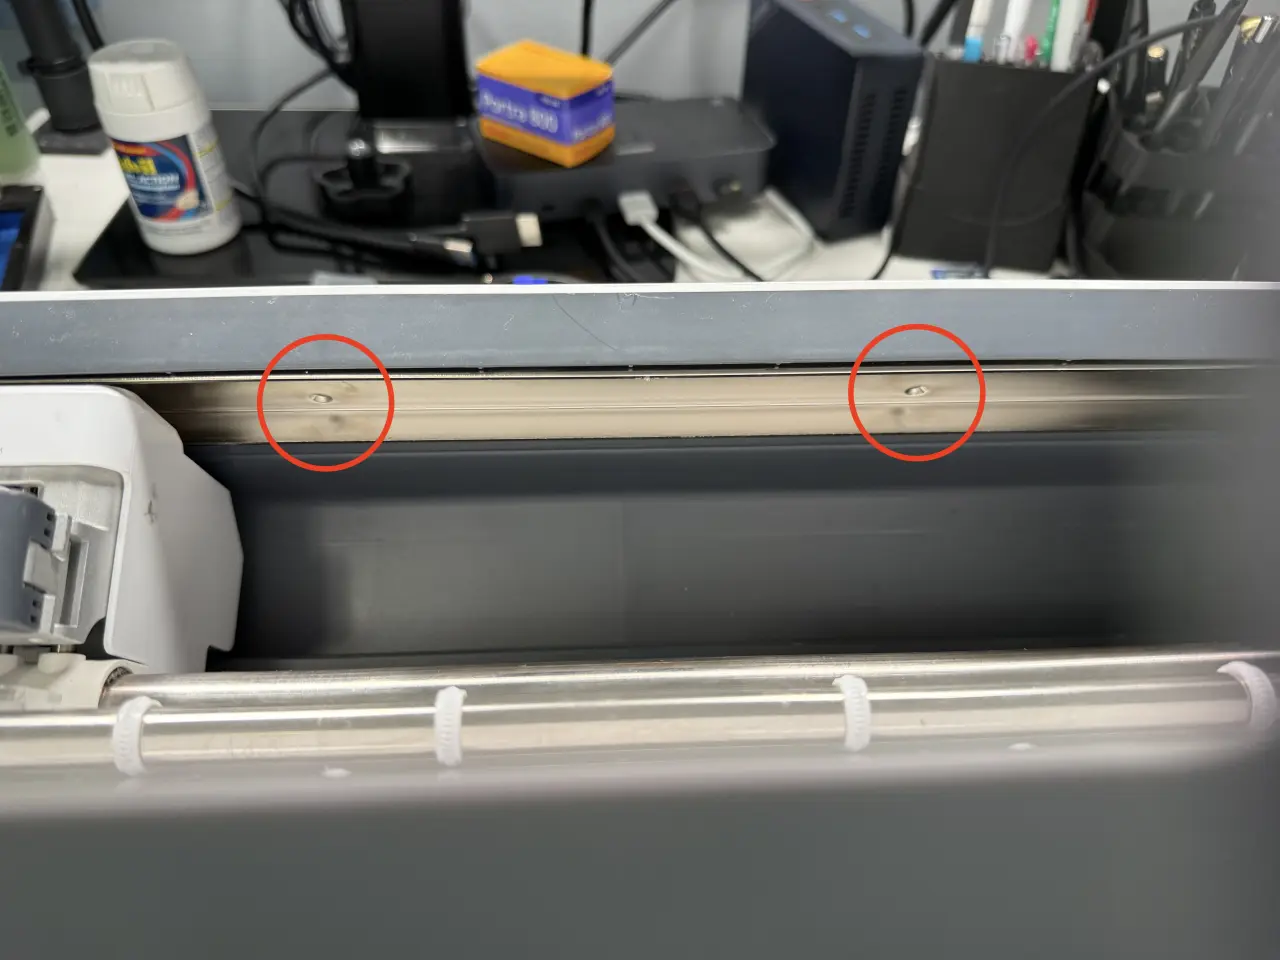
Once you have them off you’ll see four screws with a torx head. These are holding the lid onto the body. Remove them.
With the screws removed the lid will now lift off. It is held in place by those four screws and some alignment tabs. Just carefully lift it up - it will come out easily.
Bottom Screws
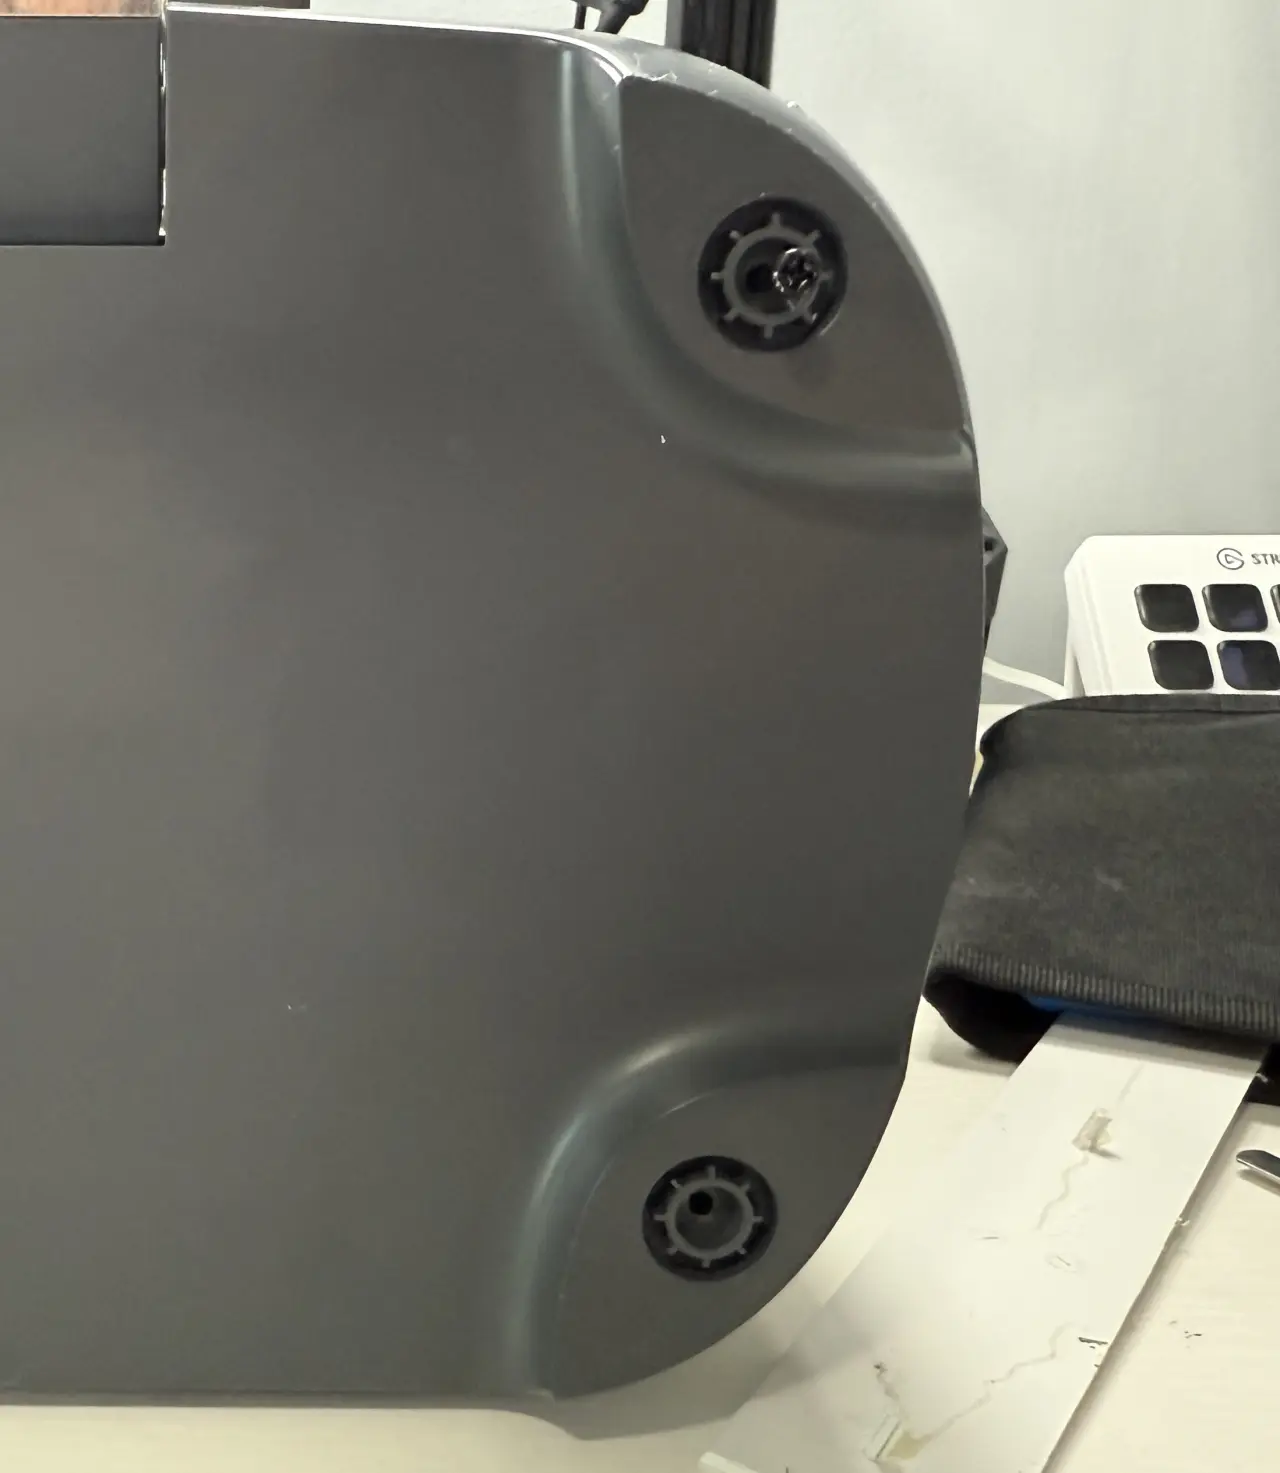
Now we need to remove the 4 bottom screws that are hidden underneath the rubber feet.
Using the jimmy tool (or a screwdriver), gently remove the four feet (they are not glued down - just a tension fit). Under each foot is a Phillips-head screw. Go ahead and remove those.
Do not try to remove the top yet! It’s about to get annoying.
The Interior Screws
There are several more screws that need to be removed - the problem is that they are not visible from the outside. You will need to experiment with whatever angles work best for you (especially if you have large hands). You will need a 90-degree screwdriver or a very small stubby one. A magnetic one will make this much easier (mine was not).
The screws are inside the cutting bay at vaguely the locations shown.
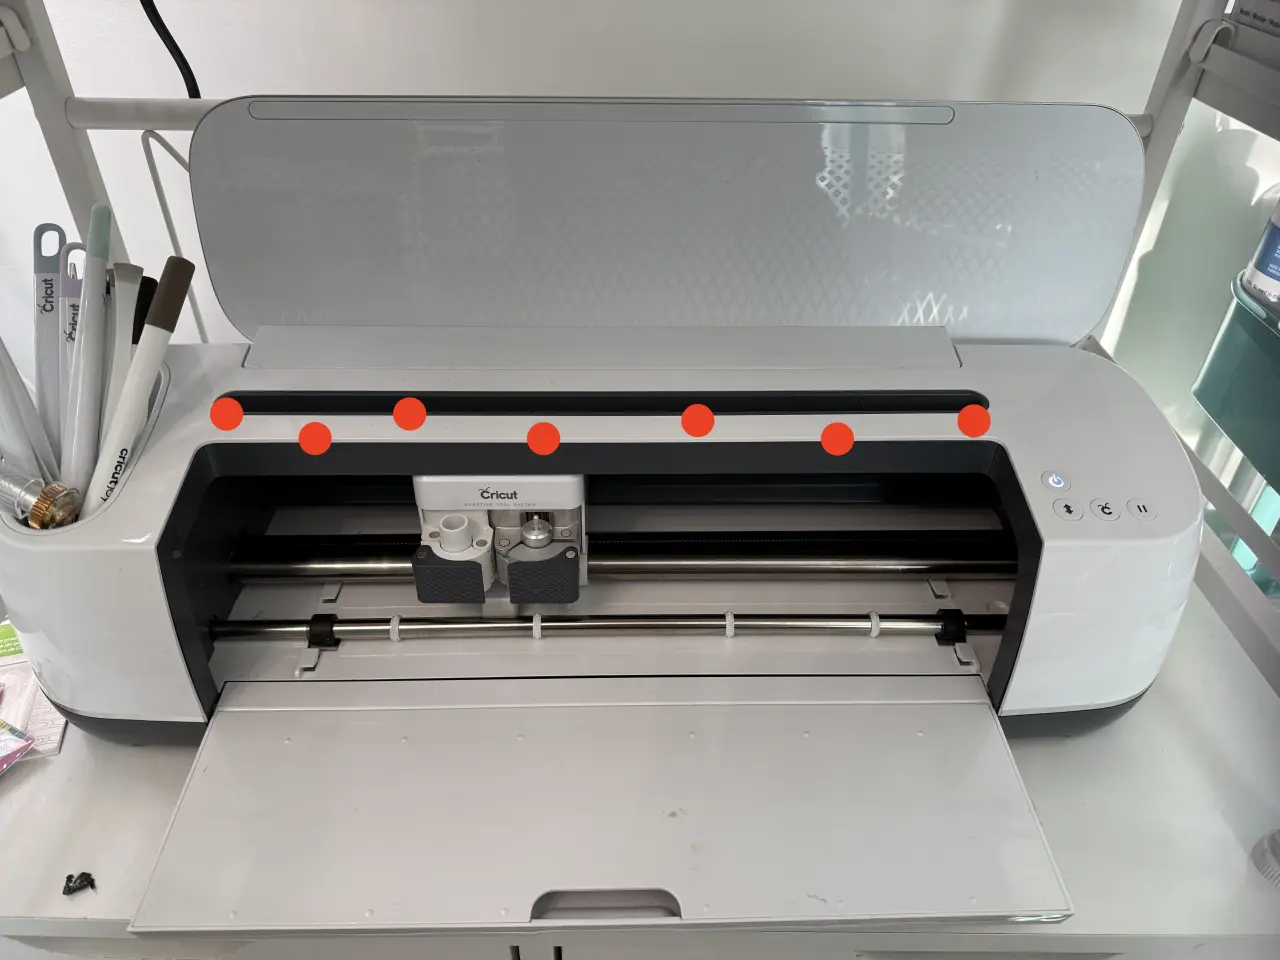
Here are some of them - they are not all easy (or even possible) to see. You might need to use your fingers to find a few and you will need to move the cutting head as it will cover at least once no matter where it is.
Keep that Advil nearby. It's harder getting them back in.
Remove the Lid (SLOWLY!)
When you have all three of these steps done, the white shell will lift off the base but you need to go slow. The buttons on the lid are connected via a ribbon cable to the base - if you yank too hard you might break the cables. There is enough slack that you can lay the lid to the side or behind the unit. You do not need to disconnect any wiring for any part of this repair.
Remove the Bar
With the lid removed it’s time to get the bar out.
Right Side
This might be a good time to put on those glasses - we don't want anything flying into your eyes.
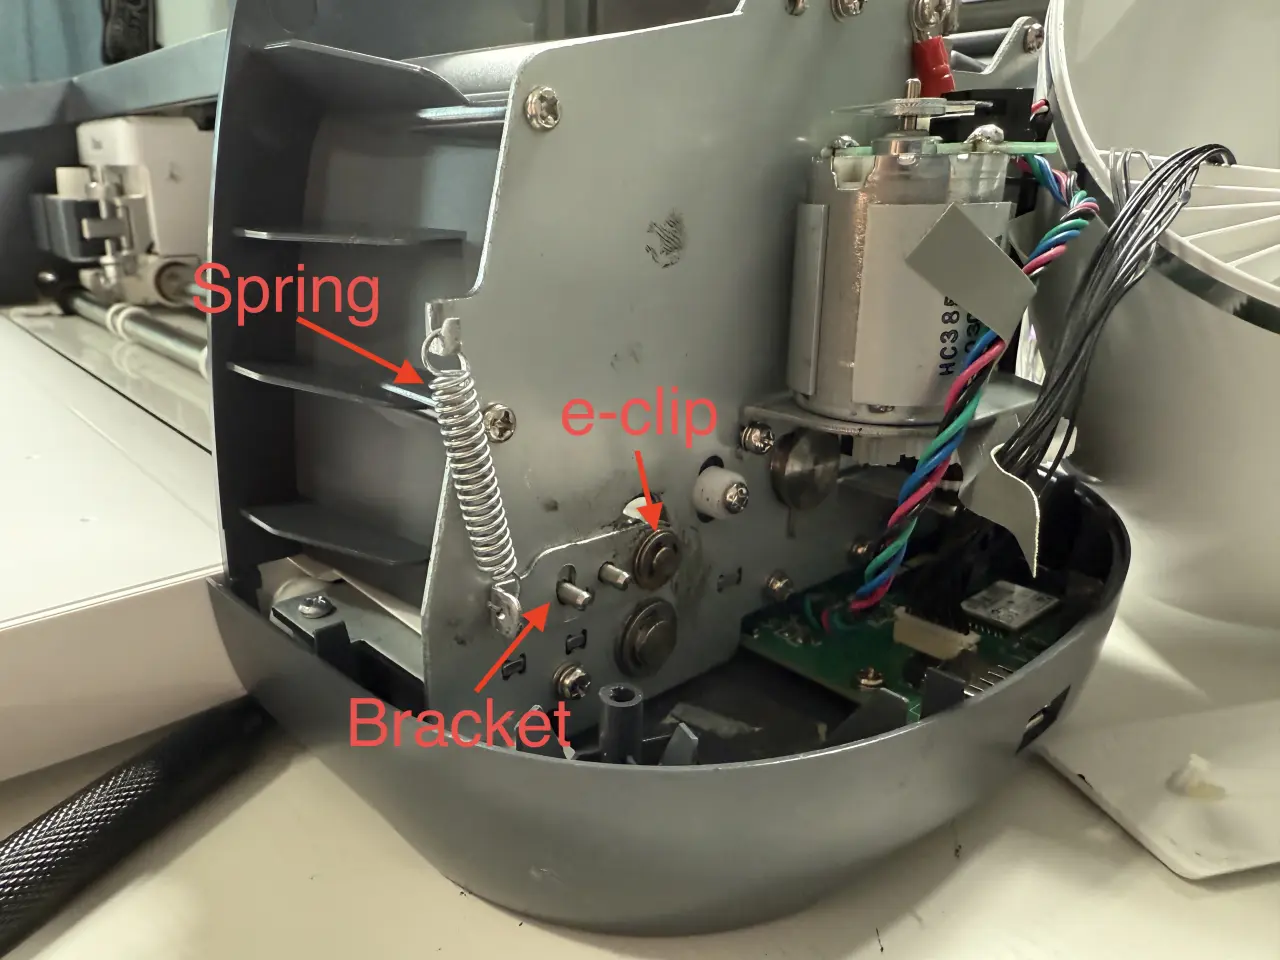
First, use your needle-nose pliers to remove the spring. Grasp it at the top and lift it up to unhook it from the frame. It will take some strength. Just be careful not to let it go flying.
When the spring is removed the bracket can now move up and down a little but you can’t remove it yet. There is an e-clip holding it in place (and a flange behind that - we’ll be taking that off too but it’s easy).
Removing this e-clip can be done pretty easily or it might be really hard. It kind of depends on what tools you have. If you have snap-ring pliers with the right size head maybe you can just get at it in 5 seconds. If you, like me, do not - it might take a little longer.
E-clips have a large opening (this is to get it on and off) and two small holes on the opposite side. What you want to do is get the tip of your needle-nose pliers into one of those small holes and carefully (slowly!) pry it off the bar. It will come easily - you don’t need a lot of force - but it may take several tries.
If you lose the e-clip it is a 3/16” e-clip and you can get them from your local hardware store.
With the clip and spring removed the bracket can now slide off. There is a flange in the bracket - as you take it off just leave it be. It will come out (you want that) but you don’t need to do anything with it (just don’t lose it).
Left Side
OK - now we need to do the same thing on the left side. Now don’t get mad at me - I’m just delivering the message.
The right side was the easy-mode version of what we’re about to do. But it’s OK - we’ll get there :)
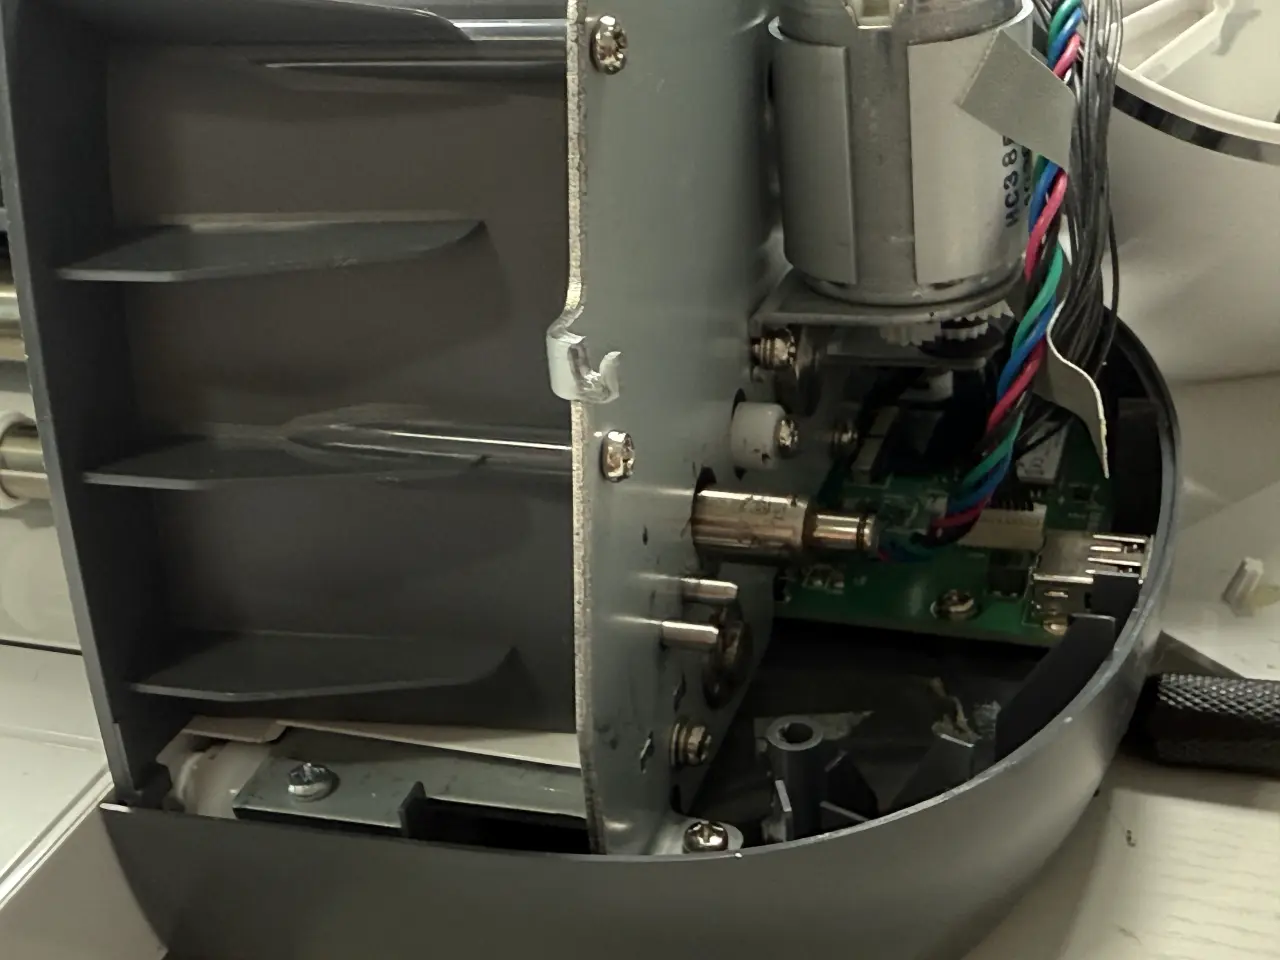
First we need to get that motor out of the way.
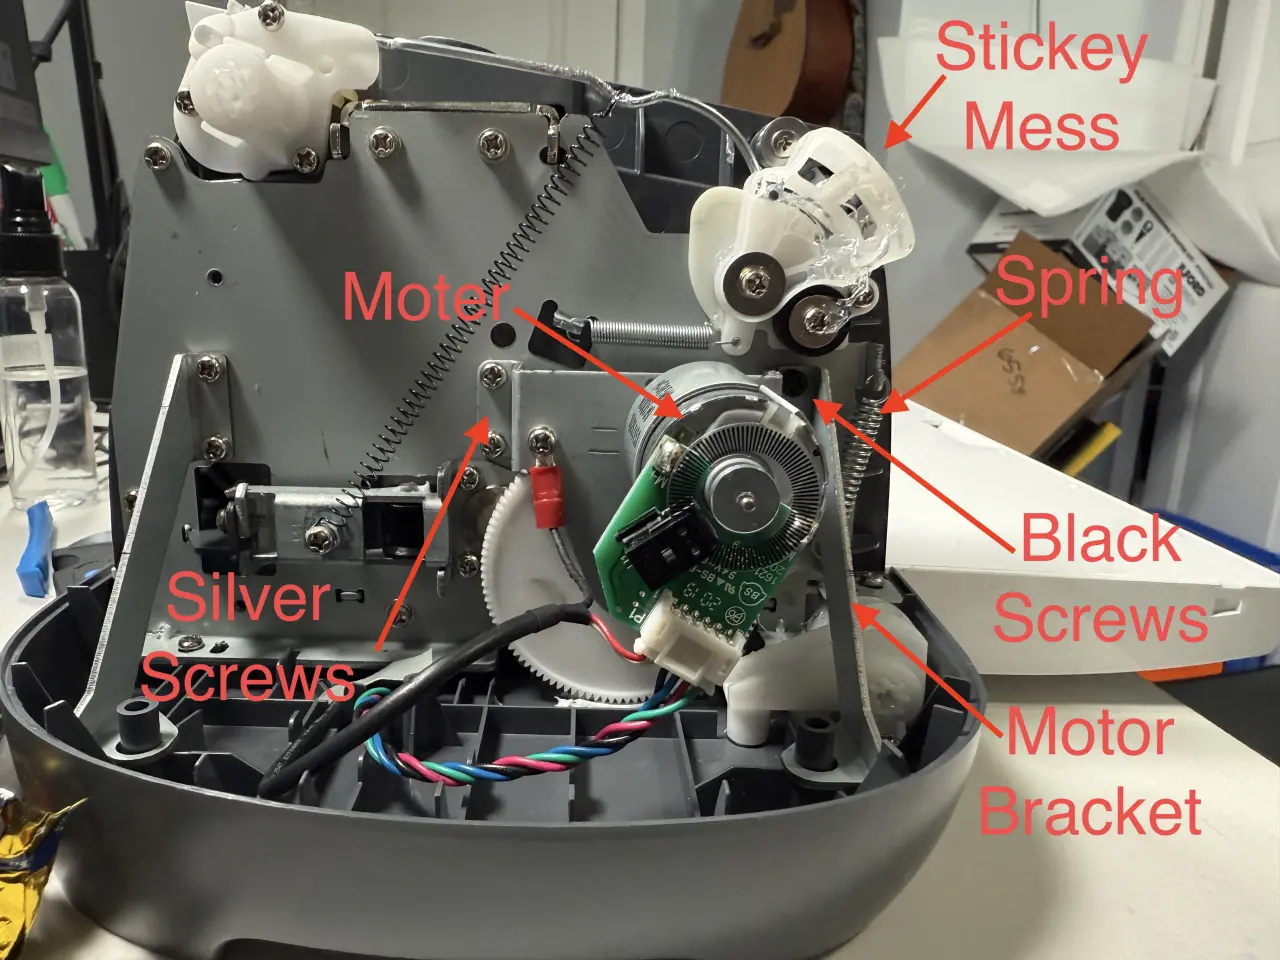
- Remove the two silver screws
- Remove the two black screws
- Lift the motor bracket out of the way
- Lift the motor out of the way
- Try not to touch the sticky mess over and over
Now with the motor removed you can see a large white gear and the spring (there is more than one on this side - make sure you remove the right one).
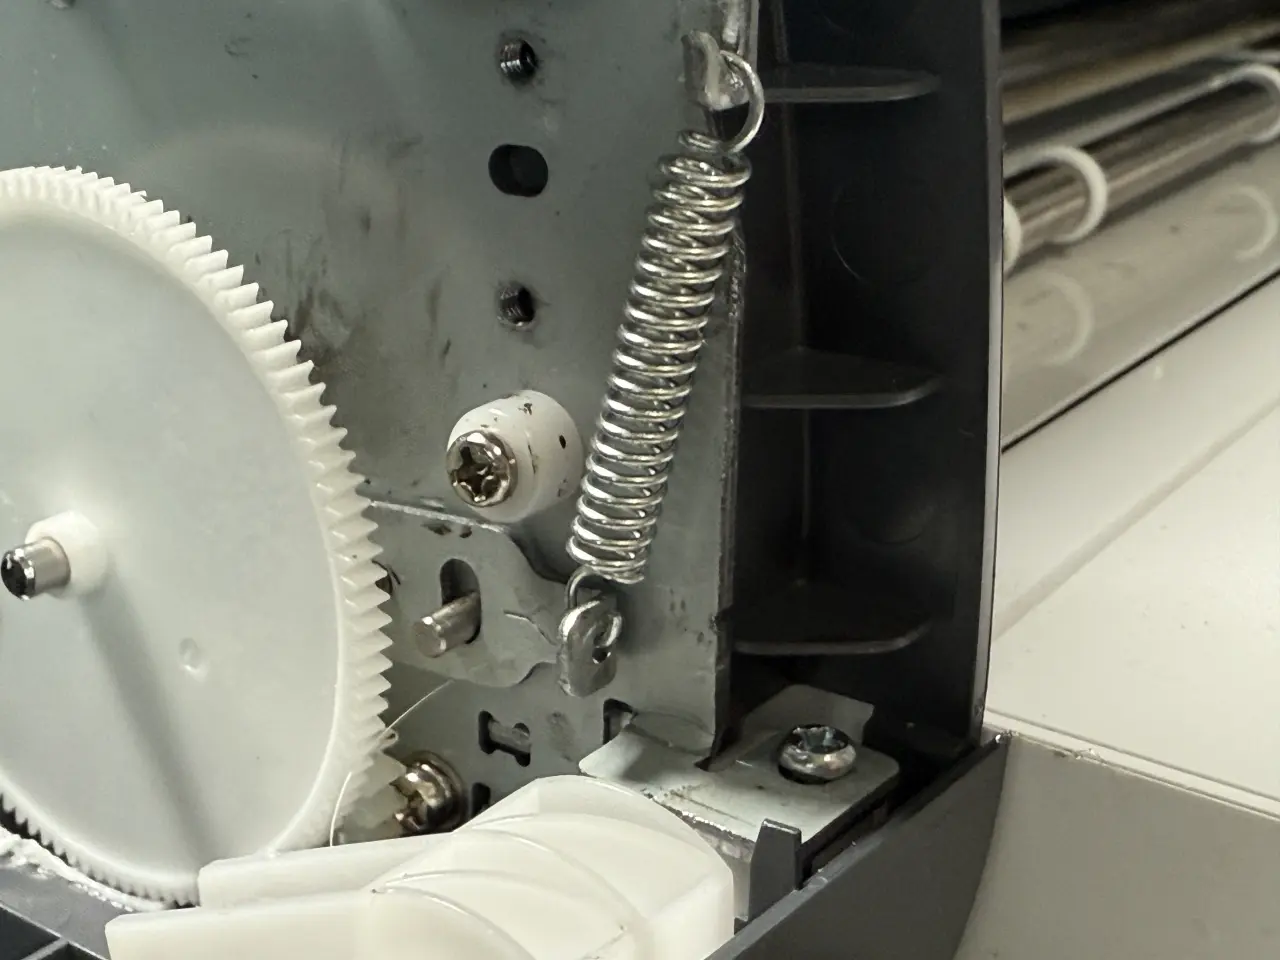
You should notice that the same spring and bracket configuration are on this side - but that dang gear is in front of them.
- Remove the spring
- Notice the gear can slide in and out a little but cannot be removed because there is a part blocking it.
If you want to waste a bunch of time you can try and remove the thing blocking the gear but it's easier if you just work around it.
- Remove the e-clip. You’ll need to go slow and don’t put much pressure on the gear. It will slide out far enough to allow you to get needle-nose pliers in there. You’ll get it. Be super careful not to drop it or it might get lost in the body. But if you do … just buy a 3/16 e-clip and move on (make sure it’s not in the gear, though, it would ruin that).
That was the hardest part of the whole repair.
I’m proud of you!
Lift it Out
Now let’s get the bar out. With the e-clip removed you can slide the bar out but it doesn’t slide much.
Go back to the right side of the machine and slide the bar out about 3/4 of an inch - as far as it will go. You’ll need to give it a little push and might need to lift it slightly.
When it’s like this it is now free from the left side. So go back to the left side and gently lift the bar up and you can find an angle where it clears the body and can be fully removed.
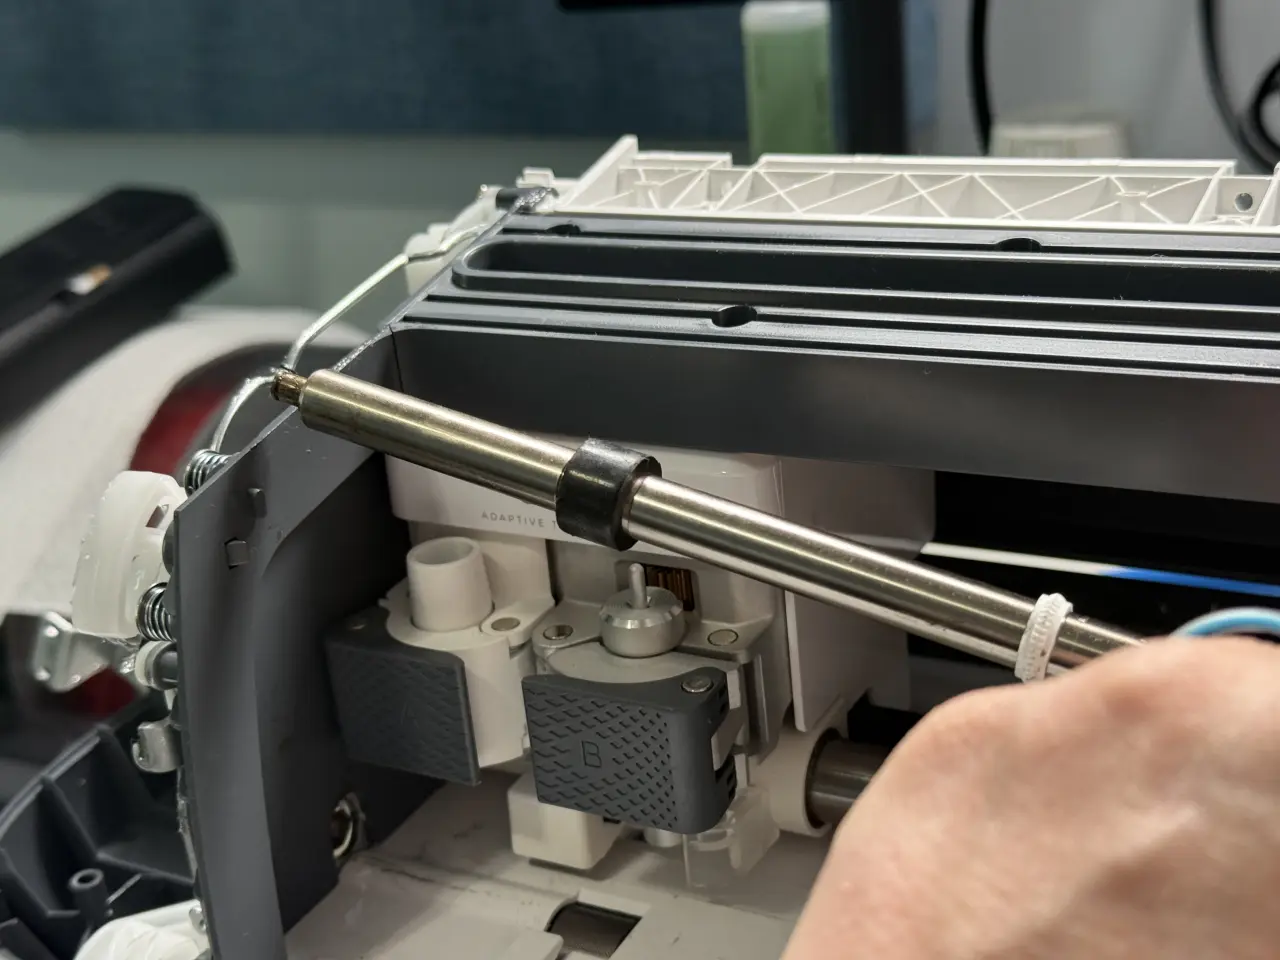
Notice that the bar is not symmetrical. The left side has a single nub and the right side has multiple levels. Just keep that in mind when you put it back in.
Replace the Rollers
I was so excited to be at this spot that I forgot to take pictures - but this is the easiest part!
Using the needle-nose pliers, grip one of the black rollers and stretch it a little. Now slide it off the bar.
Do the same on the other side (replace both!)
Make sure you leave the white plastic rollers on the bar. They can slide around - you’ll adjust them later.
Now would be a good time to clean the bar with some 90%+ IPA or detergent.
Now go to your kitchen and get a cup of water in a measuring cup or coffee mug - whatever. Put it in the microwave until it just starts bubbling. You don’t want it boiling - 170°F (77°C) is fine.
Once the water is hot put the new rollers in the water and let them sit for a minute or two to heat up.
Carefully remove one with a spoon and slide it onto the bar so it settles in the groove. Repeat for the other side. Don’t use any lubrication or stretch them out. If they are heated enough they will slide on with some force.
Now Do it All In Reverse
OK - we’re officially halfway done!
Doing it all in reverse is all pretty straightforward but a few pieces of advice.
- When putting the e-clips back on, start on the left side. Like before, you need to work around the gear. Basically you want to slide it onto the bar after the flange - there is a slight groove in it. I found it easiest to get it seated with my finger and then push on it gently with needle-nose pliers. Go slow and don’t drop it.
- When putting the right-side clip on you might need to push the flange to get enough spacing for the e-clip.
- Remember the silver screws go on the left side and the black screws go on the right and hold the motor bracket down.
- When putting the body back on, pay attention to how everything is lining up. The back of the body has alignment grooves you need to get lined up correctly. Once you get those interior screws in you don’t want to realize there is an issue and have to remove them (ask me how I know!)
- Make sure you don’t have any leftover screws.
- Give the whole thing a wipe down with some IPA and a paper towel - you probably transferred some grease around.
You did it!
Final Check
With everything reassembled, now is a good time to do a quick sanity check.
First, feed a cutting mat with some paper on it into the machine. You should be able to load and unload without any issues. The rubber wheels should be staying in place and gripping the mat correctly.
Next, create a simple design in Design Studio and sent it to be cut. Again, watch the rollers for any sign that something is wrong. They should not be “walking” around and should be properly gripping the mat.
If everything looks good - great! If not - start debugging! I’m confident you’ll figure it out.